Bluegingerdoll Hack

Hack – “hak” – verb
1. cut with rough or heavy blows. “I watched them hack the branches” synonyms: cut, chop, hew, lop, saw; slash

DSC_0522

Yeah, this one isn’t an elegant mashup of patterns. It’s more slashing and hewing.

This started its life as another Bonnie. I was sewing my flannel M6696 and I thought that, since I couldn’t wear a long sleeved jumper over those sleeve cuffs, I may as well go ahead and make another Bonnie, with 3/4 sleeves. I wear my first one so much that this seemed like a clear winner. I even had more of the same fabric that I made my first one with!

Or so I thought. Actually it turns out I’d bought two different kinds of fleecy knit, when shopping at the Fabric Store on a trip earlier this year. I’d intended to buy a fleece and a thinner merino knit, but must have picked up the wrong roll. I’d assumed the fleeces were the same. NOPE. The second one was thicker, with less stretch and less recovery.

DSC_0529

I didn’t notice this until I got to the sleeves. I’d cut the bodice out of the original knit, using up the last scraps. So when I cut the sleeves and bands out of the new one… it immediately became clear that they weren’t the same fabric, and any garment made from the two of them together would be a disaster.

Instead I cut the whole top again, out of the new fabric. As soon as I tried it on I knew I’d miscalcuated. The lack of stretch meant what was a flattering negative ease in the other fabric was tight and bunchy in this. Add into that trying to get sticky fleece over sticky flannel… well, it wasn’t going to work.

DSC_0526

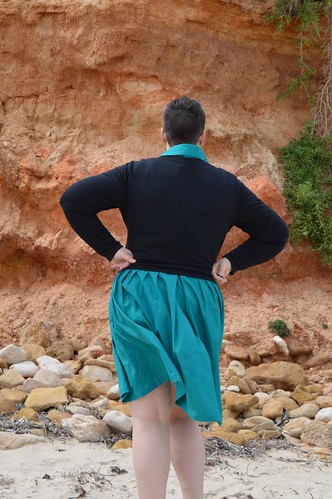
It was too tight to work as an over-things top. So I decided I’d add on the violet skirt, like I had to the moneta bodice before. I don’t seem to have taken any in-progress photos, so you’ll have to use your imagination. First, I cut the bottom band in half and sewed the skirt to that. Unfortunately, because the bonnie top is looser at the waist than the moneta, this resulted in a back that was super baggy and awful looking.

DSC_0549
This is the IMPROVED version
DSC_0535
Bleh

I tried taking it in and up various ways and then ended up just hacking the band off and attaching the skirt to the now even shorter bodice.

DSC_0530

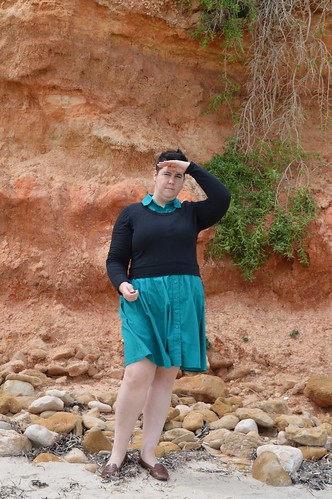
Even so, I still had to take both the skirt and the bodice in a couple of times, and scoop out the back. Doing this in the middle instead of at the start pulled the fabric out and puckered it. It eventually went back with a good steam, but the end result is a skirt that is about 1″ off at the side seams. I think as a result of this, it pulls to the left as soon as I move, twisting around. And it’s short. At least 1″ shorter than I’m comfortable with.

DSC_0531

DSC_0544

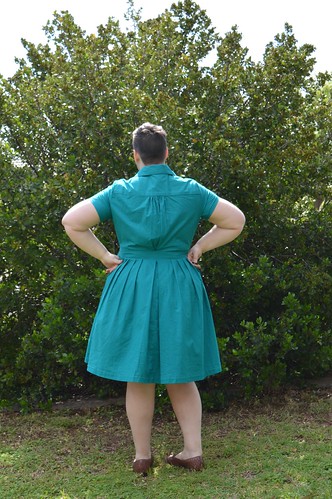
Not only that, it ends up pulling up at the centre front. I could pretend it’s a trendy hi-lo front, I guess. But the reality is, I think this one might be a big fat lose. I wore it to work last week to see, and I just felt awkward and uncomfortable all day. Objectively it’s not completely terrible, and I could wear it with tights. But unfortunately I think I’m just always going to feel weird when wearing this one.

I wish I’d given up on this one sooner, because I knew early in it was going to fight me and tbh, in the time I spent wrestling with it I could have sewn half another shirtdress. At least it didn’t become another WIP hanging over my head, I suppose. I guess you can’t save ’em all.

Better Photos Projects

I don’t know if anyone noticed some new, more varied locations in my last post about my latest M6696. I was inspired by Heather’s post on Gillian’s Better Pictures Project, about taking photos in public places to get better shots.

Although I would like to learn to use my DSLR a bit better, I try not to be too fussy about my photos, I find it gets in the way of actually blogging which is my priority. But I am generally unhappy with two things – the backdrops and how I always end up doing ‘Ima stab you’ face. So I’m working on them! I took my camera and tripod down to the beach at the end of my street.

DSC_0465

This is a five minute walk from my house. How lucky am I to live here?! It does mean a long commute, but it’s worth it.

I was nervous about looking weird in public, and people commenting but it was fine! I did get a few curious looks but no one was weird about it at all, although to be fair there were only a few people there because it’s still COLD. But it’s a fairly community beach – I mean, there was a body boarding class, some surfers, and a bunch of dog walkers. People go there to do things, so I guess I didn’t stick out too much.

As you can see in my last post, I tried a couple of spots. The cliff face is gorgeous but in the end it was just too windy!

Windy!
Being blown away, or something

I ended up on the steps down the cliff, and just put the camera down on one of the steps. Lovely! Although it would be harder on a warmer day, because it’s usually a fairly high traffic area. I ended up having a great time, though, and I absolutely will be trying it again! I found it easier to make actual facial expressions for some reason. I also found a spot in my front yard where I can take photos, and that will be a good backup, I think.

Dog!! Also stretching side seams, but this isn’t a sewing post.

What worked:

  • Being willing to take a lot of photos and move position a few times.
  • The more photos I got, the more relaxed I got about it. The later photos are much better.
  • Listening to Stop Podcasting Yourself right before I left the house, so I was still laughing about some of the jokes.
Laughing at myself for being excited about a dog. It’s a dog beach, so….

Things to remember next time:

  • Think about where the sun is. I knew I should have gone down earlier, because the sun would have been behind the cliff and it would have been much less glarey. But I couldn’t lever myself out of bed in time. This also is why the front yard is better than the backyard – it means I can have my back to the sun and not squint all the time.
  • Remember the wind. It’s often less windy on the beach than on the top of the cliff, but not today! Figuring out a few different locations will help with this.
  • Take the opportunities when they present themselves – I thought about putting it off till the next morning, to try to get the sun in right place, but decided just to go for it. Good thing too, because the next day was rainy and wet and even windier, and photos would have been impossible.
  • Think about some of the other places I saw today – I was hoping the local school on my street might have a wall I could use, but there doesn’t seem to be anywhere that would work. There were a few on-the-street spots that looked nice but I’m not sure I’m brave enough for that, yet.
  • Don’t take the first batch of photos in the location I like best. As I said, I warmed up as I went along, so the first dozen or so photos are not very good. I’d be better off shooting some practice photos, and then going to my favourite location.
  • Make sure the camera is fully charged. It was close to flat when I left, and I didn’t realise. It makes the remote a bit more patchy, which was frustrating. It meant I had to point it exactly straight on, which limits poses, and it also would just randomly not work, which meant a lot of photos looked like this:

DSC_0502

  • Have fun, and it’s ok to be/look stupid! There are some real dumb photos in my batch, but because I had fun doing it I don’t feel embarrassed about them, they just make me laugh. I tend to get in my head about things, but I just reminded myself that I have just as much right to use the beach, and to look silly in public, as anyone else, and that seemed to work!

All in all, I feel really good about my photography adventures! I would like to learn and play with my settings more, but I never seem to have time and brain, and I do find it a bit overwhelming. Hopefully I’ll work up to it soon!

I knows what I likes

GUESS WHAT PATTERN I MADE?

Yeah. Another McCalls 6696. Even I’m looking unimpressed with my lack of adventure. What can I say? I knows what I likes.

Also, I cleaned out my wardrobe of all the things I didn’t like or didn’t wear, and I was left with about four outfits.

DSC_0344
This is pretty much everything except tshirts and yoga pants

Since there are five days in a working week, this was making things a tad repetitive. And you’ll recall that I said, when I made my first one, that I was dreaming of a teal version. This isn’t voile, it’s cheapo broadcloth from spotlight. I bought it to line the skirt of my flannel version, and just got an extra three metres for this dress at the same time. It was on sale for $5 a metre, which means that the buttons and thread cost more than the fabric. Can’t argue with that – well, I could if I wanted it’s not the best quality, I suspect it’ll have some colour fading issues eventually, given my experience with similar fabrics, and how it looks when I press it. But I wanted a teal version and I wanted it NOW, and I wanted a weight I could wear now, too – everything else in my stash is quite a bit lighter and would be too cold for this weather.

I will say, it was a really pleasant fabric to sew, though. Presses nicely, behaves itself, the lot. And I know what I’m doing with this dress well enough now that I could take my time with the bits I know matter, like getting the pleats pressed right the first time, and paying attention when sewing the placket, and the gathering at the back.

The only thing really worth noting is that I ‘drafted’ a curved waistband by slashing and spreading the existing band. I took my flannel version apart to deal with the too-small skirt issue and after some mucking around I’ve decided I need the size 20 above the waist and the 22 below. Wearing my anchor version I notice that the waistband pulls at the bottom and not the top, so I thought I’d give the curved band a go on this version, as a tester. It seems to work really well! That, and some press studs either side of the waist button, have all but eliminated the gape I get there. I don;t want to make the band much wider itself, because then the centre back pulls down at the pleat/gather, and is baggy and frumpy.

Slashing and spreading the band until it measures size 20 on top and 22 on bottom.
Slashing and spreading the band until it measures the same as size 20 on top and 22 on bottom – a 2 inch difference overall.

I did the waistband as a half, to cut on the fold, but I need to go back and even out the curve at the centre. I also ‘drafted’ a bigger pocket bag by drawing around my hand, but should have compared it to the existing bag. It IS bigger, but the side seam part doesn’t go down low enough so I can’t get my hands into it. I’m going to go back, cut it in half, and add in a bit of fabric in the middle, but I haven’t gotten around to it yet.

New pocket bag
New pocket bag

Fit wise, it has a few issues. The sleeves/armscye still aren’t perfect, the front bodice where I adjusted it by trimming some off the centre line is a bit weird, and the dart is too high. As a result of this combination, plus just having a belly so my waist is actually the widest part of my torso, at least on the front, the bodice rides up a bit.

Riding up to above my waist

Which I’m not a super fan of, and you can see the pull lines on the bodice that would argue it’s too tight. But loosening it anywhere leads to bagginess, and I’m even less a fan of that, so this is ok.

From the side and the back, though, it’s exactly how I want it and I’m so pleased.

And I feel very comfortable in it, both physically and because it’s basically exactly how I want to look, always.

I especially love it paired with my Bonnie jumper, which is looking a bit hard used, because I wear it almost every day. I need to make some more.

I also hemmed it a bit longer – I find because the skirt is so wide, it does tend to blow up a bit (see above…), so I hemmed it 4cm in total – 1cm turned under, 3cm turned up, which is less than the instructions say, I forget by how much. I think this is about perfect. It also means it’s long enough to wear my petticoat with it.

Be petticoated

Not going to lie, I am pretty into this look and also how it feels and sounds when I sit down in it, and I wish I were brave enough to wear it to work like this.

With petticoat

You can see here how the bodice is riding up because the dart is in the wrong place:

I think the dart needs to be lower and maybe also a bit shorter. I did think about turning it into a double dart, but I just wanted to sew so I didn’t bother. As I said, I know this fit could be better but it’s an acceptable compromise to me.

Here are some innards:

DSC_0553

Turns out I sewed the snaps a bit wonky so I’ll have to fix that – they make the waistband sit a bit off line. The buttons are in the right spot, thought. Buttons picked, once again, by the lovely Veronica at the Button Bar. I feel very lucky to work right across the road from there. Veronica ALWAYS picks the perfect buttons. She’s just magic.

DSC_0561

I french seamed the bodice, overlocked the sides of the skirt, and sewed the skirt together with a straight stitch. Luckily, because that will make fixing the pockets easier! The centre side of the skirts were cut right on the selvage so I didn’t need to finish them, and I overlocked the bottom seam of the waistband once I was sure it was working.

DSC_0560

DSC_0558
I’m finally happy with my workmanship on the gathers, for this one.

I kept an informal count of how long this took, it was about 7 hours cutting to buttons. And the last two hours were buttons, because I was doing it over a couple of evenings when I was SO TIRED and it took me longer than it should have. I am really pleased with this one – with how it fits, how it looks, my workmanship and how I took it from start to finish without any hissy fits at all! A true winner.

Fehr Trade Steeplechase shorts

Or: Unflattering pictures of my butt and other parts.

Butts
Butts

I winced a bit at the thought of blogging these, because 1) it’s impossible to get a flattering shot of them, so ~~bodyfeels~~ 2) they are essentially underwear, even though they are covering a lot, and I am not a person who feels natural about putting photos of herself in her underwear onto the internet. But these are essential things that I wear every day, and I want a record of what changes I made, and also, all the same reasons that Nicole blogged her bra.

So! I made some steeplechase bike shorts by Fehr Trade. I wear bike shorts every day I wear skirts or dresses, which is basically every day. I can’t stand chub rub, and it’s nice to be confident to move freely without worrying you’ll flash someone. I was using a pattern adapted from leggings that I had been refining over the years, but they always wore out at the inseam long before they did anywhere else, and also the inseam itself occasionally caused chub rub. I was trying to get my mind around how to make a pattern with no inseam, when the steeplechase leggings/shorts were released. I figured the hard work was done, and much better than I would be able to!

My measurements fell somewhere between L and XL for the hips, and above XL for the waist – waist 99cm, hips 116cm. But I know from experience that my waist is functionally a smaller size than its actual measurements, especially for elastic-waisted things, because of where the width is. I have a belly so that my waist is actually my largest place on the front, but that’s balanced by a big swayback, so for elastic waists or tight fitting yokes, I generally need a size down from my measurements because it sits closer to my sacrum than a measuring tape will.

DSC_0309

Because of the funky (and so smart) way the pattern is drafted, I wasn’t sure how to blend between sizes. I sort of wunged it and traced a bit between the L and XL lines, for this first one. If I’d read the instructions all the way through properly, I would have seen that there’s instructions for sizing up the waist yoke by slashing and spreading. If I’d stopped to think I’d have known to do that without needing to read the instructions, since that was where I needed the most room. But I’m trying to sew even when I’m not 100% at my best, which is resulting in a much higher output in both actual, wearable clothes, and also dumb mistakes. So.

DSC_0311
Also, there is a lot of underwear bunching going on at the hips but that’s life.

As you can see, these are too large. They have enough positive ease that they actually chafe a bit – I find that for shorts I need exactly the right amount of negative ease or they are loose at the bottom and rub. I also had some pattern adjusting shenanigans because I initially put these on back-to-front and there was way too much height at front. I still find them quite high in the stomach area, but it helps if I put them on correctly! The leg seam should go at the back, which handily removes any need for a tab or anything to tell front from back.

DSC_0308
v. saggy

I also found them too long, I have to be careful they don’t peek out the bottom of skirts, so in future versions I shortened the pattern by 1″.

So after that I cut a straight L

DSC_0314

These were much better, but after about a half day of wear they relax enough to have slight positive ease. The back view of these ones are at the top of the post.

DSC_0317

So then I cut a straight size M.

DSC_0319

I was initially really pleased with this. However, after wearing them a few times, it’s clear they are too small at the waist – the L sit above my belly and sit flat and still – high waisted might not be particularly attractive but for undershorts it’s much better because they sit nice under clothes and it means I don’t have two waistbands in the same spot if I’m wearing a skirt. Whereas the M are too small to stretch all the way around my belly at its widest, and not high enough to go above it. I find myself needing to adjust them every time I go to the bathroom during the day, and sometimes they bunch weirdly beneath clothes. They also are too short, and the hem hits high enough to be in the Chub Zone, which means they chafe a bit. I mean, duh, more negative ease = less length.

DSC_0321
Pulling down at the sacrum, too small everywhere across my butt.
DSC_0320
You can see the belly issues – that’s sitting at my widest point while the L sit comfortably above it.

Annoyingly, I thought I’d cracked the fit and made three of the M. They’re still wearable, and still better than the ones I had made before from my own pattern. I’ll need to make more anyway, so I think next time I will slash and spread the yoke to be a M at the bottom and an L at the top, and use the M legs, which do fit pretty perfectly, once I add back in that 1″ of length.

I serged them all with grey thread because that’s what was in my machine and who cares. It shows through a bit when they stretch but… they are very unsexy under-wear anyway, not to mention muslins, so it’s not a big deal.

DSC_0345
Thread show through

I have to say, these were really fun to make. They are a cool draft, the instructions are great, and I felt smart once I sewed it, even though they actually weren’t hard. I just followed the excellent instructions blindly the first time, and now I know how the origami of them works they don’t seem any harder to make than a regular thing with legs. I also really like the way the instructions have you insert the elastic – mine is very functional and comfortable but not neat, but if you were wearing these as outerwear it would be easy to take just slightly more care than I was bothered about and have the insides look nice.

DSC_0346
I made a couple out of scraps of different colours.

I will definitely be making more of these, as soon as I can source some appropriate fabric. It needs to be stretchy but breatheable, which is a hard ask. Spotlight has some ‘performance knit’ which my last batch before this were made from, which was great but it’s $24 a metre or something which I guess is not particularly expensive but it is for spotlight and also for something as boring as this! But given that I’ve failed to find anything else appropriate, I’ll be buying some. At least I know how it behaves – the trouble with sewing something like this is that every fabric is slightly different. For instance, the M shorts that I’ve shown here have slightly less length-ways stretch and so are too short to wear by themselves without chafing, while the M shorts made from the same light blue fabric as the L size are closer to long enough.

At least the long-but-short nature of the pattern pieces means it’s actually better for being parsimonious with your fabric use. I got all of these out of scraps left over from various projects – there was a lot of fabric but in weird shapes, but I managed to get these out of it. I did cut one cross grain by accident, but since this fabric has pretty close to 50% stretch each way, I don’t actually notice it at all.

I really love these shorts, and am so glad I tried this pattern. If it’s something you would wear or use, I definitely recommend it.

Who wore it better?
Who wore it better?