

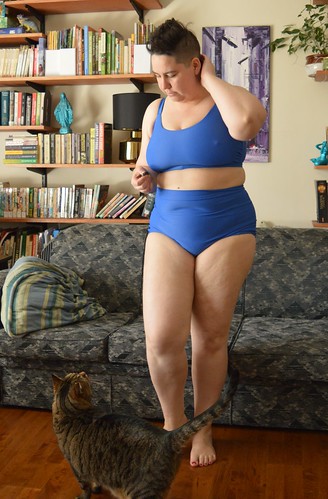
You guys, I am a MAGICIAN. Look!
I made SWIMWEAR.
I probably should have done this photoshoot at the beach but it’s COLD and I couldn’t wait to show you this. I fully intend to report back one this one gets the actual swim test, so perhaps I’ll do another photoshoot in a more appropriate location then.
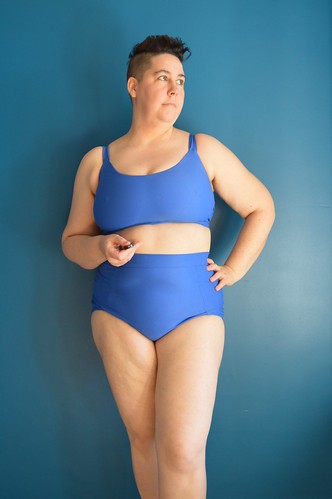
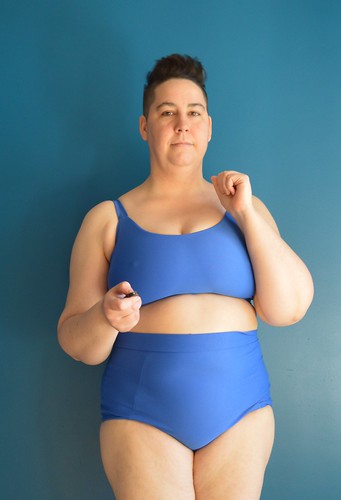
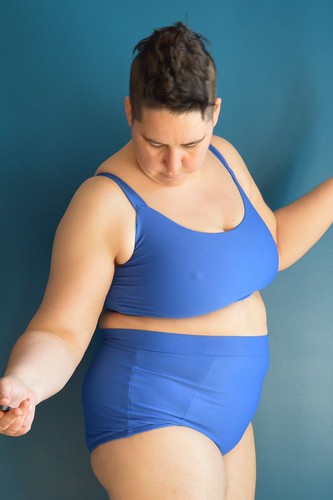
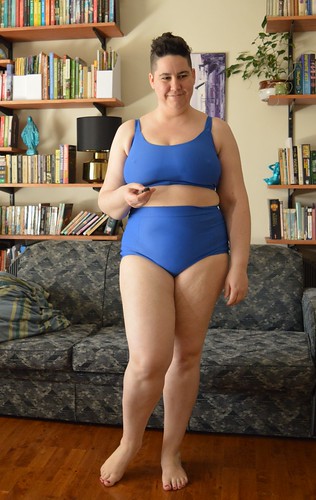
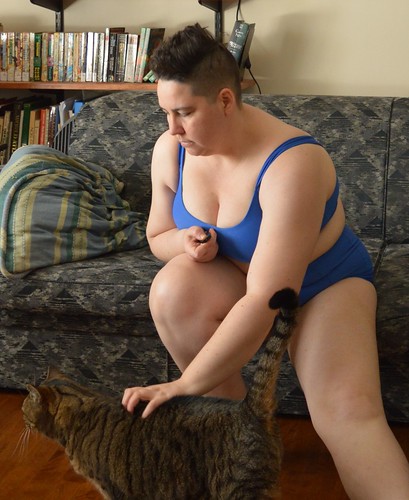
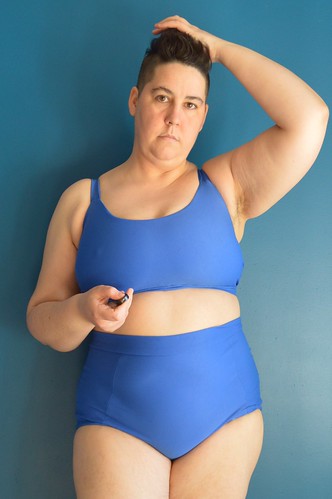
This is the Patterns4Pirates swim set, consisting of the Siren swim top and the Hello Sailor swim bottoms (you get a discount if you buy them together). I had seen these before but first thought about making them myself when I saw Michelle’s review on the Curvy Sewing Collective.

The top seemed like just what I have been looking for for… maybe a decade. Even when I fit into RTW swimwear I couldn’t find something to fit my specs. All I wanted was a bikini top that acted like a bra – I wear wireless bras also so wireless is much better for me especially in something like a swim top where I want a lot of movement and comfort. And I wanted it to NOT be a halterneck. My boobs are heavy. They are heavy enough that I have neck issues just from carrying them around wearing a good supportive bra (and I have comparatively small boobs – I’m an E/DDD cup which is honestly not that big) so WHY in all that is good would I want to literally hang them off of my neck? That’s a recipe for both a migraine and a black eye. No thanks.
Of course, I could never find such a top. I have some ok one pieces, and they are great for swimming laps but I really really really wanted a bikini. S even bought me a custom made one off of etsy for christmas one year but it just doesn’t fit right and… it’s a halter neck. So I never wear it and then I feel sad.
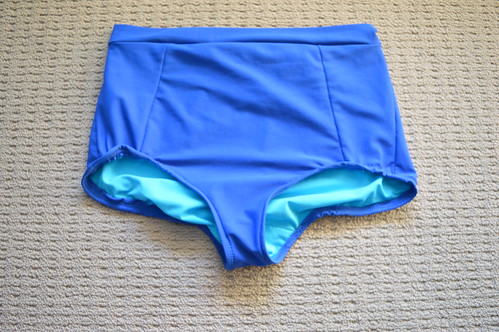
So. I saw this bikini and I thought ‘I bet I could do that’. I bought my fabric from the Remnant Warehouse and it came so quick, I was impressed. The fabric is this Aqua Life chlorine resistant stuff and I also bought aqua swim lining and rubber elastic from them. The fabric was really nice and actually quite easy to work with, although slippery enough that I had to go slow. The one issue I had that it was quite hard to tell the right side from the wrong side, to the extent that either the top or the bottom is cut the wrong way. And they BOTH have the grainline running sideways because I cut the top, decided I’d cut it the wrong way and sewed it so the cross grain is on front, and then did the same with the bottom. But the other way.
Anyway, it doesn’t matter because there is equal stretch both ways – I know, because I tried to use that to give me an indication of the right side! In the end, I just used the side that felt nicest because it clearly looks pretty much the same to me. Next time I would choose which side is the right side at the start and mark that, and make sure I track it while I’m sewing, so at least I will be consistent. That said, I honestly don’t think you can tell that the top and the bottoms are different sides of the fabric. I used poly thread and lightning stitch throughout and I started out with a regular foot before switching to my walking foot, which made it a lot easier.
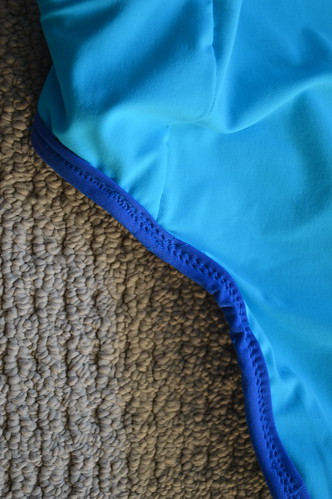
My overlocker is in for a service and it’s waiting for a part so I just went ahead and did it all on my sewing machine. That means there’s a couple of unfinished seams on both top and bottom where the bands attach, but I can always go back and finish them later.
I did not like the way the pattern pdf was constructed at ALL. It’s a no trim pattern, where you just overlay the sheets of paper on each other. Which is great in theory but it made it a bit hard to see if I was lining it up properly because there’s no grid or joining marks. There were also a couple of pieces where corners and curves were missing because they fell within the edges of the paper that doesn’t get printed. Not a fan. However, I liked pretty much everything else about the pattern – it’s well drafted, the instructions are great, the pdf is tiled so you can print just the size you want, or a few sizes to grade between (a thing I did not realise when I printed them), the pieces are laid out in a logical order so you can just print the first section for the most basic parts of the pattern, and the instructions tell you which pages to print for what view (another thing I did not realise before printing). I really appreciated the range of options in this pattern, plus extra hack ideas on the website. It’s the sort of thing that’s easy to draft but it involves more trial and error than I’m happy with for something like swimwear so I don’t really want to do it myself. So when it’s included in a pattern I feel I’m getting value for money and also that I’m in the hands of someone who cares about her customers.
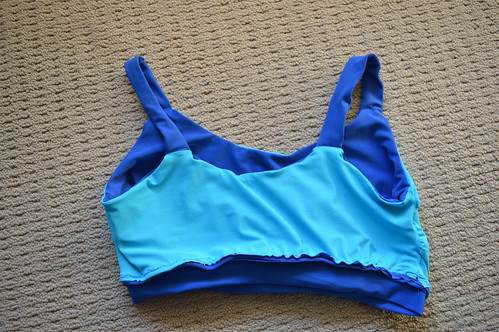
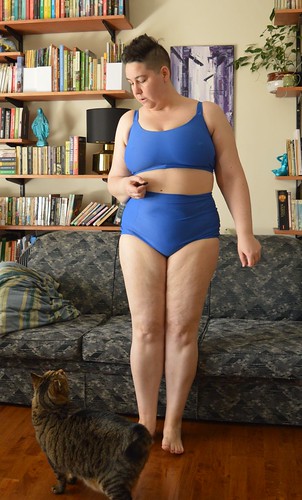
The sizing is laid out really well in the pattern, and how to pick your size is explained well. For the top, the biggest three sizes have quite a gap between – I fell between a size XXL and a size 1XL. My bust size is high bust 41″, full bust 46″, under bust 37.5″. I graded between size XXL and 1XL, which was easy to do as it’s a simple pattern shape, and cut a 5″ front length. I did spend like five minutes looking for the band pattern piece before realising you’re just given cut specs for it. I rescind my statement above that I am a genius.
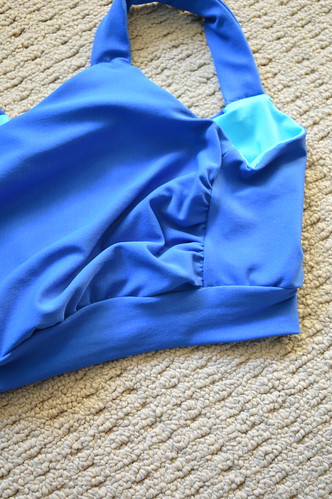
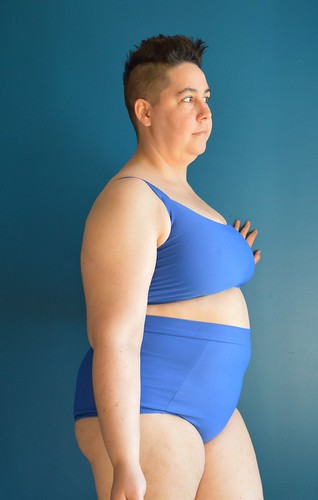
For the top, I chose to use the elastic gathering method for the bust side rouching, because I figured it would act like gentle boning and add a bit of support, which I think worked really well. Obviously it’s not actual boning but it helps hold it in place, especially as I have firm rubber elastic. I only had thin elastic as that’s all that I could find available, so for the straps I threaded two pieces in side by side. I didn’t actually read that there are cut lengths for this part (whoops, doing a lot of not reading atm…), I just fed it in so that it sat at rest inside the straps, and then I basted it in place before sewing the straps in.
I chose the straight straps for ease of getting it on, which I think was good – it’s quite tight by necessity, and so it’s a bit hilarious to get in, especially as my high bust/underbust measurements are so far apart (lots of tugging and rearranging) although it got easier as I tried it on and the elastic got a bit less rigid. I don’t find this a problem but it’s worth noting for people who have a similar or higher bust/underbust ratio to me, and who have mobility issues. If the under bust wasn’t so much smaller it would be ok, so perhaps a drawstring or something would help in that instance? I guess it’s the price for having a no-clasp swim top. I did try stepping into it rather than pulling it over my head, but because my hips are about the same measurement as my bust (but less smooshy – when I put it on over my head I basically have to put it on one boob at a time. TMI city!) it was no go. Something to think about if I want to make a one piece out of this, I guess, I might not be able to use elastic all the way around in that case. Perhaps I could just use it at the front?
The first part went together so incredibly quickly, but then the fiddly bits and sizing slowed me down. The straps took me a while, and the under bust band totally tripped me up. My under bust size is 37.5, which is again in between sizes. I initially cut the smaller size, because I figured that was a good place for negative ease, since almost all the support of the top comes from the band. Yeah, nope. That’s not a part of my body that has any give (my ribcage) so the band was super tight and rolled up and uncomfortable. I ended up unpicking it, recutting it at 27″ (right in between the suggested sizes for the two sizes I’m in between. Duh). I also switched around the construction a bit here. The instructions have you just double over the material and sew it on the top, but I decided that I wanted to put some elastic in there for more support. What I ended up doing was placing the top and the opened out band RS together, and basting it with a straight stitch. Then I used a long zig zag stitch to baste some at-rest elastic around the top – so not stretching it at all. THEN I folded the band over and sewed it with lightning stitch, as directed by the pattern.
This resulted in an unfinished seam but it works, and I can always finish it when my overlocker gets back to me. I think I would use this construction method another time, it worked really well (although I was too busy winging it to take pics, sorry! If anyone desperately wants to know leave a comment and I can try to show you on a mockup) and then I’d just finish the seam with serging.
I did not realise when I re-sewed the band on that I’d sewn the join at the front instead of the back, whoops. But actually, the band rolls upwards and you can never see it so… that’s fine? I have a big dent in my chest there from where my bra band sits so the rolling up is inevitable. It’s wide and tight enough to still provide solid support so I’m not worried. This top definitely passed the jump test although we’ll see if it passes the actual swimming test.
I initially thought the top was a bit tight, particularly under the arms, and I was wishing I’d cut the bigger size. But having worn it for photos, it eased out just enough that I think I made the right choice. It was incredibly comfy after about a minute of wear. I think a good change would be to go up a size but use power mesh in the front, which I think would give good support as well as maybe mitigating my always-visible nipple situation – but I didn’t buy any power mesh, so. The support in this top is coming from negative ease, so it needs the squish factor it has.

Flushed with success, I cut out the bottoms. I thought I’d try the side panel version, for fun. I was already thinking I might do the one piece hack and the plainest bottoms would be best for that so I thought I’d get this one in first. Plus, I thought it would be easier to adjust the sizing if I needed it.
Size wise, I was closer to the chart for this one. My waist and thigh measurements are band on the 1XL size. My hip measurement is an XL – that’s two sizes lower! I ummed and ahed and then I ended up just cutting the straight size 1XL because I figured it would be easy to take it in especially with the side panels. In the end I think it came out totally perfect!
I had a bit of trouble easing in the crotch curve, but managed it in the end. I found the notches for the pattern pieces did not match up at ALL on a lot of the pieces. It’s possible this was user error though because I tend to be slapdash about notches if I know they’re not 100% necessary, and they did match up where matching was actually necessary for precision.
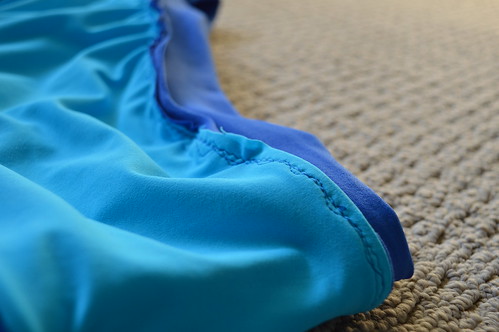
I was a bit skeptical about the elastic cut sizes for the leg, and also couldn’t quite work out if I was reading the instructions on how to sew it right, so I basted the leg elastic first. I’m really glad I did because it was TIIIIIIGHTTTTT. The instructions say not to ease it at all in the front of the leg but I found it so tight that I couldn’t help easing it a bit there, and it dug in to me. I wonder if my rubber elastic is more firm than the expected elastic?
I unpicked it and cut it with an extra 2″, and rebasted. It seemed to work pretty well, although my second leg has a better distribution because I’d gotten the hang of it more. The first leg I did has a spot at the back where I didn’t pull it enough and a spot at the front where it’s a bit tight, but it’s fine. I also turned the fabric under so the raw edge wasn’t showing, based the elastic on that and THEN turned and sewed. I think if I’d had an overlocker available I might have been fine with the technique given, but I didn’t want the unfinished edge there.
The leg edges are for sure the dodgiest part of this make. I think I probably should have used a twin needle rather than a lightning stitch – I had to go back and do another row of stitching in some places but on the other hand, I really appreciate the stretch power of the lightning stitch there. It’s going to be a stress point, so it’s nice to have them feel solid. They look alright on, and I think they’re pretty good for a first go. Next time I would take extra time in this bit. There’s no rush! The bits where I basted and went extra slow are definitely better.
For the waistband I cut a strip the width suggested and then held it around me until it fit right, and then used that. It ended up being 34.5″ which is a bit longer than recommended. I think I probably could have made it a bit tighter, as it creeps down a bit after some movement, but it’s am ok compromise for comfort, although I worry it will stretch out with wear. High waisted things do tend to creep on me because of the shape of my waist. Next time I might consider putting some elastic in the bottoms in the same way I did in the top.
Next time I will scoop out the front leg curve a bit – it still feels like it’s cutting in a bit and you can see it’s rolling in. I compromised by sewing with a wider turnover there but it’s still just a bit long, so next time I’ll scoop it just a bit. I might see if I can go back and copy the next size down’s curve.
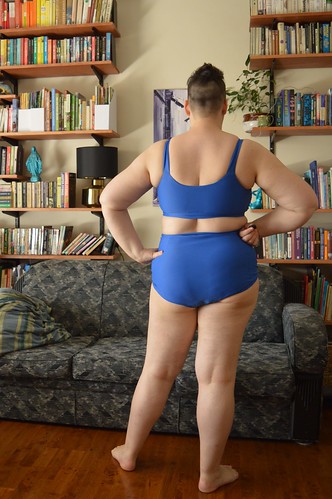
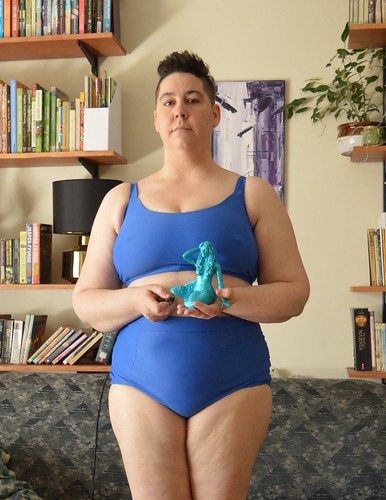
I REALLY love the coverage this gives me on the back legs, and on my belly. I actually thought I would be nervous to share these photos and was braced to do it anyway because dammit, it’s my body and I refuse to be ashamed of it. But in the end, I feel totally comfortable! I am so thrilled.
So that was a big ol’ wall of words. Here’s your TL;DR – I love this pattern. I found it really well written and helpful, and I am thrilled by the size range on this. I know there are a lot of people still sized out, which stinks. But it’s definitely a larger size range than most patterns I see around and I appreciate that It’s nice not to be the largest size, like usual! I also love the potential it has, and the hack and suggestions available for it. I am interested in trying out other P4P patterns after this.
I am so thrilled and grateful to finally have a bikini that I look and feel good in, and that is comfortable and practical. A quadruple threat! I honestly never thought it would happen. I also feel very grateful to the CSC and their swimwear month, because although I always intended to get around to swimwear, I felt intimidated and overwhelmed, and I probably wouldn’t have gotten to it this year or even any time soon. The CSC month made it seem possible and even simple, and also introduced me to this pattern! And thanks to everyone on the CSC facebook group who have been so nice and encouraging and excited for me when I posted about this! You have all made me feel very happy. ❤

Amazing. Well done you!
Thank you! I feel very pleased 🙂
You look gorgeous in this bikini! Wonderful job!
Thank you so much! 🙂
It looks really really fabulous. Hope you have a lot of fun wearing it!
Thank you! I’m looking forward to taking it for a swim test!
It looks amazing!
Thank you! 🙂
Congrats! This looks awesome and its great that it is supportive too! I’m glad the csc swimwear month could provide a little inspiration 🙂
Thanks so much! Yes I’ve never had a properly supportive suit since I was a teen, except ones that smoosh my bust so much it’s uncomfortable. So this is very exciting for me XD
Great swimsuit!
Thank you so much!
I like this! (these?) Awesome colour too!
Thank you, lovely! 🙂
Re right side/wrong side issues, I haven’t worked with swim fabric, but I know that for standard knit fabric and edge cut across the width of the fabric (that you might call cross grain, except I’m not sure that applies as knit fabric doesn’t have a grain), curls to the front. However, you also need to factor in that an edge cut parallel to the selvage will curl to the back of the fabric (I found this out the hard way when I read a “knit curls to the front” fact online, used it, got everything back to front as I was looking at an edge cut parallel to the selvage. I had to work out for myself they behave differently but I’ve noticed it on lots of different knits now). Hope that might be of help if you make one again.
Thank you, I will do some playing around with it. This fabric seems to be almost a double knit, with the wrong side running sideways, so it was hard to work out if I was looking at the wrong side, or the right side on the cross grain. Not sure if that makes sense. In the end I settled on ‘the right side is the one where the knit stitches neatly run along the selvedge, the wrong side is the one where what would be the selvedge if this were the right side across a line of knit stitches’.
Next time I will take that + the curling information and decide right at the start which side should be the right side. As usual I rushed in and then realised halfway through I was being inconsistent. Oh well!
Great job on your first swimsuit! I’ve had similar issues when using rubber elastic vs cotton swimwear elastic. The rubber has much less give and winds up very tight compared to the cotton. Next time you could either just cut it longer or measure the leg openings and then cut the rubber elastic ~15% smaller, and stretch as you sew. 🙂
Thank you! I am glad to have it confirmed that it was the rubber elastic causing the issue. I actually really liked it so I would like to keep using it, I think next time I would do what you suggested with the 15%. Although if I can find some suitable cotton swimwear elastic I might use that just for the legs so it’s not so firm there.
Way to go, challenging yourself to expand your sewing skills and killin’ it!
Thank you! I can’t believe I was intimidated by sewing swimwear. It was not any harder than anything else I’ve sewed, just different. Let that be a lesson to me!