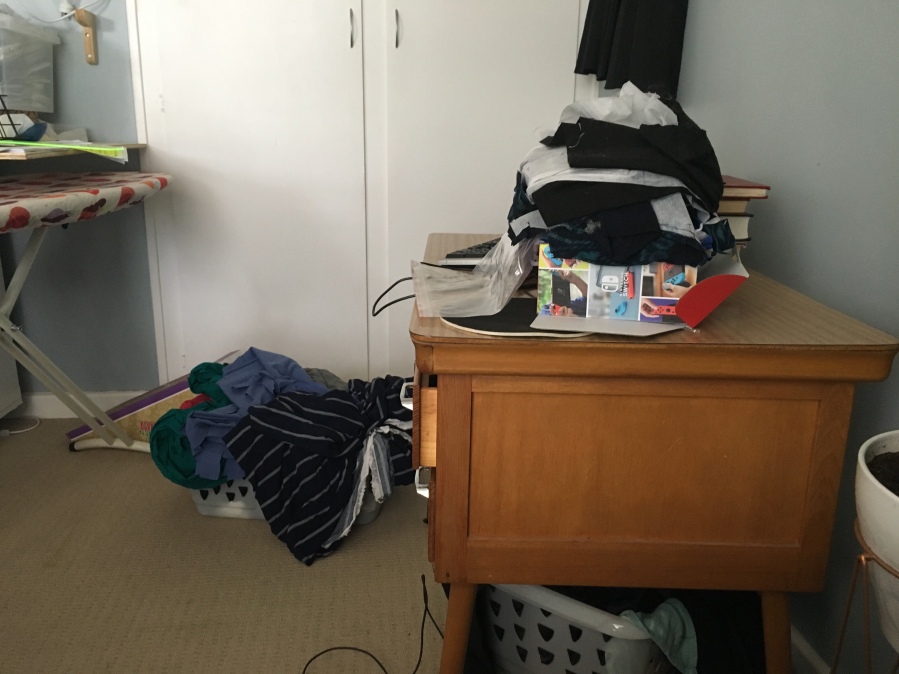
Do you plan your sewing? I try not to, too much. I generally have a loose, constantly changing ‘want to sew’ list in my head but I find that any time I make a longer or more concrete list I immediately want to sew anything but the things on my list. So just going with my immediate impulses generally works for me. However, at the moment my craft room looks like this:
That fan set up is indicative of part of the problem. We’ve been having heatwave after heatwave of 40C+, which is just RIDICULOUS. My craft room gets full afternoon sun (thanks neighbours for killing off that shady tree in our yard… long story…) The only room with aircon is the living room, so I’ve been cutting things out there and then not sewing them because my room is too hot and bringing the machine out is a Whole Thing. So now I have this:
Which is a pule of cut out items on my computer desk – they were in the wire basket in the previous shot but then I used that basket to rig up a makeshift evaporative cooling thing so I could sew in there. It sort of worked. Anyway there’s also two baskets of newly bought, pre washed fabrics in this shot. The thing is that my stash is FULL. I’ve since folded and put away one basket but the one under the table is going to sit there for a while because there’s just straight up nowhere to put it. Which is a problem.
Especially when I keep thinking about other fabric I want to buy! Listen, I am not against stashes. I am not against buying fabric. I AM against mindless consumption for the dopamine rush because I am using it as a displacement activity because I haven’t had or made time to do the actual sewing which brings me greater joy. I AM against spending money I shouldn’t spend on something I don’t currently need, that I don’t have room for. Even if it IS on sale, practical, and lovely.
So I made a plan. I wrote down everything I have in my ‘want to sew in the near future’. There’s like thirty things, so that was good to see – perhaps the reason I feel like I’m not making progress (apart from the not actually sewing part…) is that the list is LONG. I’d be lucky if I consistently sewed an item a month, so that means this is, like, my next three year’s worth of sewing. So. Let’s be realistic here.
Anyway I put it in a rough order or priority. First were things I already have cut out, or have a deadline. Then, summery things that I need in my wardrobe. The list gets slowly more wintery as it goes down. After that, I broke it up into chunks of four or five things, and placed a ‘buy fabric’ note after each.
My plan is not to go on a ‘fabric diet’ or anything. What I want is to match incoming fabric and patterns roughly to the amount being used. Or less than that. Definitely not more. This isn’t ‘rewarding myself’, it’s realigning things so that fabric buying doesn’t become a secondary hobby. Here’s the intro to and the first two chunks of my list.
RULES:
Idk do whatever. This is supposed to be your hobby.
All items can be swapped and rearranged, but keep the number in each section the same.
Each free buy is up to $100
Fabric and notions for a thing in the list are ok to buy separate from free buy – but not until you’re in the tier for them. No buying them two tiers ahead!
Sub in list are useful things to sew any time. They can be subbed in for any make, in which case the making list gets bumped down the list (moving past the buy points)
TO SEW
Kalle
Lenox – blue
Felicity (JLH)
2x silas pants
Dorothy Lara
BUY DENIM
Maxi laneway (navy)
Ponte/ottoman ames
Egg dress
2x silas pants
Rayon stripe knit dress
FREE BUY
The sub in list is separate and is basic, boring staples that I always need, so if I get the urge to sew them up then I should go for it.
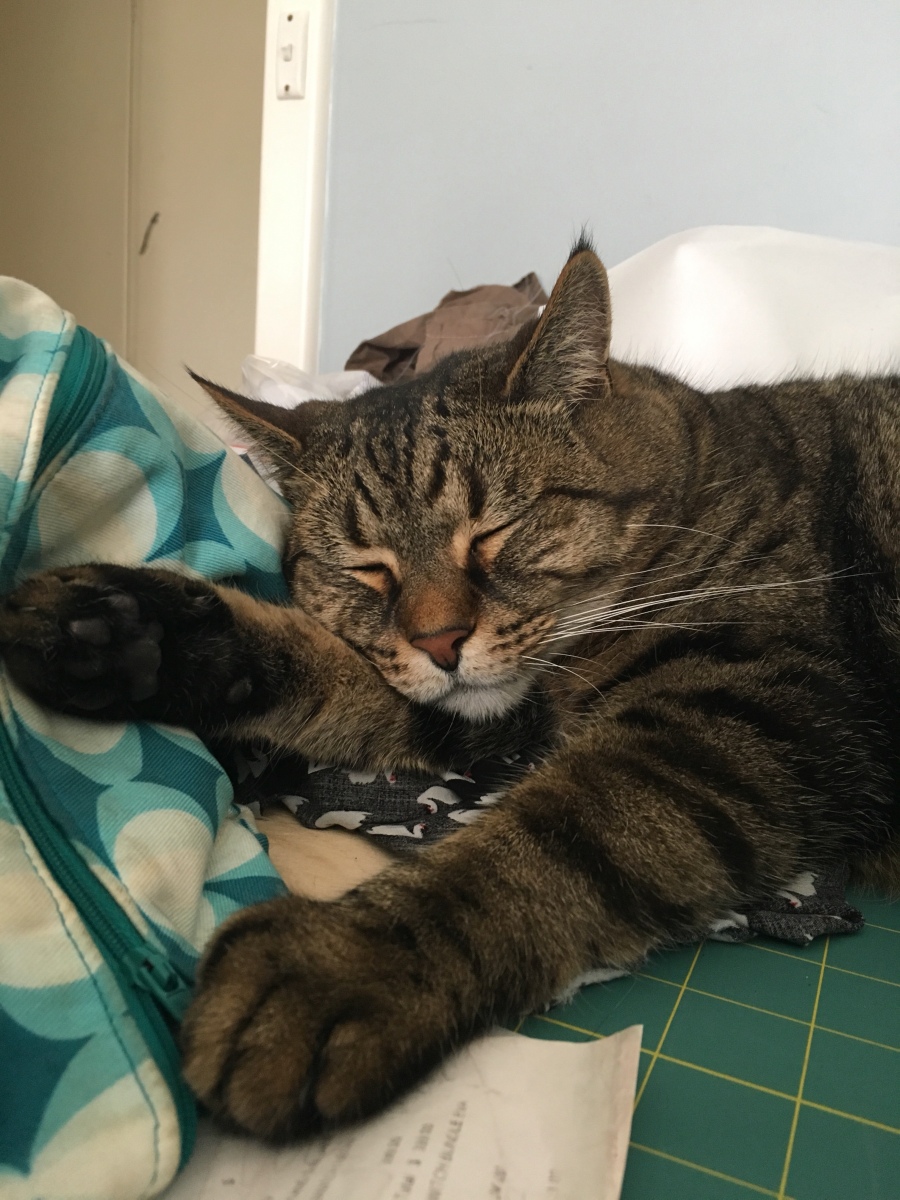
At least one of us is enjoying the piles of fabric lying everywhere
So that’s my plan. Not exactly groundbreaking, but it’s exciting for me. I suspect the trick is that this isn’t focused on output, if it takes me a year to get the first five things done who cares. It’s also flexible enough that I feel I can swap in new things, or move things up and down the list as I get motivated without artificially punishing myself or making my hobby less fun. It has already worked as I spent a lot of the weekend sewing which I don’t think I would have otherwise! Maybe there’ll even be a blog post or two of FOs coming. Wouldn’t that be just thrilling?
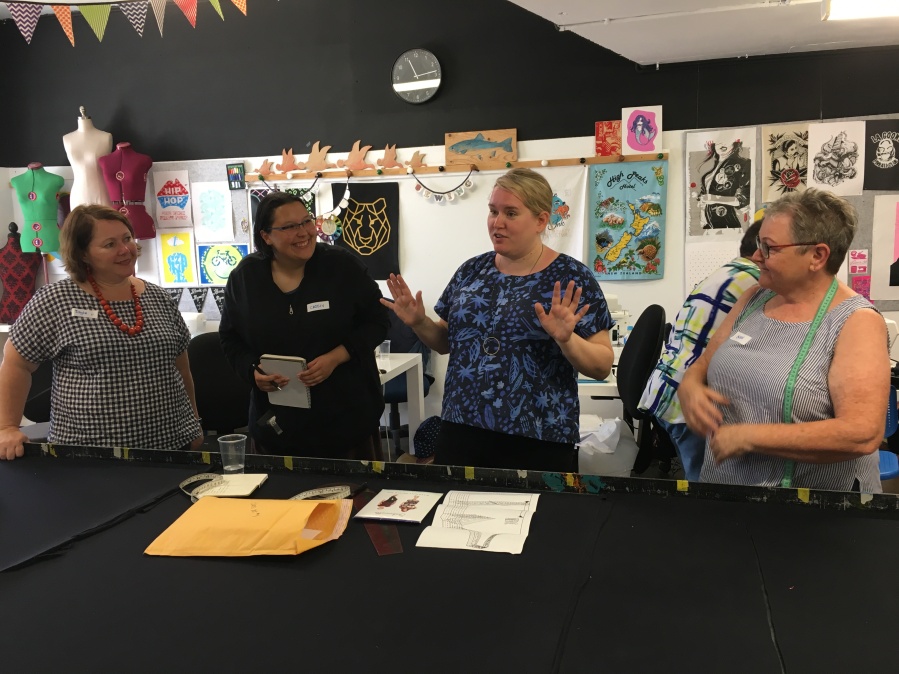
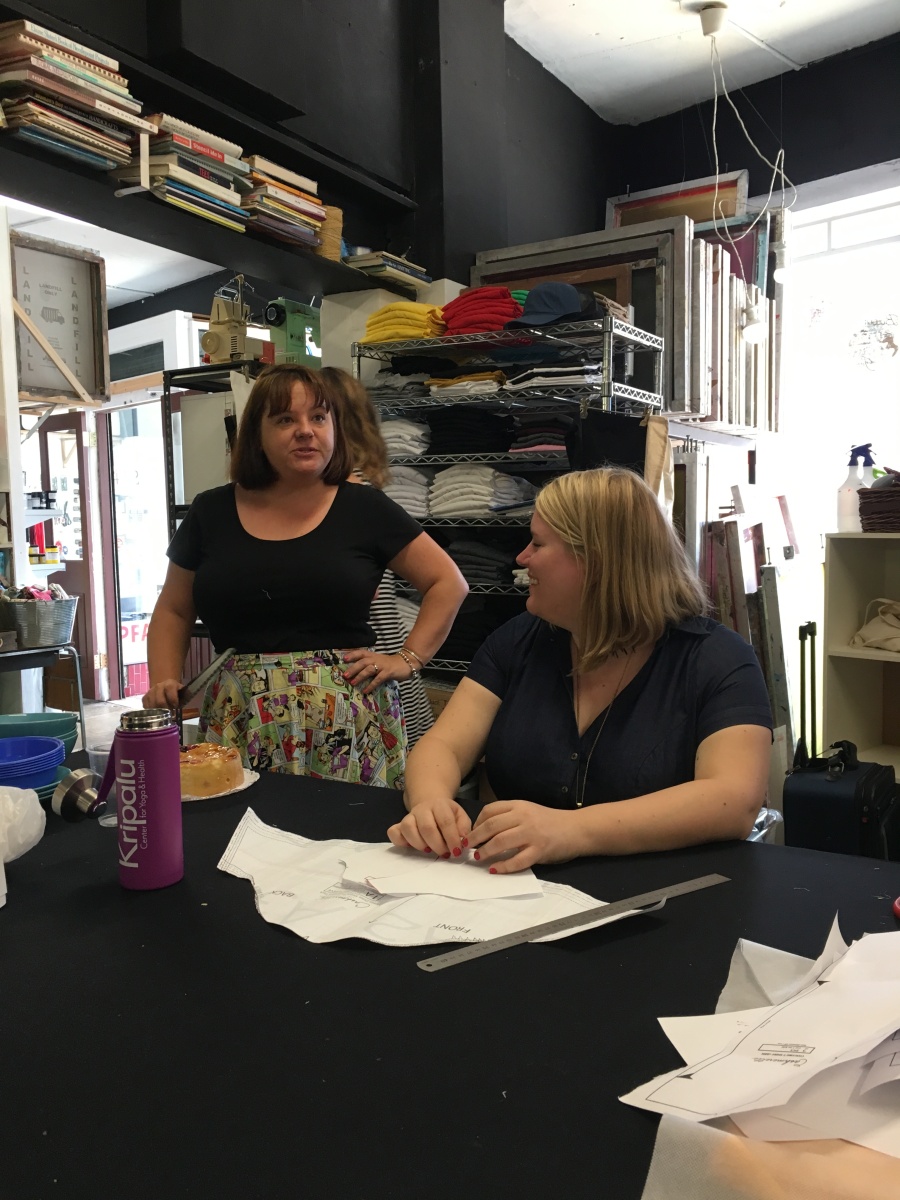
Last weekend I headed over to Sydney for the first 2018 Cashmerette retreat. I’ll be honest with you, I was a little apprehensive about this at the start because I just wasn’t sure that it would be good enough to justify the cost. The two day course isn’t exactly cheap but I also wouldn’t call it expensive for what it is. But add in flights to Sydney and accommodation there and it was a real luxury purchase for me, so the stakes were high. I also wasn’t sure how much I would get out of it, given that I feel reasonably confident in my sewing and fitting skills. I justified it because I can’t make March craft camp so I figured it was the slightly more expensive version of that.
I’ll just cut to the chase and say it was absolutely 100% worth it.
There was a meet and greet the night before but because my plane was delayed I missed it. I think most if not all of the other attendees had been and so already knew each other, and there were a few people who were already friends and were attending the course together. But it quickly felt like I’d known everyone for ages. I was going to say that we lucked out with an absolutely stellar group of people but honestly, I think most random groups of sewists are pretty excellent, to be honest.
Me diligently trying to trace out my pattern in front of a fan, screenshotted from Jenny’s insta stories!
Jenny started off with a statement about how our bodies aren’t the wrong sizes, if a pattern doesn’t fit you it’s the PATTERN that’s wrong, not you. Given that we were all people of size there was plenty of honest talking about where our lumps and bumps sit, how stomachs expand and boobs droop and larger shapes are different to smaller people’s shapes. Lots of grabbing boobs to demonstrate things! It was really refreshing and relaxing to be in that atmosphere, it felt accepting and safe.
Jenny demonstrating sleeve adjustments while Carrie supervises
There was a real range of ages, skills and expectations in the group, which was really wonderful. Everyone was welcome to do whatever they wanted independently and Jenny and Carrie went around helping where needed. Periodically Jenny gave specific little talks about fitting and adjustment covering things like picking a size, grading between sizes, FBAs, full bicep adjustments, narrow shoulder adjustments, and a whole bunch of other things that I didn’t write down. 😛
Nat brought cake!!
Jenny also showed us a bunch of tips and tricks. Most of them were things I’d already heard about, like this collar turning trick, but hadn’t tried because they seemed too fiddly or complicated. Seeing them demonstrated was really helpful and confidence boosting. I’m self taught, mostly from the internet, and I just hadn’t realised how much of a difference it makes having someone showing you in person. All the things Jenny covered (and more!) are in her online courses, which you also get access to when you pay for the course. I’m definitely going to go back and watch some of them over again.
Also screenshotted from Jenny.
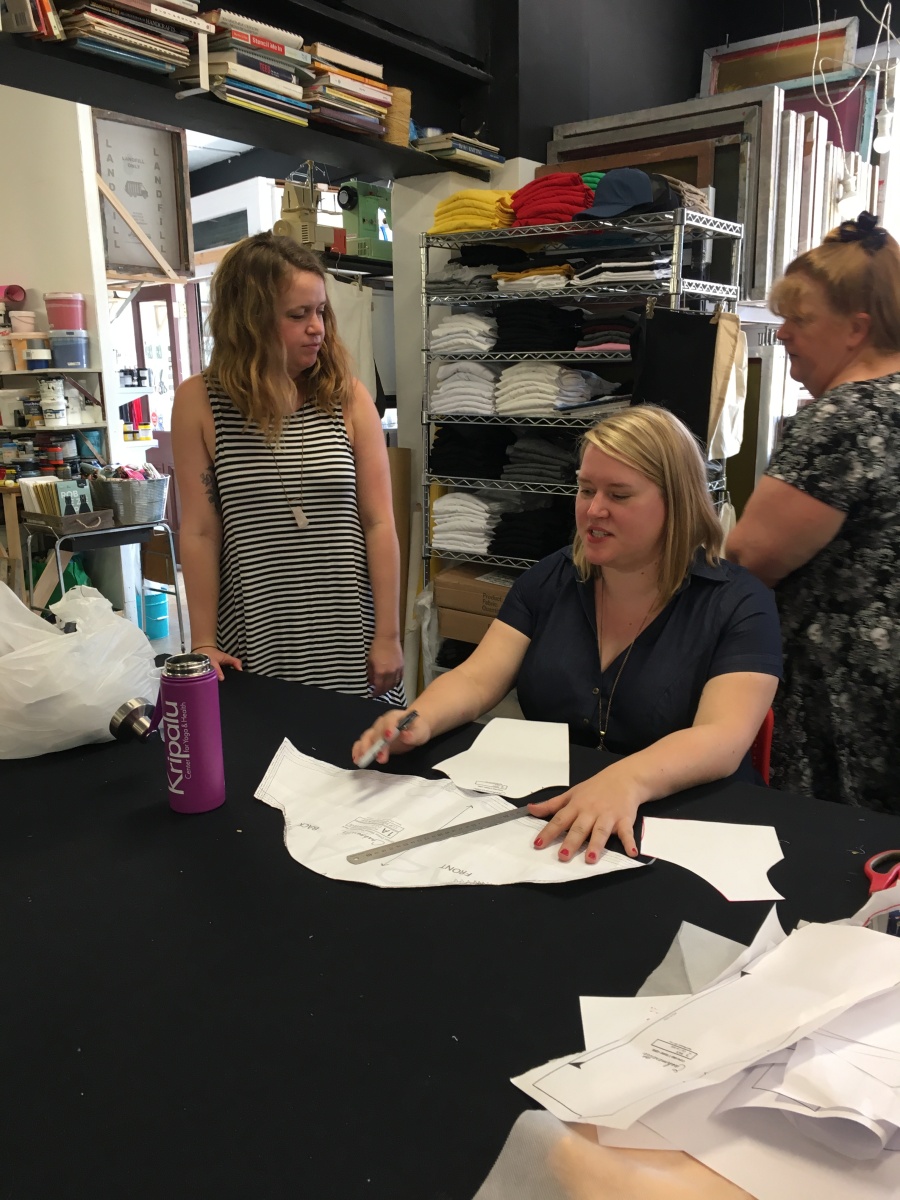
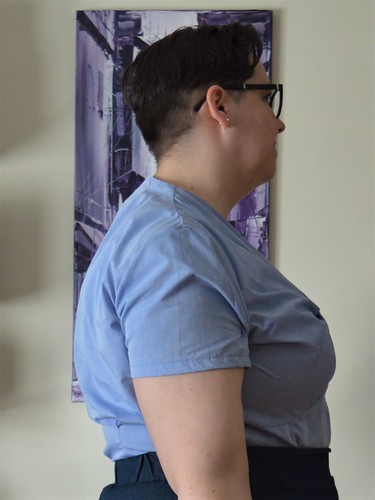
I had brought the Ames jeans to muslin because I am intimidated by fitting pants. I actually haven’t worn my Ginger jeans I made because I decided I don’t like the fabric, and I haven’t made another pair because I wasn’t happy enough with the crotch fit to justify it. The Ames were so much better straight out of the packet, but it also definitely helped having Jenny and Carrie there. They had so much knowledge of fitting and of that pattern in particular, and were so encouraging. I feel like I would have been much more frustrated and unsure on my own and maybe felt like I was doing things wrong or gotten in a negative body image space. Instead it just all felt like part of the process, no big deal. I had meant to muslin them beforehand to maximise my time at the course but in the end I’m glad I didn’t since Jenny and Carrie were really helpful with picking the right size and version to cut out. I’ve since sewn them up and I’ll try to get photos and do a blog post for them soon.
Guys it’s SO HARD to photograph jeans in a mirror.
Once I was done muslining and fitting them, I also muslined the Lenox dress, which I’ve been meaning to make for ages but there are enough pieces to make muslining it and then making it feel tedious. I feel like I would have made the same changes by myself, but it would have taken me much longer to get there. I also learnt a few better or easier ways to make the adjustments that I usually make for every pattern. It turns out Jenny and I are almost exactly the same measurements which I wouldn’t really have picked from just photos. I guess we’re shaped different? Bodies are weird like that.
I definitely learnt a lot at the course but I think what will stick with me is the joy in that room the whole weekend. Jenny and Carrie are just wonderful, funny, smart, warm people. It was a delight to spend the weekend with them. And it was so unbelievably wonderful to see people at the end of the course with a finished (or almost) object tearing up because they’d never had a fitted dress or shirt or anything before. It was pretty magical I have to say.
I’m told there’s still a couple places left in the second Sydney session that was added. Not to sound like a shill, but honestly if you’ve been thinking about it but are on the fence, I would highly recommend it. Like I said, I wasn’t sure going in and now I am so glad that I went. I have a feeling that the memory of that weekend will stick with me for a long time. Thanks Jenny and Carrie!
Hi folks! It’s been a while, huh? I have to say, 2017 kind of kicked my butt. Not anything major, but lots of small and medium sized things all got together to make sure I was just exhausted at the end of last year. As a result of that I took a break from the internet. And I have to say, it was honestly pretty great. I’m still on a slow down. I haven’t reinstalled instagram and I don’t think I will any time soon. But here I am blogging at least.
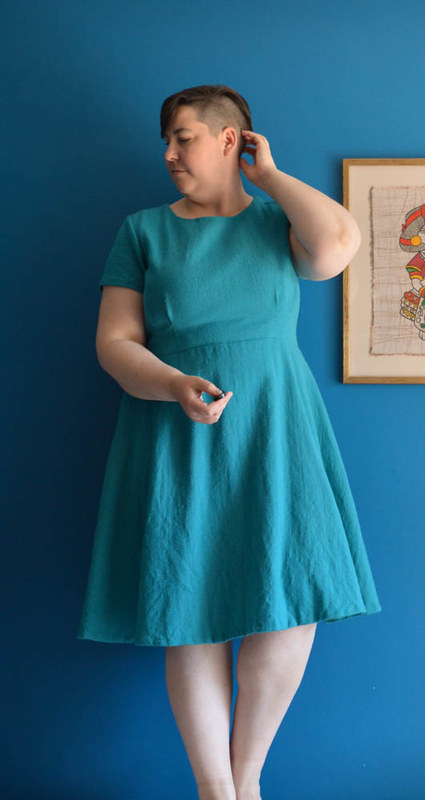
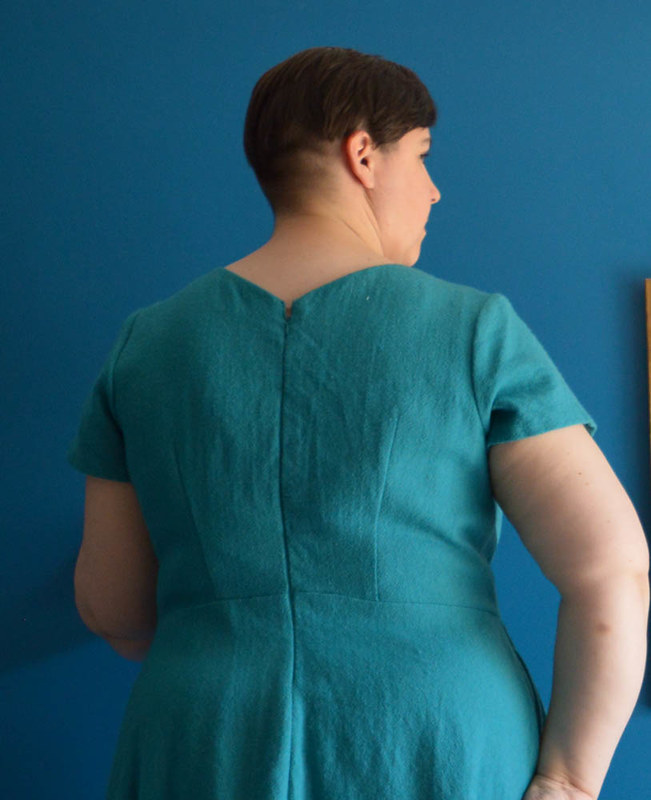
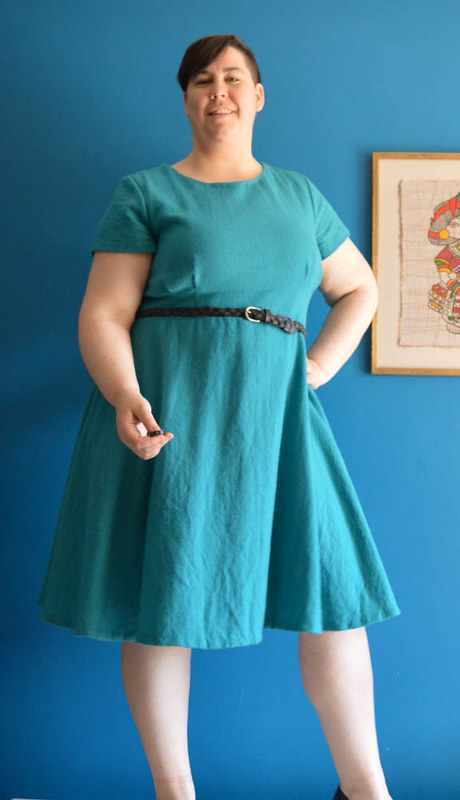
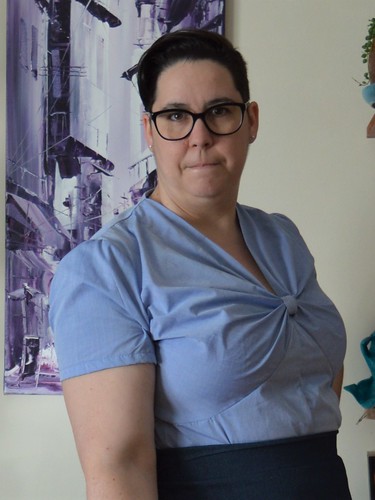
This is an old make, now! I took the photos in November, edited them in December and now I’m blogging them at the end of January. That’s how it goes. It means it’s extremely unseasonable for me (today’s high is going to be 41C!) so I guess this one’s for you Northern hemisphere peeps!
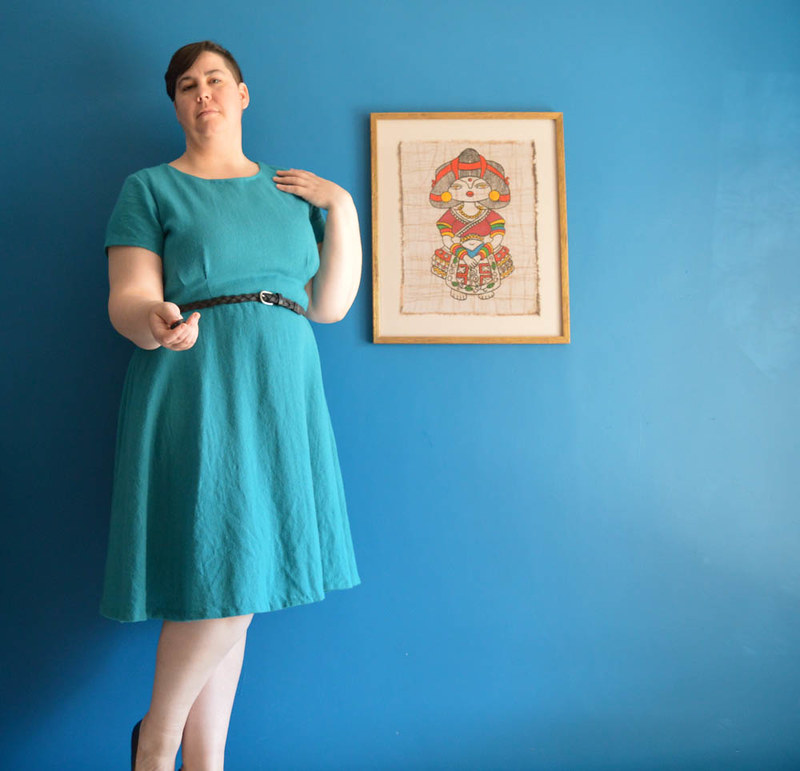
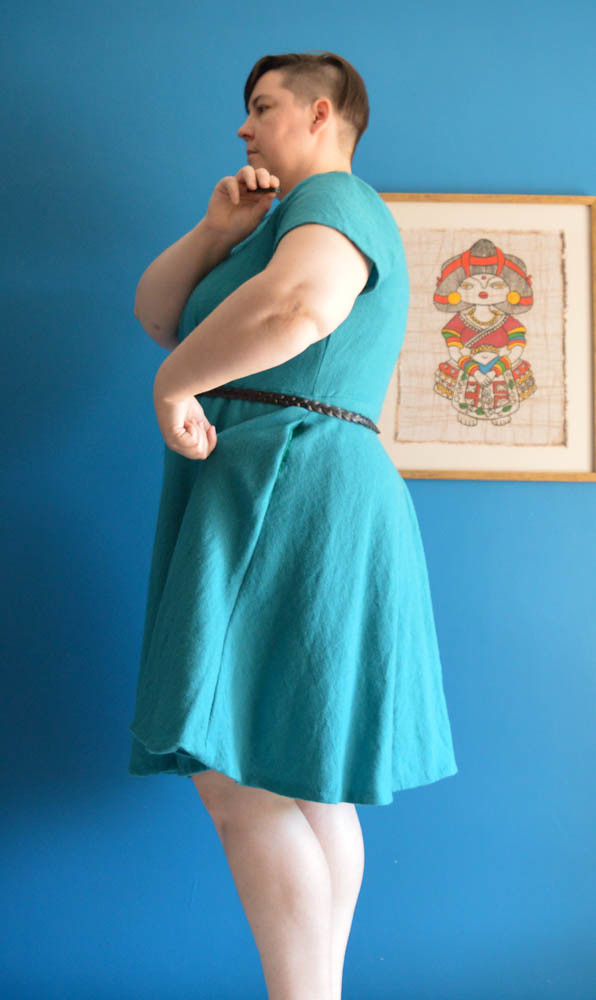
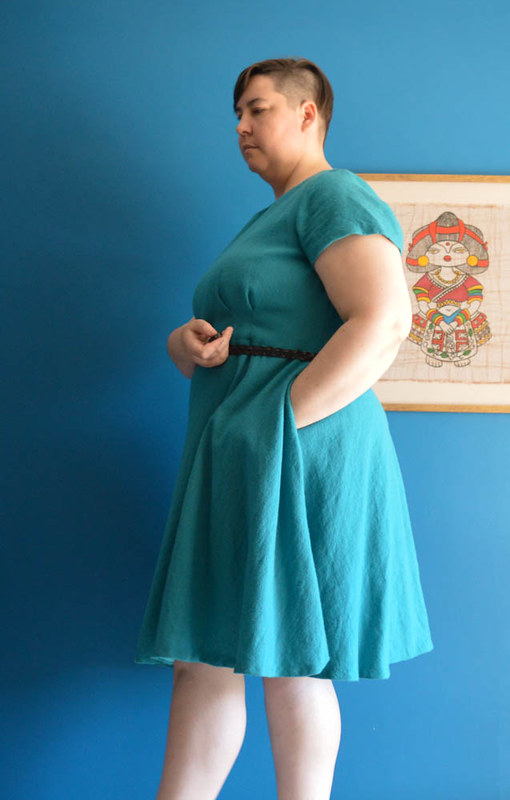
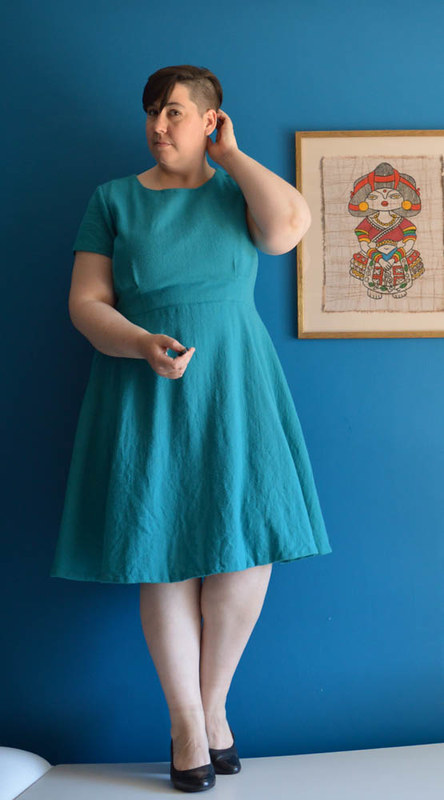
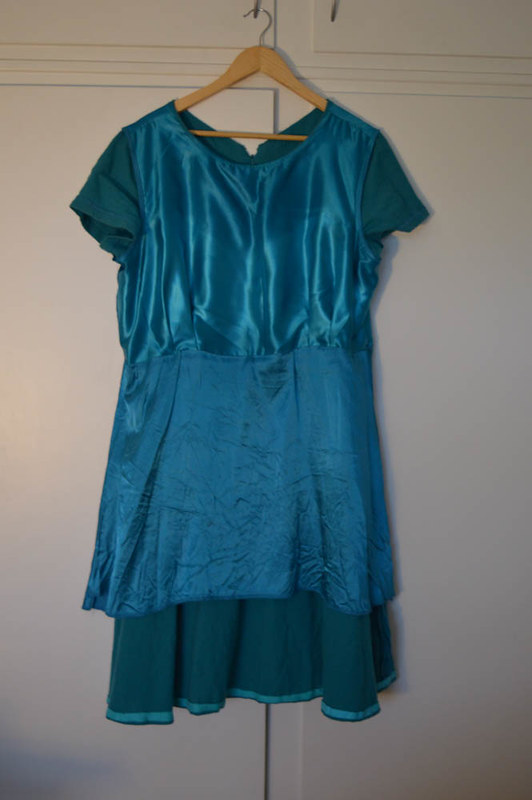
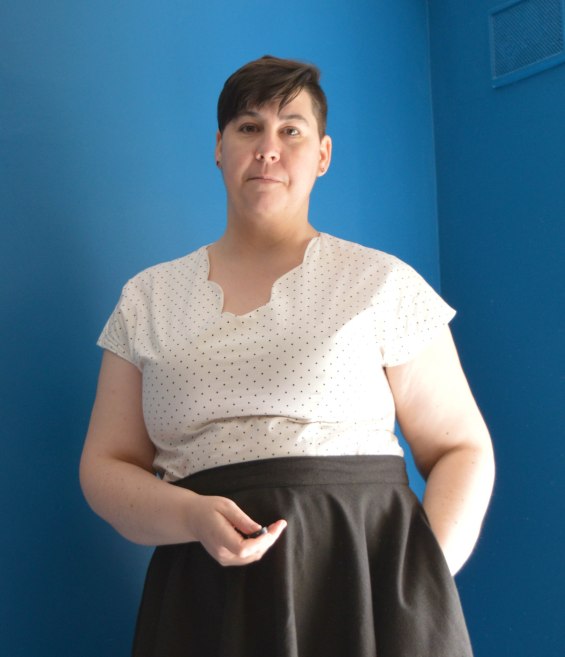
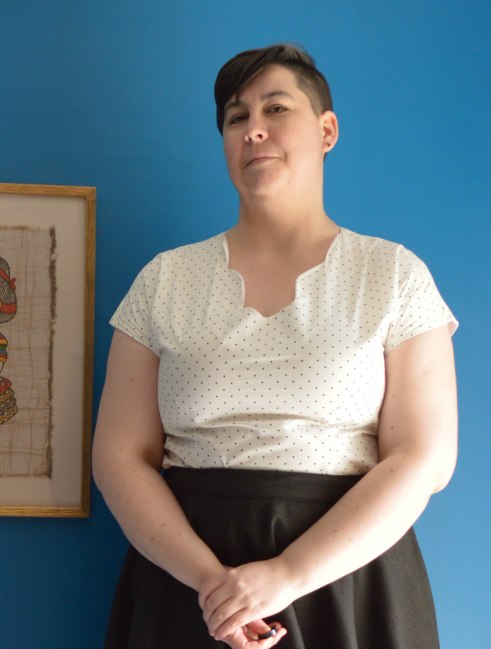
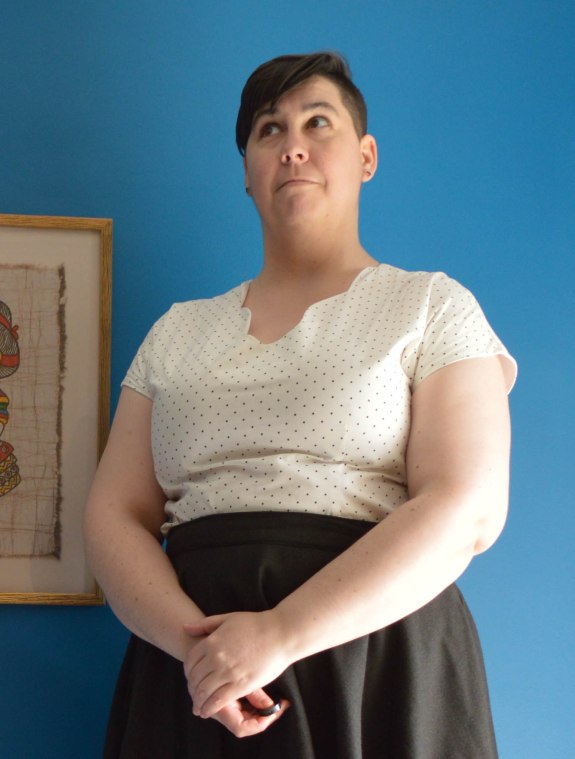
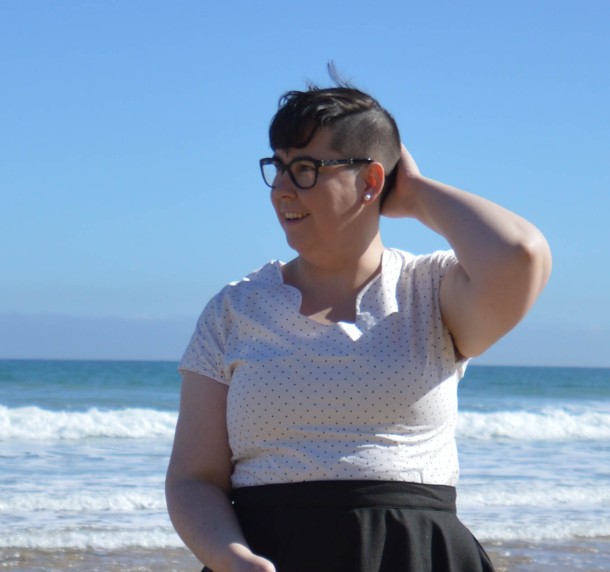
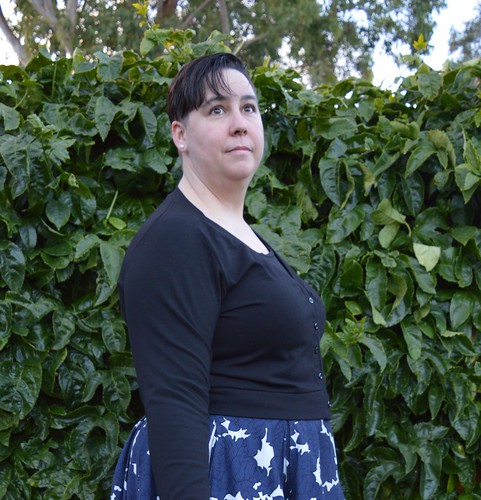
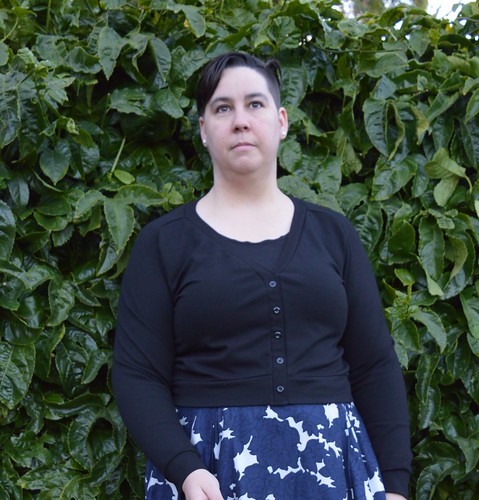
This is the Laneway Dress by Jennifer Lauren Handmade. This pattern came out right after I had finished making my Juniper cardigan and I was so pleased with that pattern that I bought Laneway and taped it up immediately. And then ofc I didn’t do any of the actual sewing until September craft camp. Nothing like being timely… As an aside I can now report that, with the fix on the button band and the change of seasons, the Juniper cardigan is getting a tonne of wear.
I auditioned a bunch of different fabrics for this dress with different ideas for that split neck but in the end I decided to make the ‘bonus’ plain neckline because trying to figure out what combo to make was holding up the actual sewing. I love the look of the split neck on others but I know I’m going to struggle with fabric pairing. It’s the perfect opportunity to use a busy print or a colour you don’t want near your face, and then break it up with a contrast facing. On the other hand… I’m really a plain colours, simple shapes kind of gal, ya know?
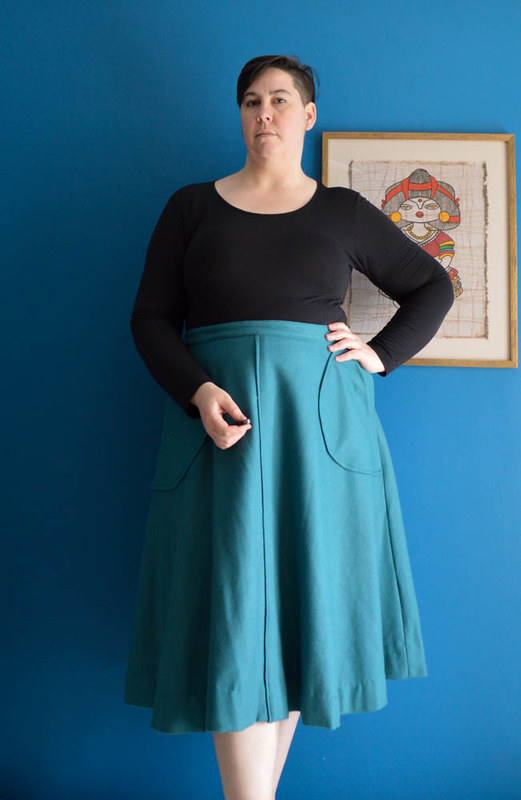
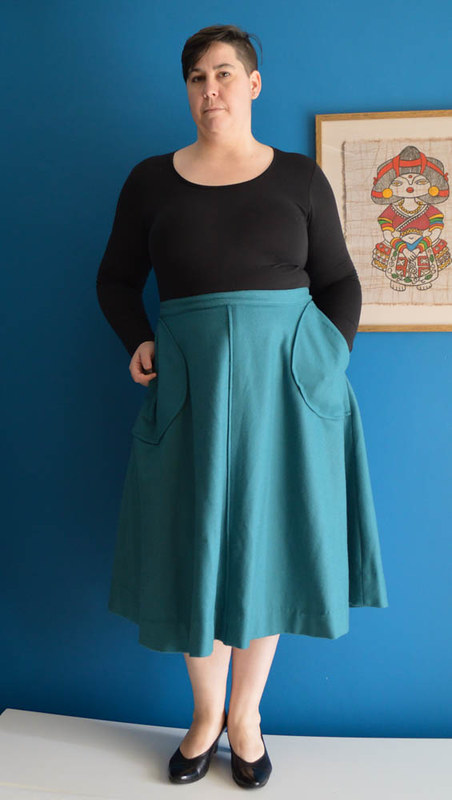
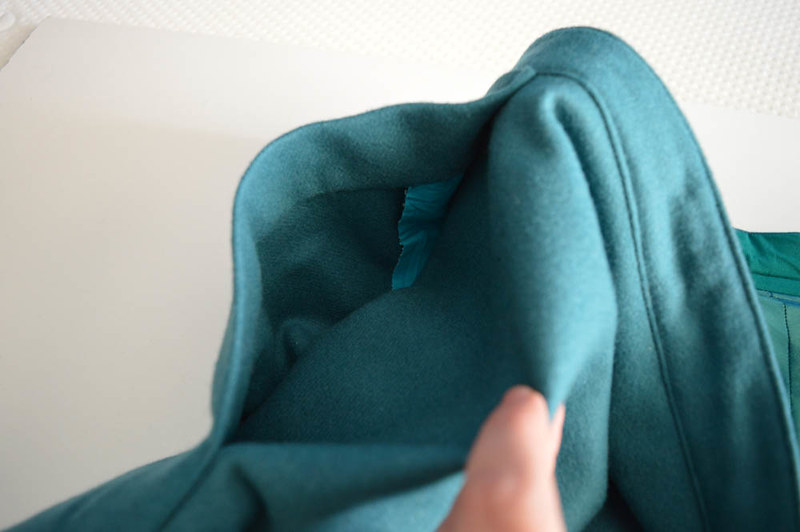
I settled on this fabric because while it’s not precious, I do really like it. It’s been in my stash for a while so if the finished dress was imperfect as the first version of a make usually is for me, I wouldn’t mind too much. It’s more teal wool that I uncovered from my stash when I made my Horseshoes skirt. This one I do know where it came from! I bought it from DK fabrics when I used to work near there, so at least seven years ago. I bought it with the idea of making a coat out of it, LONG before such a thing was within my skill range but there’s nothing like optimism. Also I only bought three metres which is nowhere near enough to make a coat. The label said dry clean only but that’s not how I roll so I washed it on a delicate cycle and it came up all crepey. Which I was mildly bummed about at the time but now I really like it.
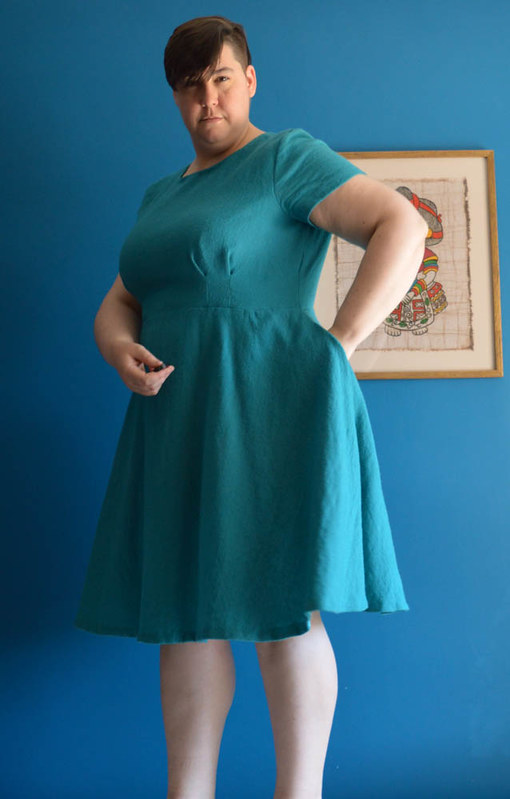
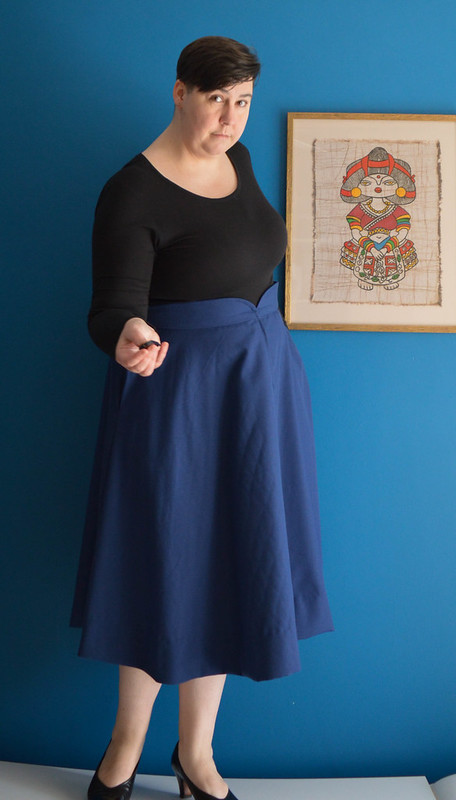
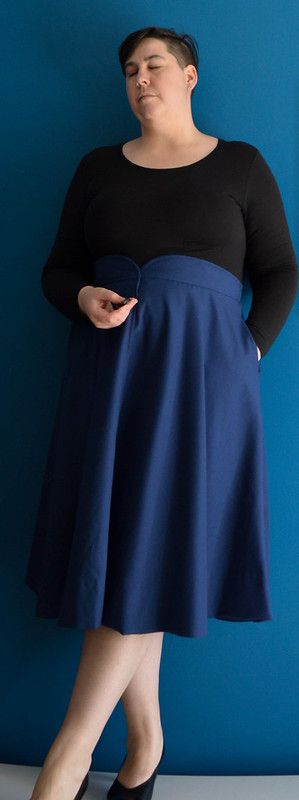
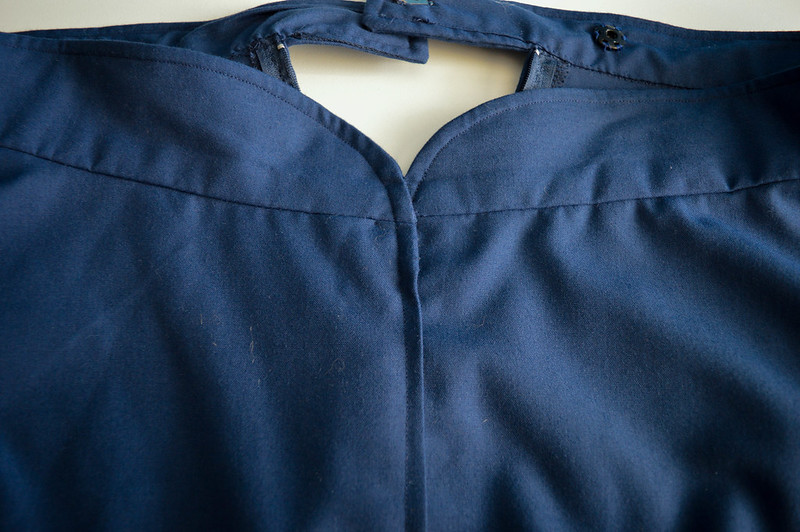
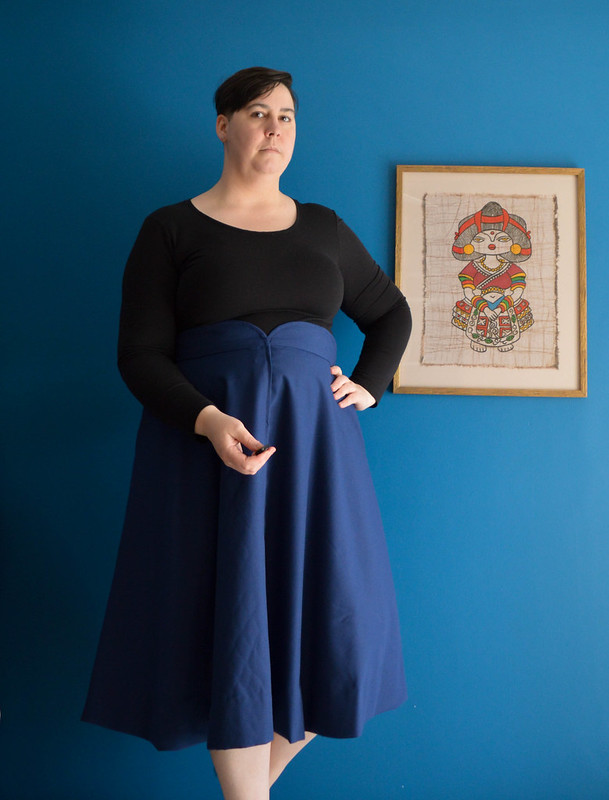
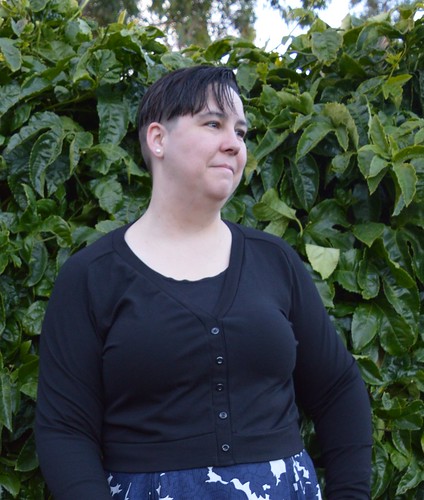
So anyhow. This dress has cup sizes, which is so nice. I sewed the D cup, size 18 at the shoulder, 20 at the bust and 24 at the waist. My muslin was really long at the waist – I think perhaps it is meant to be, because I see a lot of the makes popping up are also sitting at people’s natural waist. I don’t like that on me because 1) it’s not the silhouette I prefer and 2) I like a fitted waist but if I have it fitted at my natural waist there’s nowhere for my stomach to go when I sit down. If the waistline is at my high waist, there’s enough room in the skirt for my stomach to expand below the waist. So I took 2 inches off the bodice. The instructions direct you how to do this properly but I just folded the pleats in on the pattern piece and then lopped off 2 inches. It worked pretty good! I also took an extra centimetre off the centre front where it curves down, based on how the muslin was sitting. But I ended up adding that back in when I sewed the fashion fabric – I think the muslin was pulling forward because of the high neck (because I forgot to either cut the split or cut the lower neckline in. Duh) so I’ll go back and add that curve back into my pattern.
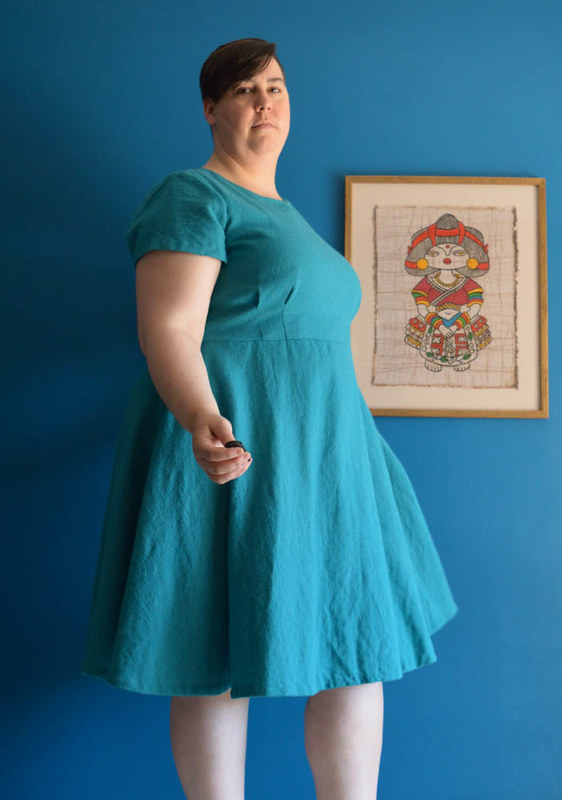
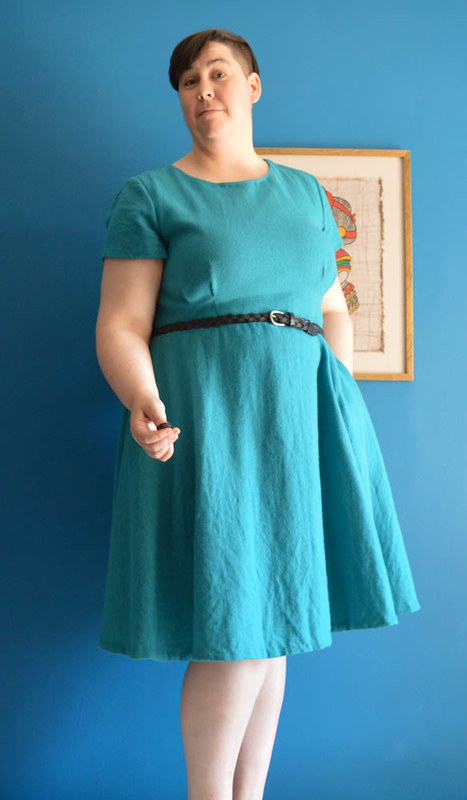
I’m not 100% sure what to do with the waistline in my next make to be honest. There’s some slight fit issues with where the neck is sitting that’s making me unsure – I think I will fix the neck issues (all based on my body not pattern errors or anything!) and see about the waistline later. The other thing is that this wool stretched out on the bias quite a bit after sewing – I was expecting it on the hem but it also stretched on the bodice! It’s quite loose so I shouldn’t have been surprised. Anyhow it’s longer at the sides now, and the waistline is obviously uneven. I should go back and fix it but I don’t really care enough, if I wear a belt with it it’s not visible. But now I’m questioning everything because I like the lower waistline! Maybe I need to revisit my muslin.
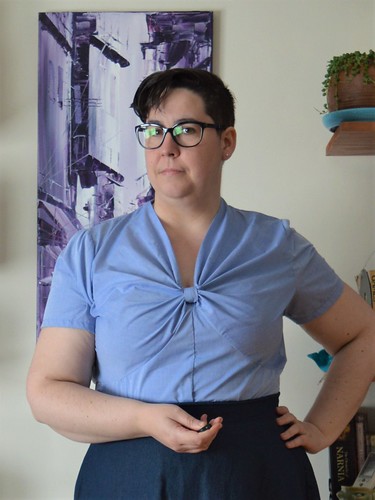
I also sewed the pleats higher up – so they’re the original length (because shortening the bodice shortened them) but finish higher up. Originally they were looking very cavernous which is not really my best look. But I remembered reading a blog where someone talked about pressing the pleat to the centre – I can’t remember who sorry! So I did that and they sit much nicer. Very pleased with them now!
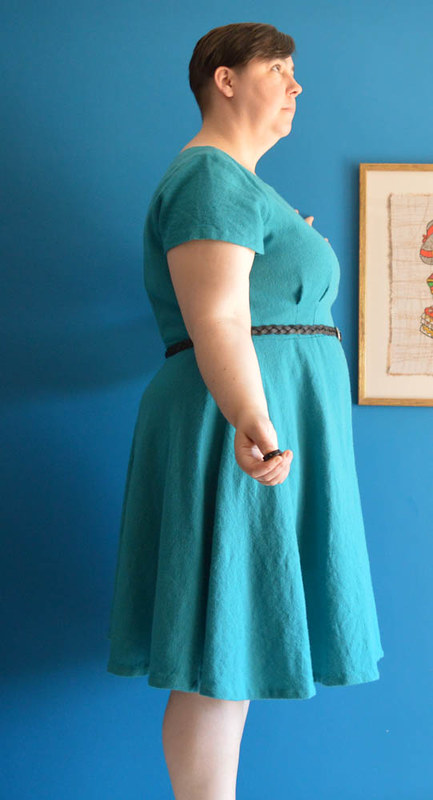
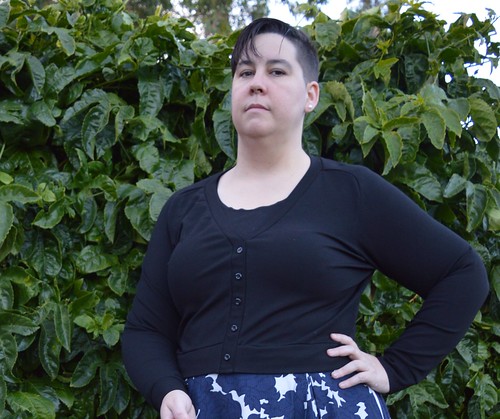
I brought the neckline in 0.5cm at the shoulders and brought the back v neck up 1.5 cm because I liked how the muslin was sitting without the seam allowance used up. I am on the fence about this – on the one hand it kind of looks like I just mucked up a normal neckline and cut it too low. On the other hand the lower neckline really emphasised my dowagers hump. So… whatever. It feels more comfortable where it’s sitting now whereas the lower neckline always felt like it was falling or pulling backwards, so I’ll probably do the same thing again in the future.
While we’re talking about the neckline, after wearing I can tell the neckline/upper torso fit is not quite right. It sits ok ish but when wearing a jumper the centre front folds in and is very annoying. I think I need to take about 1.5” out of the centre front neckline – this is a pretty usual adjustment for me because poor posture and a low bustline gived me a hollow chest, and with cup sizes in patterns this is often emphasised. The shoulder/armhole seam is also sitting slightly off my shoulders, not enough to be a poor fit as such, but enough that my perfectionist overfitting tendencies are annoyed. When I pinch that extra out that issue is resolved. I may also move the shoulder seam back 1cm, or I may just lower the neckline – I’m not sure at this stage what I need. This is a new adjustment for me so I haven’t quite worked out what works best for me.
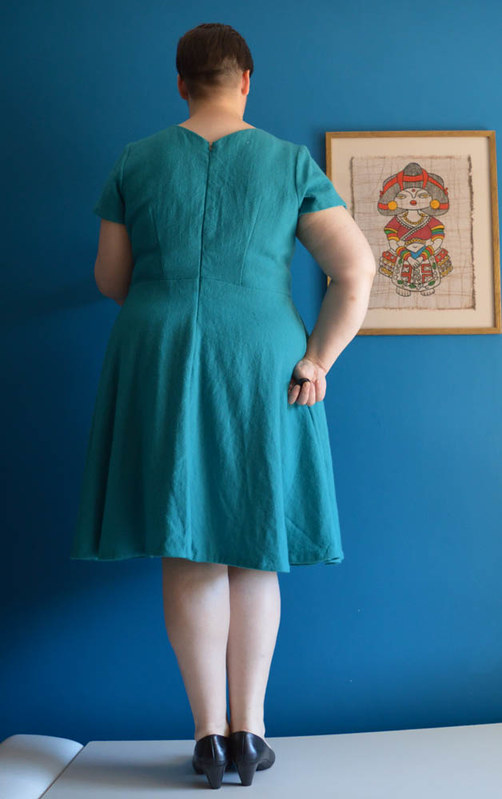
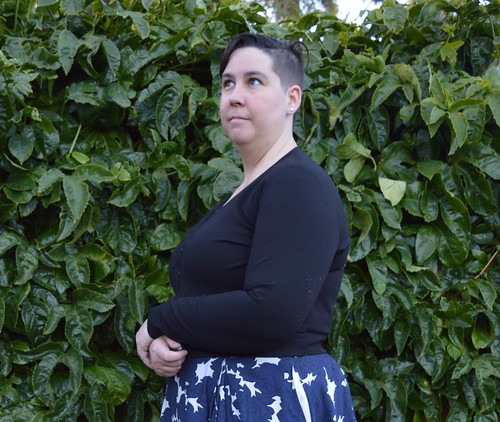
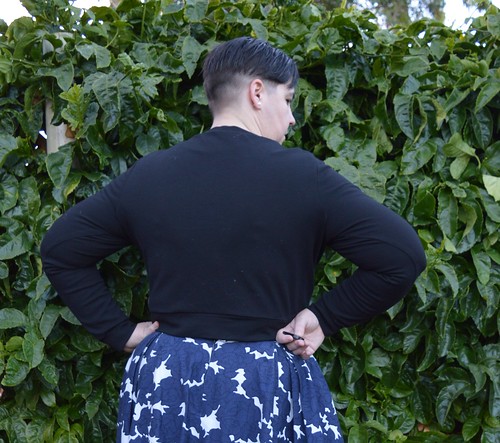
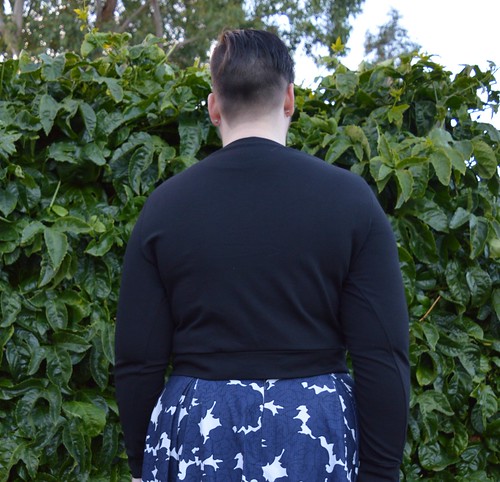
I took a 2” vertical wedge (I think? I didn’t measure I just sort of pinched it out) at the centre back seam because I had some serious pooling there. I also ended up taking the extra width I’d put in at the side seams out again. I’m not sure if this was because the wool is heavy but a relatively loose weave and stretched out. The muslin still fits how I would want it to so if I make this again in a firmer fabric I’ll still keep the extra width because it’s easy to take it back out.
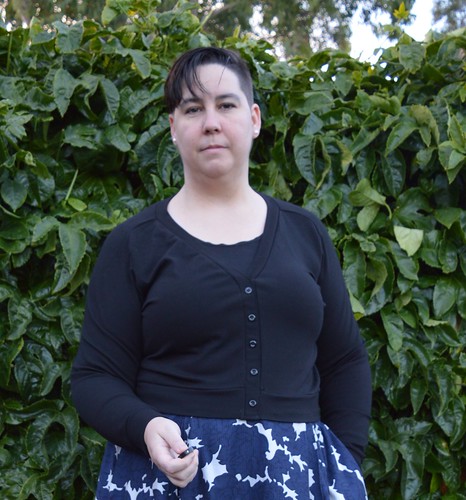
Also, guys, I am in love with these sleeves. They FIT right out of the packet and they set in so so easily and they are just the perfect proportions. I always have so much trouble with sleeves and the armhole and sleeves in this are drafted just PERFECTLY. I’m so impressed. I can tell I’ll be subbing these in on other patterns to get a good fit. A well drafted pattern is just a joy, and this one was so well drafted. Everything was well thought out to make it easy for the end user, and went together perfectly. I will continue buying and recommending Jennifer Laurence Handmade patterns because boy. They are just so pleasant to use. A real treat.
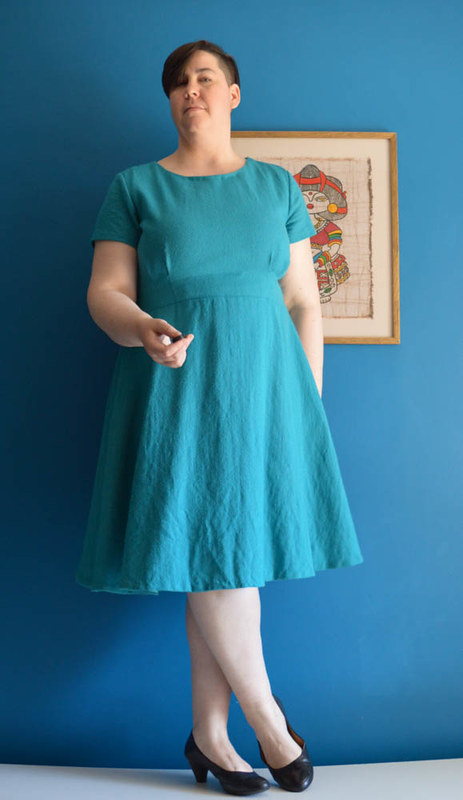
Pockettttts
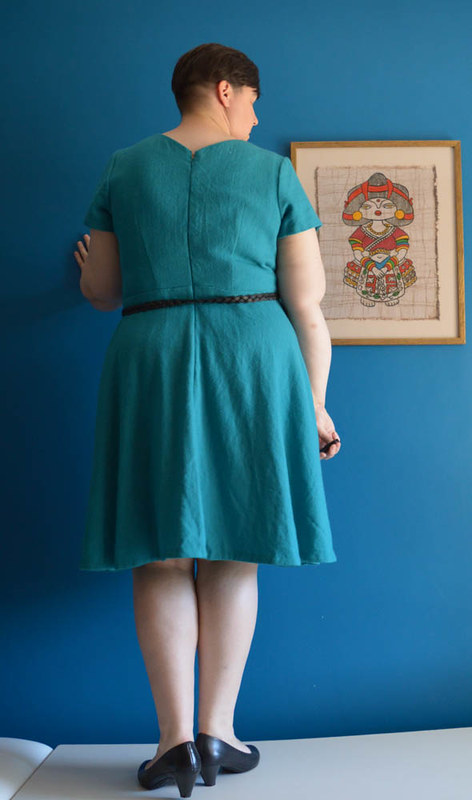
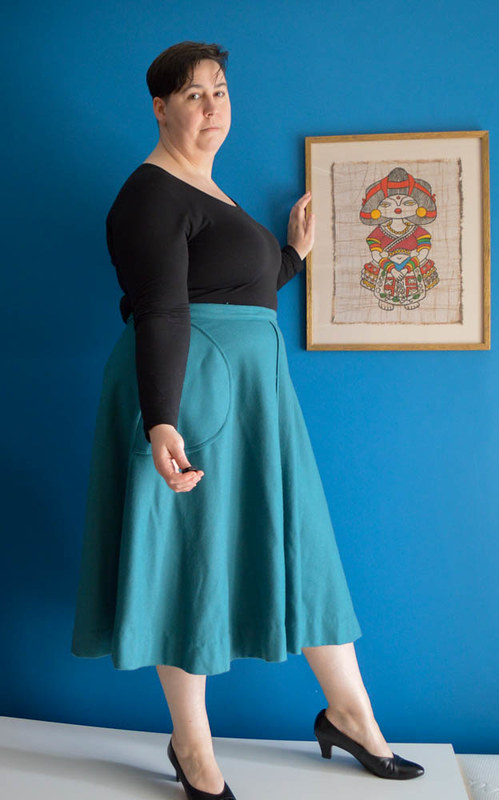
I did change up the skirt a little – I prefer a longer and a more circular skirt than the A line that comes with it. I was rushing to cut this out before the end of craft camp so I just laid my circle skirt pattern over the top and cut the waistline from the Laneway and the side seam from the circle skirt, which was not the correct way to do it. It means there’s heaps of extra fabric just at the side, and as a result the pocket folds backwards and sits maybe 2″ further back than it should. I initially thought the side seam was in the wrong place but if I pinch out that extra fullness on the lower skirt, the pocket sits right. So next time I’ll do it the way I’m supposed to.
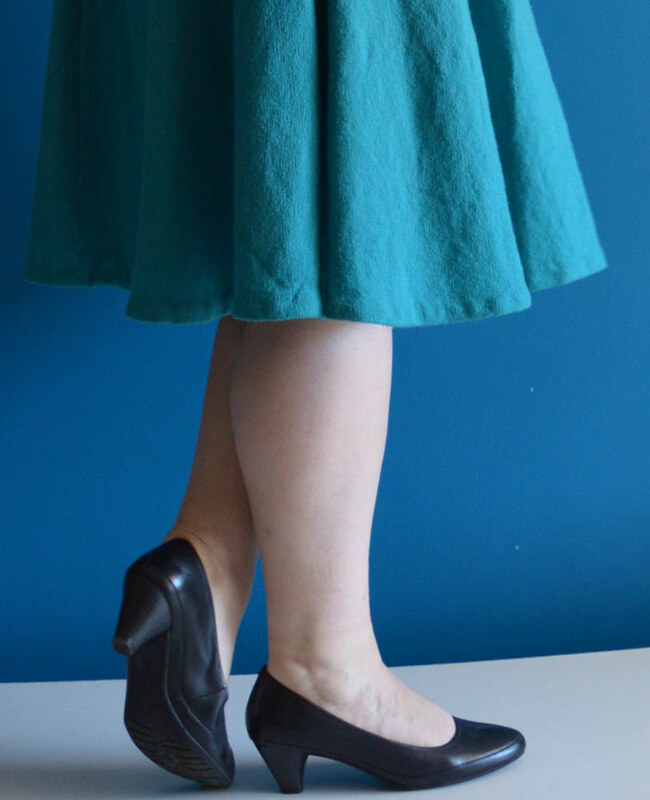
I cut the skirt 1” longer, but I wish I’d done more. I wish I had another inch or so, especially because this is a winter skirt. As is it’s a bit short to wear with long socks without looking v twee. I didn’t want to loose any more length so I hemmed it with bias tape, which I think also gives this light wool some heft. The tape is from an opshop so there are two different colours, which makes me smile when I see it.
The hem fell a BUNCH and I got S to help me measure it with a singer mini-max hem ruler that I got from the same op shop where I scored all the bias binding – maybe from the same person’s stash? I am in love with this thing, it makes everything so easy – S is a willing helper but not a sewer so he’s happy to help as long as it’s clear what he needs to do. Here’s a how to video.
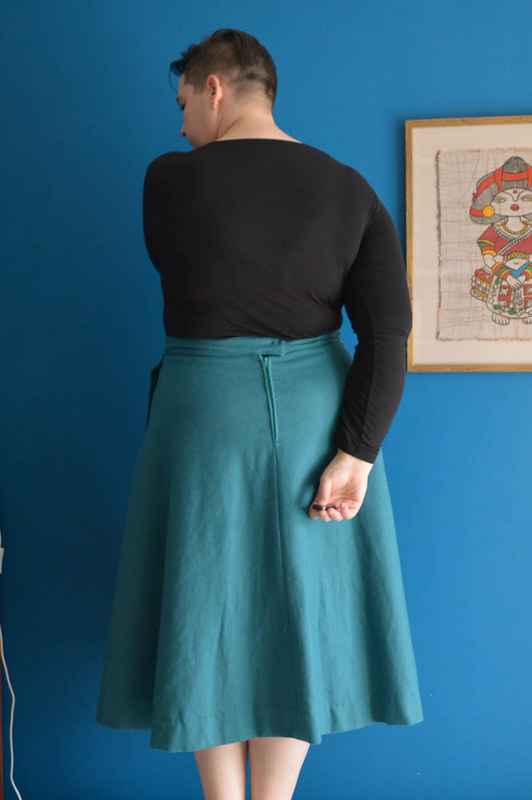
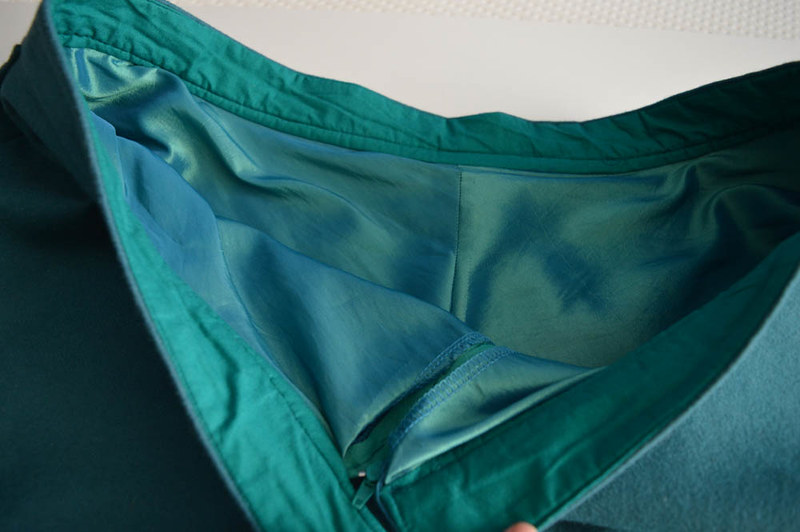
I fully lined the dress. It comes with facings but the wool is pretty loose and I wanted it to be a winter dress, and warm, so I just cut the pattern out in bemberg as well and used that to line it. I used the original skirt pattern for the skirt lining and broadcloth scraps for the pockets. As I said I perhaps should have underlined the bodice rather than lining, but oh well. The only downside is the bemberg is actually quite warm, and if I sit in the sun at lunch I come back to work all sweaty. I doubt this will be a problem in midwinter though!
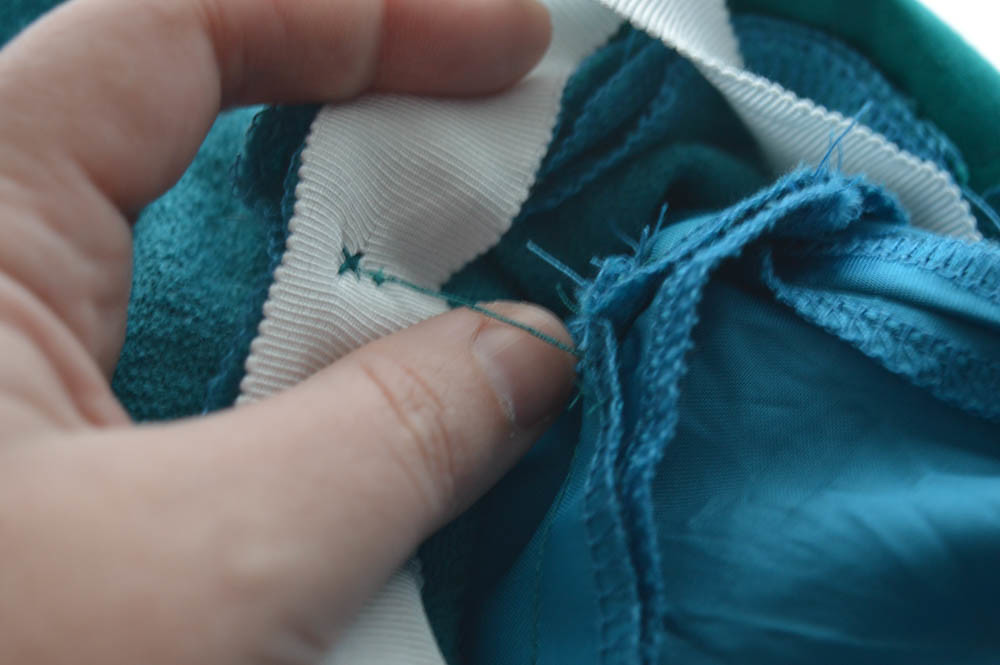
The neckline was pulling and flipping so I hand tacked it down, which is a bit visible because I did it AFTER tacking the lining to the fabric at the waistline so I had to do it through everything, not from the inside. Again, I’m not too fussed about it.
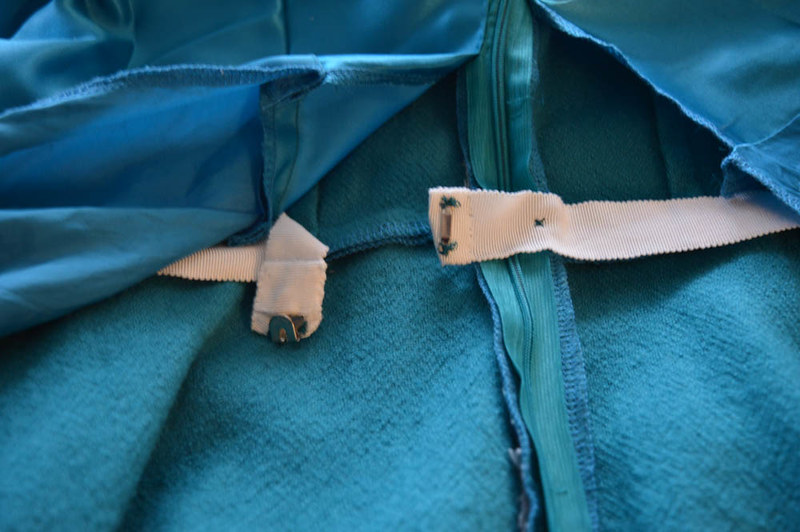
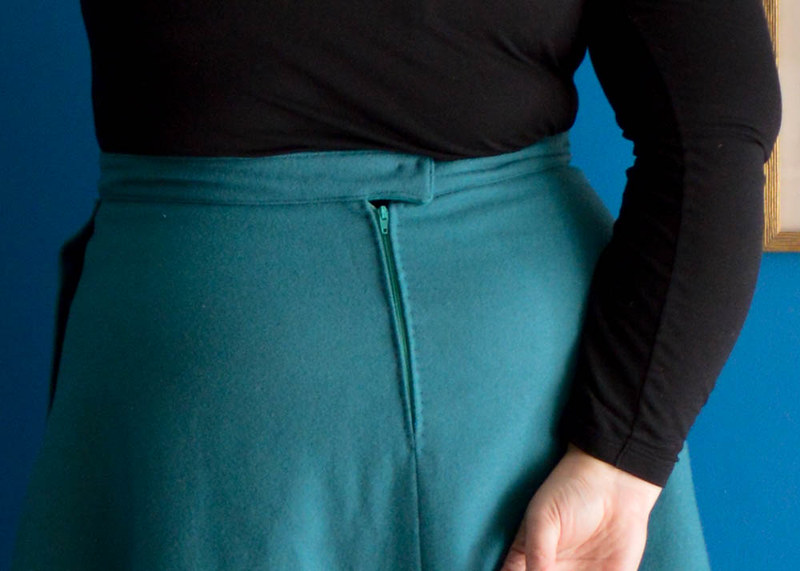
Waist stay
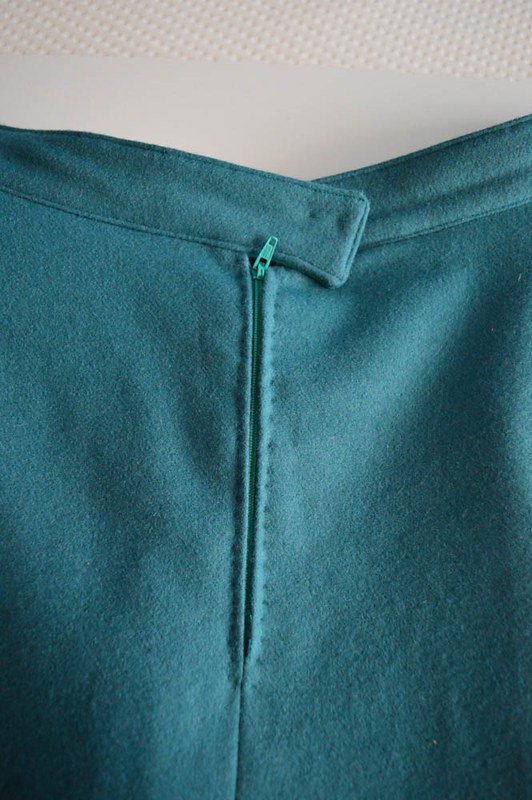
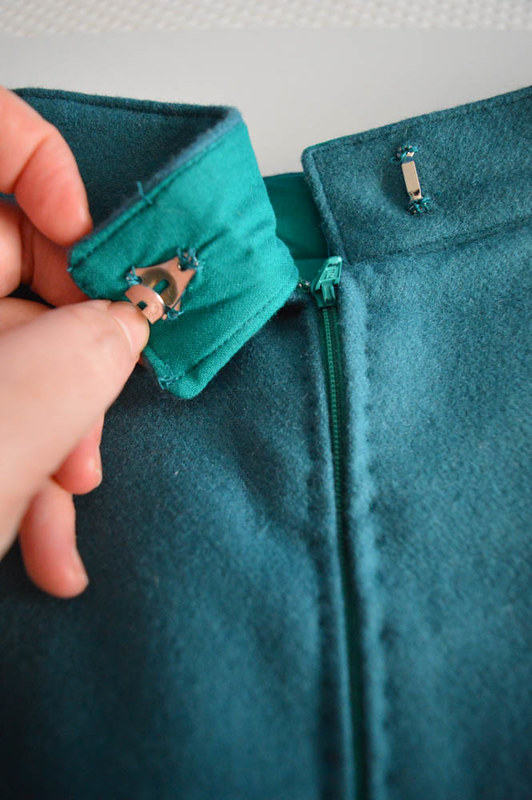
I did a lot of hand sewing on this. I tacked the lining to the shell, as I said. I also did my first ever waist stay, because of the loose weave of the wool. I think I’m sold on them! I really like how secure it makes the dress feel, and it was very easy to do. Although it does make getting the dress on less simple. Oh and I also mucked up the zip and lining bit – because I was making up the lining myself I didn’t think far enough ahead and put it in before I did the zip, so the zip couldn’t go all the way to the top, so I just put in a hook and eye. Not perfect, but good enough. Also I wish I’d gone with my instinct and done a regular zipper for this, because the waist is bulky and the zip shows there.
Lining tacked to shell
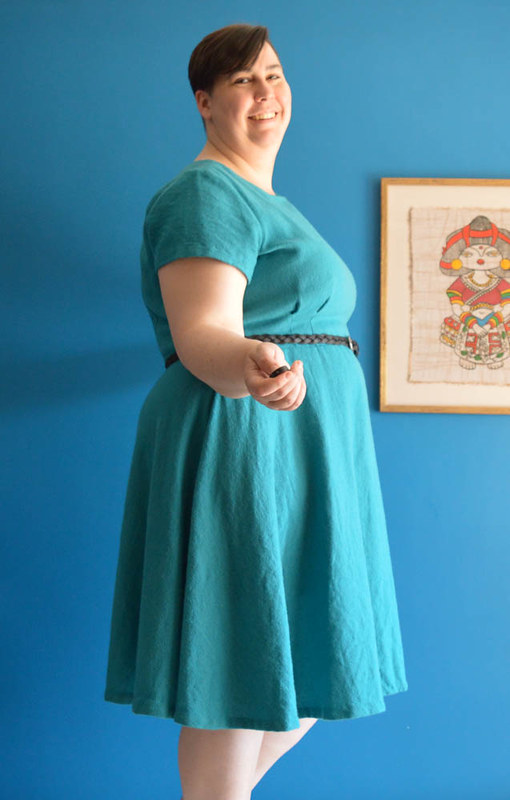
Reading this back this sounds like a litany of flaws but that’s not at all how I feel about this dress at ALL. It’s not perfect, of course. But all the issues are very minor, and mostly just noted for myself for next time. Often when a make has this many little things it’s annoying to wear, but not this dress! It’s so comfy and lovely and I feel a million bucks in it.
There will ABSOLUTELY be a next time for this pattern. I really love the shape of this dress, and the drafting, as I said, is just so excellent. I know I’m gushing about it now but seriously I’m not over how much of a difference it makes to everything. I guess I’m now a JLH fangirl!
The writeup for this dress says “The Laneway Dress blends comfort, whimsy and the unexpected into one perfectly tailored dress. With a sleek yet easy to wear 1940s A-line silhouette, Laneway will be your go-to dress for everyday adventures and beyond.” I always roll my eyes a bit at the spruiking for patterns but you know what? It’s spot on. I also think this dress will look really different in different fabrics, and will be a good jumping off point for alterations and hacks to make it more interesting. I’m really looking forward to making this a TNT! I definitely need to sew myself one in lighter fabric for summer and autumn because I miss wearing this dress!
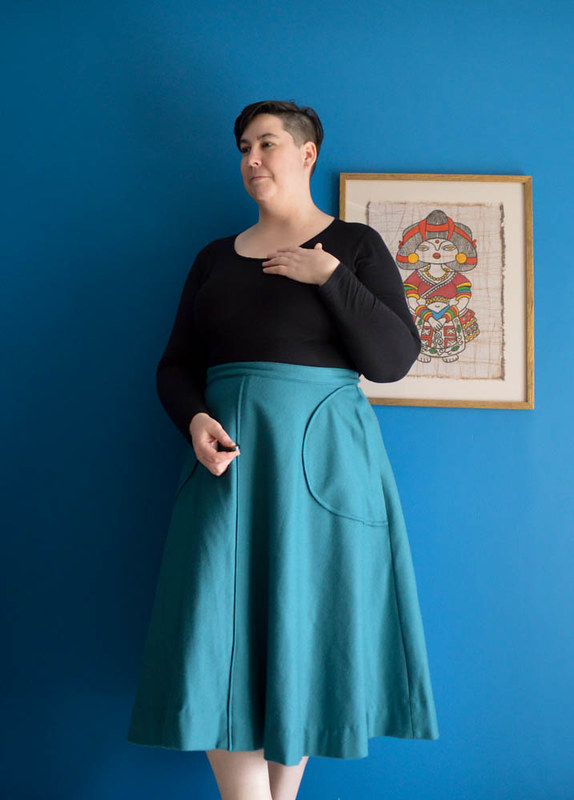
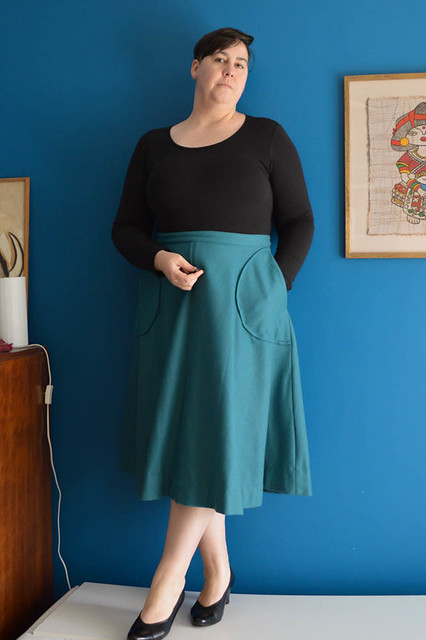
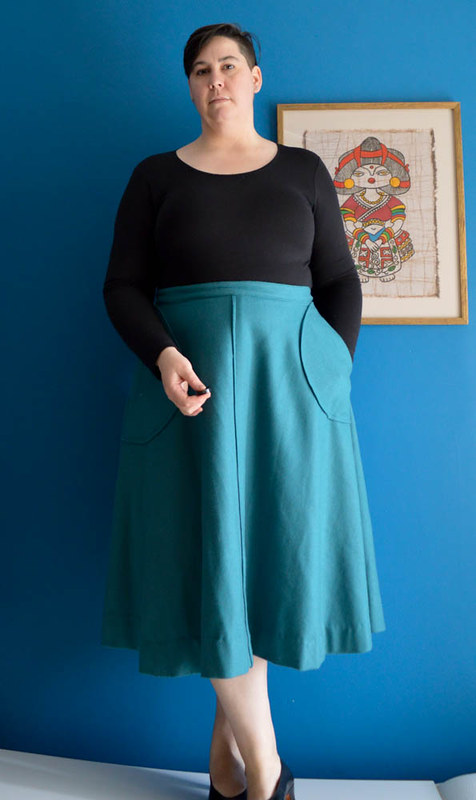
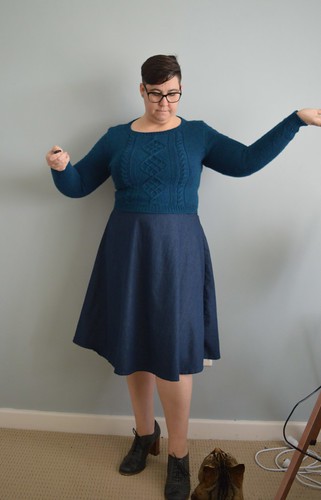
Hello friends! Things have been pretty quiet here lately – not much sewing happened for a bit there. It’s warmer now and I suddenly want to make all the time, but taking and editing photos still remains the challenge. Hopefully I’ll have some more things up before I totally forget what I did when I made them. Anyway, for now I have another Simplicity 8250 for you!
I really liked my last version of this, but wasn’t managing to get much wear out of it because the weather was too cold, so I dipped into the stash and came up with this teal wool. I’m not sure where this came from – I think perhaps from someone else’s stash via craft camp?
There was only a couple of metres and it’s a bit lighter than my preferred teal (#tealopinions) and so hadn’t been used yet. But it’s such a lovely fabric, I’m thrilled to have got it out of the stash and into my wardrobe.
Because I only had two metres I had to shorten the skirt 1″ to fit it on my fabric, which just meant I took a 2″ hem instead of 3″ which is more manageable anyhow. Tbh I think the length is a bit frumpy for a winter skirt. I like it here, but with stockings under it it looks dowdy.
That said, I’m not taking it up because it’s so warm and cozy and comfy at this length! It’s basically like wearing a blanket. I also managed to sew the front overlap the other way and I like it better this way. A small thing, but there you have it.
Once again I made the largest size, and with the bulky fabric it’s probably a bit slim at my hips, as it rides up a little when I sit down and you can see a bit of pulling at the back even when standing, but I don’t think I’d bother to go up another size.
Some pulling happening. It might actually be worth it to make the back a bit bigger now I think about it, and leave the front as is.
As I said, I sewed the size 24, which is the largest size. I also added a lining with taffeta from lincraft which was previously my favourite thing with lining but sadly they don’t appear to stock it anymore, thus removing the sole remaining reason that I ever went there. Oh well!
Lining and broadcloth facing
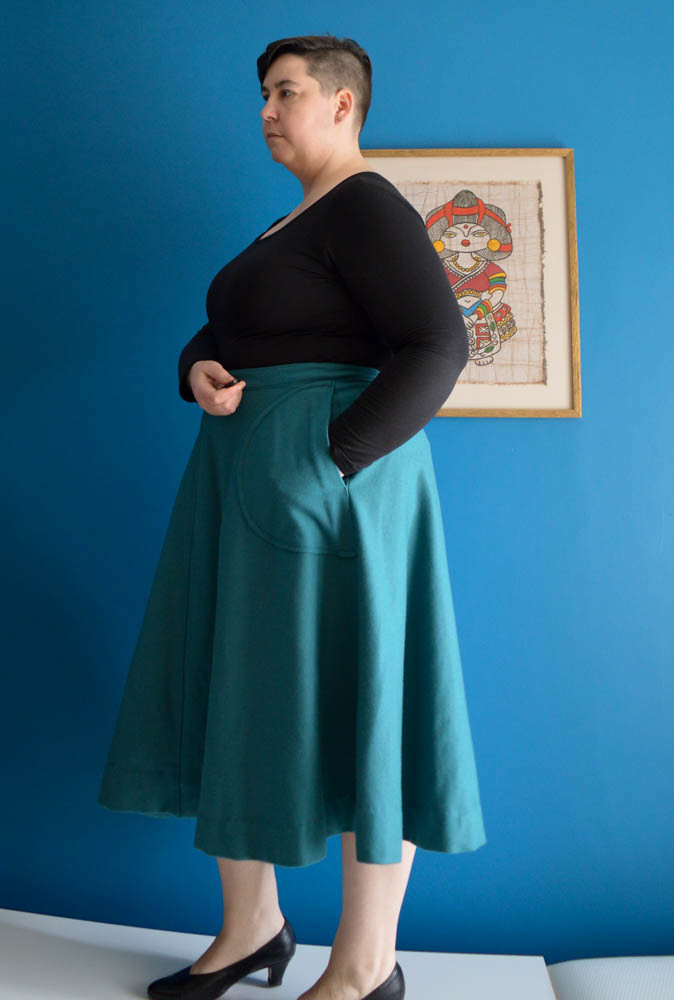
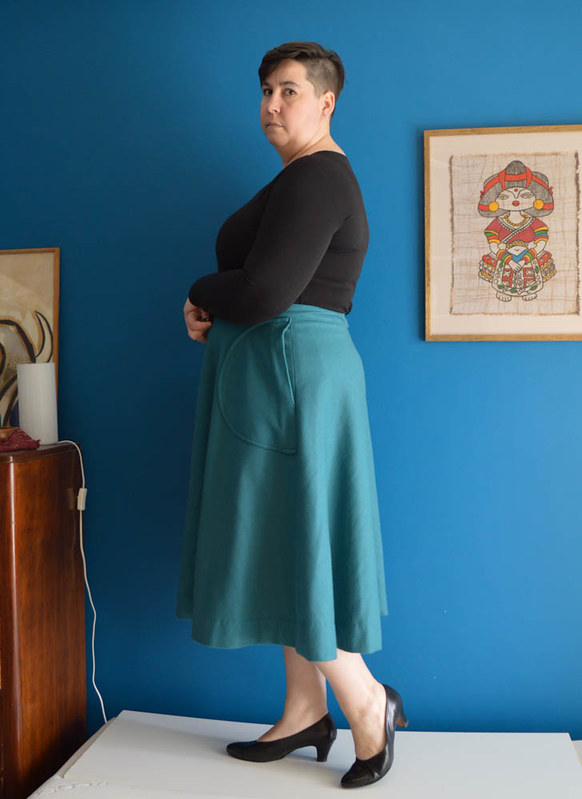
I figured that I didn’t need two skirts with curved waistbands, so I used the straight one on this. I faced it with broadcloth to prevent the wool being against my skin, and I really like the firmness it gives to the skirt. I initially gave it inseam pockets like the previous version, but I forgot to interface the seams there like I usually do, resulting in them bagging out and being a bit… hmm… well…
A little bit… euphemistic shall we say?
So I unpicked that seam and the pockets and sewed it shut again, and applied the patch pockets. And I’m very glad I did!
I love how they look and they are such an excellent size and shape. The pockets are intended to be sewn on after the whole skirt is complete anyway so I wasn’t cutting any corners.
The only thing I wish I’d done differently is that I wish I’d lined the pocket. The pattern for the pocket is the pocket shape, with an extension at the opening to fold back as a self facing. There’s also a facing for the curved side of the pocket. You sew the facing to the pocket, right sides together, catching the extension in the seams. You then flip the pocket right side out and slip stitch the self facing down.
I interfaced the fold line of the self facing, which wasn’t in the instructions, and I’m very glad I did because it would be quite floppy without it. But I wish I’d also gone with my instincts and completely lined the pocket, either keeping the self facing and stitching it down to the lining, or even just completely lining it. It would give the pocket some more structure and you wouldn’t be able to see the fold of the self facing as clearly, although this obviously would be less of a problem with a lighter fabric.
The pattern as drafted also means you can feel the facing flapping about in the pocket when you put your hands into it. I just don’t think it’s very elegant, and it would be so easy to finish it neater. Next time I will trust myself and do so.
I hand picked the zipper again, and boy do I love how it looks in this wool.
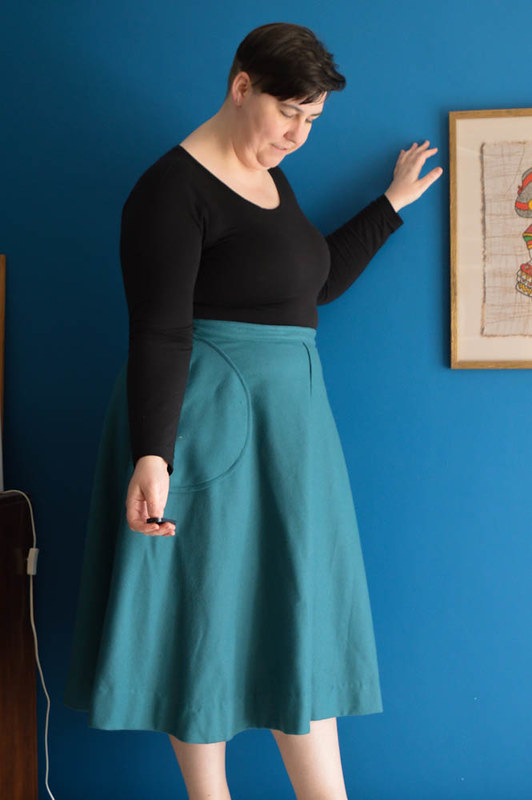
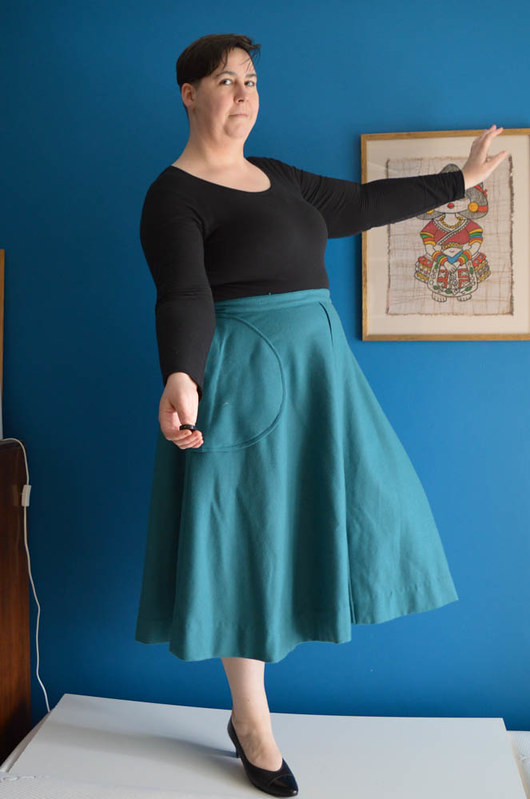
I hope you will excuse any weirdness in the photos. I’ve decided I can’t bear to give up my blue wall as a background, even if I have a bit of trouble working out how to interact with my art.
We’re pals. Gals being pals.
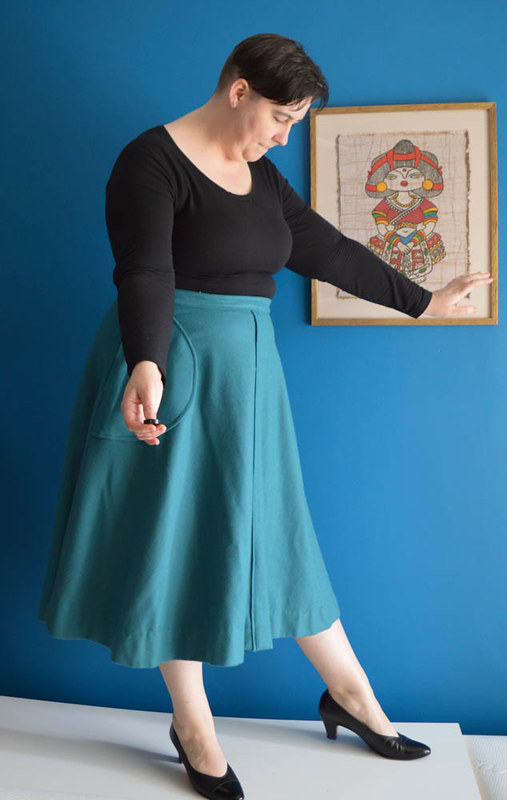
Even if it does mean balancing on a board on top of my mattress.
Even if it is…
… a little bit…
….precarious!
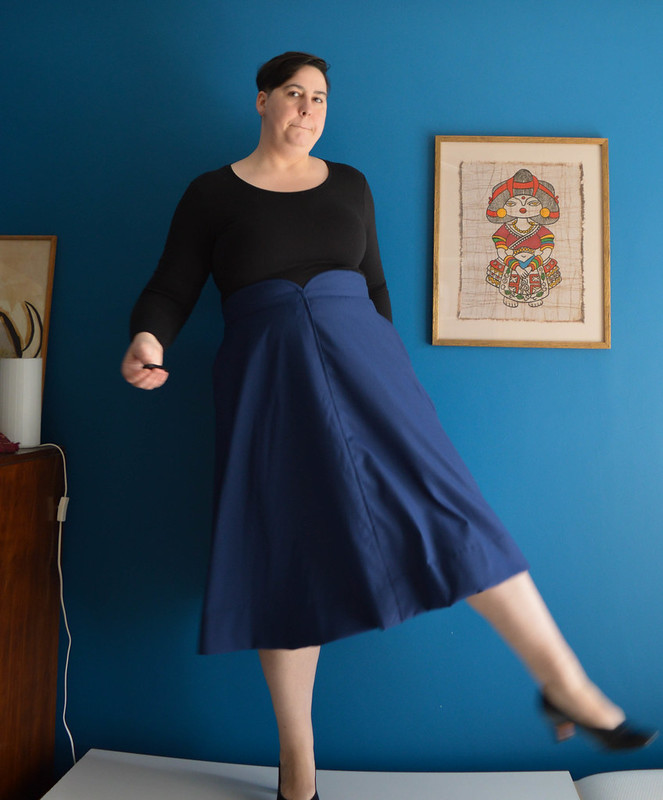
Stuck that landing! 10/10 from the Russian judge.
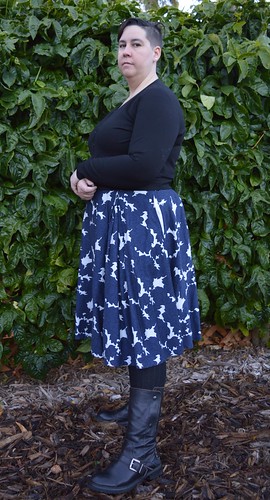
I just love this skirt, a lot. So much so that I’m almost sad that it’s too warm to wear it now! Hahaha just kidding, I will never be sad that it’s warm. Sorry, skirt!
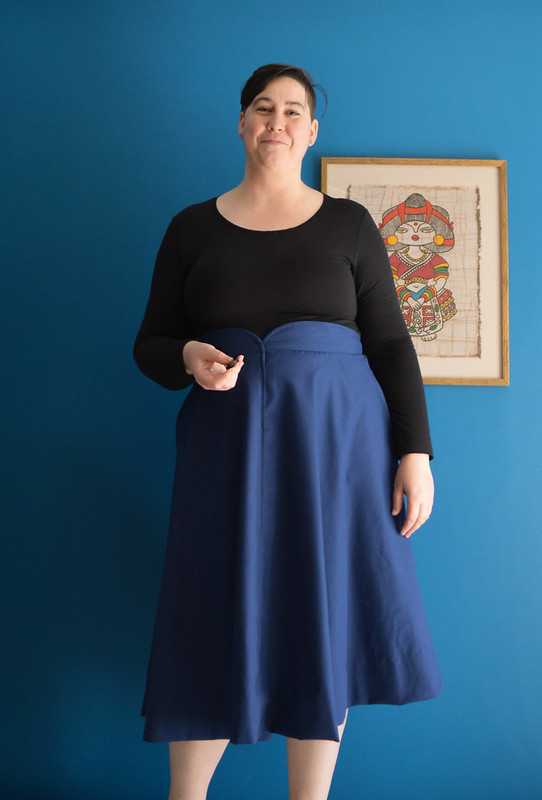
I picked this up in my last ‘3 for $15’ haul at Spotlight. I just grabbed a bunch of vintage reprints because I always regret them if I don’t pick them up and then they go out of print. Initially this wasn’t on my shortlist to make immediately. I was a bit put off by how it looks on the model. It looks to me as if the skirt is sitting too low and the bolero too high, or perhaps it’s too small?
Whatever it is, the proportions look a bit odd to me – or too modern perhaps? I’m having the same issues with 8251 which I like in theory but the proportions look very odd and I can’t work out if it’s because of the model, or the actual proportions. They use this model a lot for the vintage patterns and about half of the ones she models have the waist and bust darts in totally the wrong place, while the other half are fine, so who knows?
Anyhow! I posted my pattern haul on insta and a bunch of people commented how much they liked this one, which caused me to give it a second look. It’s a pretty basic pattern – it’s a 1/4 circle with front, back and side seams. Both sides of the front have extensions of an inch or so that are folded over to create that overlap, which is then topstitched down. It would be incredibly simple to draft this oneself. The highlights are obviously the shaped waistband and the patch pockets.
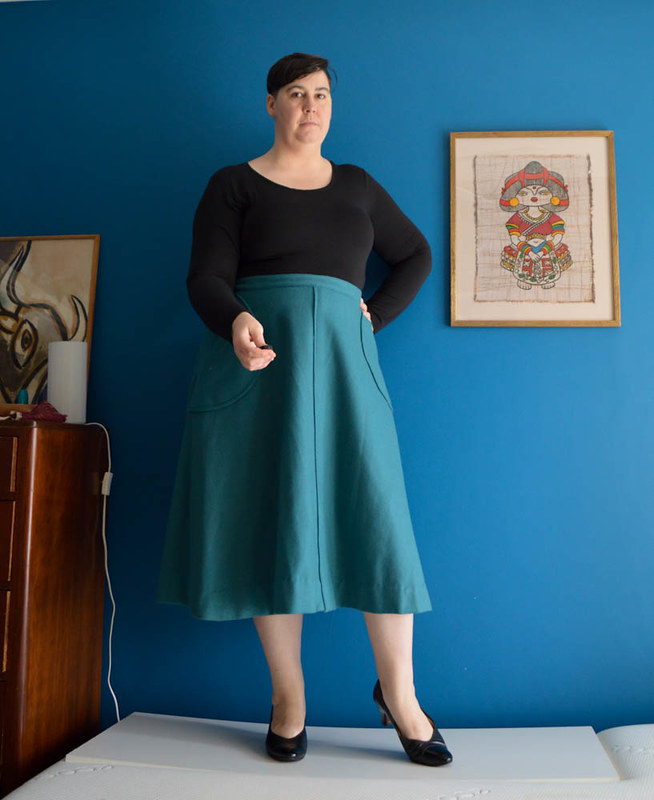
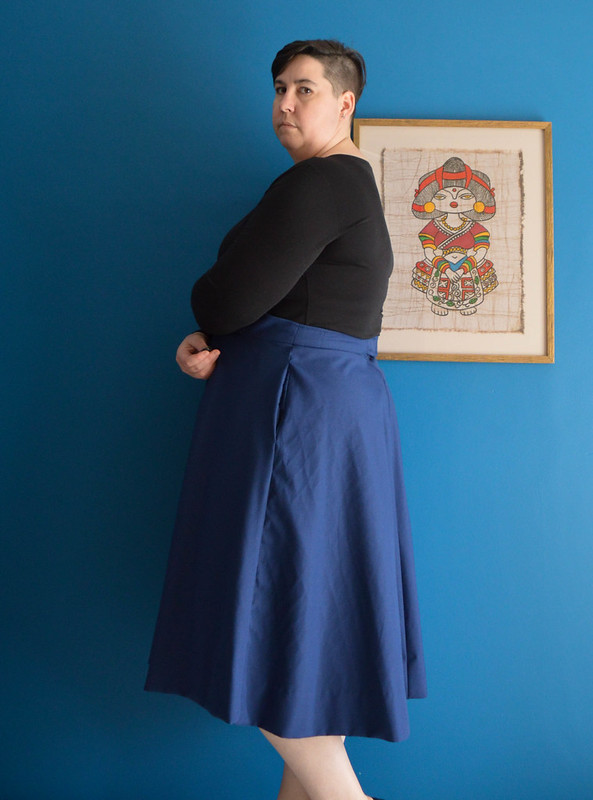
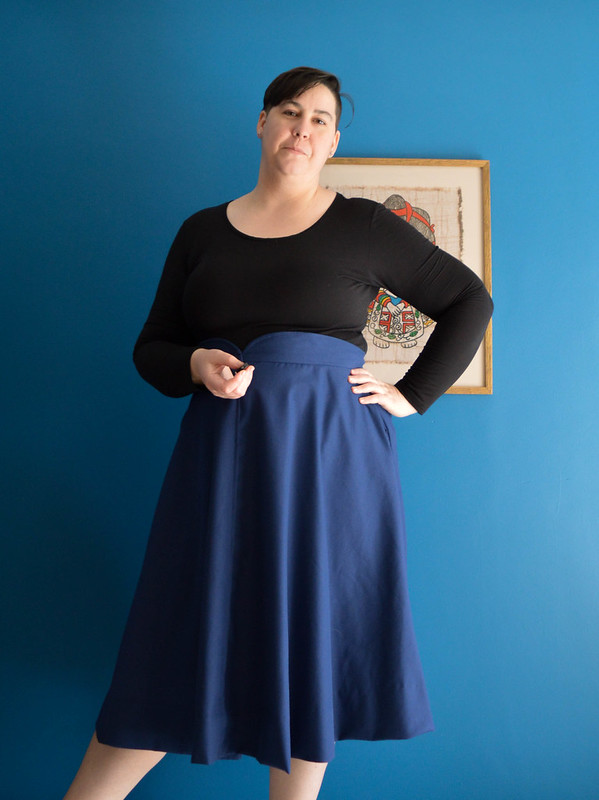
The quoits skirt was sewn at craft camp. The fabric is a mid weight cotton drill-type fabric that I got from unique fabrics in Melbourne which is basically my favourite place in the world. I have trouble finding good bottom weight fabrics in Adelaide so I was thrilled to find this. I was envisioning an a-line type skirt, something 70s ish, maybe S8019, for spring and autumn. But no matter how many times I got out the pattern and put it on this fabric, I ended up putting it back again. It just wasn’t right. This fabric wants to drape and swoosh! Once I decided to make up 8250 it was the perfect candidate.
I sewed a size 24, the largest size. Obviously I made up the version with the shaped waistband! I was concerned that it would fold and rumple, but I find it sits in the right place on my torso and so the curved portion sits up away from my body just enough that it only folds slightly when I sit down and my belly smooshes into it. I used thick sew in interfacing, too, so it holds its shape nicely.
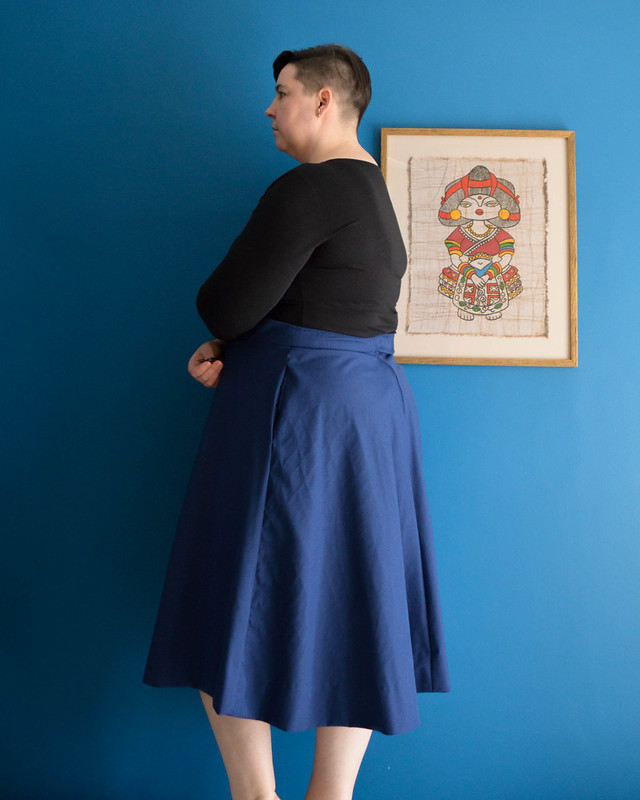
The only negative is that I wasn’t quite sure what I was doing when I sewed it together, and I didn’t take the curves as nicely as I’d like. As a result they’re not really shapely in the correct way. They’re ok, but every time I look at it I notice that they’re slightly wonky and it does annoy me. I would recommend that you do a practice run on scrap fabric before you sew this, as well as marking the sewing line on the backside so you can be sure to follow it. I was only out by a few millimetres but that made a massive difference on the curve. I didn’t manage a great closeup of this on, but you can see it below – there should be more of an overlap in the ‘petals’.
Pertinent to the above, the instructions for this are not good at all. Despite the simplicity (ha!) of the skirt pattern itself, I would NOT recommend this pattern to a beginner, because the instructions are just chaos. To be honest I only glanced at them to see what they suggested doing for the curved waistband, but I went back and checked them before I wrote this blog post and boy! I had trouble comprehending them at all.
There are separate instructions for the shaped vs the straight waistband, but it just launches into one and doesn’t point this out, or mention the places where they differ so if you are sewing skirt B you are totally disoriented. I would have found it easier if they’d done it all in one and then where it differed, said ‘for skirt B do blah blah, for skirt A do blah blah’ but I guess they were following their convention for writing instructions. I also felt that the sewing together of the fronts and the waistband curves are not explained well at all, and the diagrams didn’t really show the bits I needed visual help with.
They also have you top stitch the front before putting everything together, and don’t continue the topstitching onto the curved band. You can see that’s what they did on the modern remake of the pattern. I think it looks messy and is a real missed opportunity for a nice detail. The vintage line drawing clearly has the topstitching continuing up and around the curved waistband, as Liz points out, so that’s what I did.
I basted the fronts together, attached the waistband, and then topstitched everything in one go. Easy. The basting also made it much easier to be accurate with the topstitching and not pull it out of line as I went. I honestly would not like to attempt it without basting. I’m really pleased with my topstitching on this. I tend to rush it and that is not a recipe for good topstitching! This time I went slowly and carefully and it paid off.
I guess they don’t tell you to do it this way because it would make another difference between the way the two waistbands are sewn so they would have to describe it twice and probably take another piece of paper. But they definitely could have condensed other parts of the instructions to allow for this. (I did cut a small hole in it when I was unpicking the basting because I wasn’t being careful. I don’t have any fraycheck so I darned it and you can just see it if you look closely. Oops!)
The instructions have you topstitch at, I think, 1.5cm. I just did it the width of the sewing machine foot, which ended up something like 7mm? I like it and think 1.5cm would seem very wide to me, although it could be fun and chunky. Maybe another time?
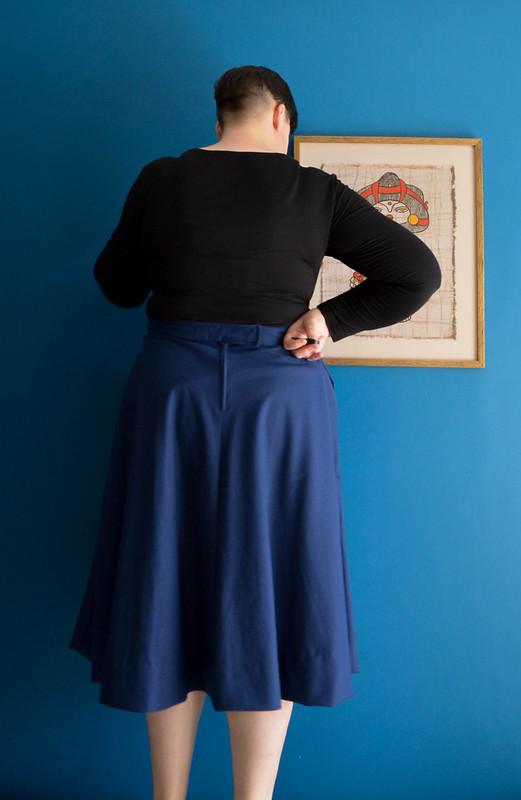
They also have you put the zipper in all the way to the top for the curved waistband, but only to the bottom of the band for the straight and add a hook and eye. I did not do this – I find I need a hook and bar for my skirts to sit nicely. My stomach expands when I sit down so without that the waistband will gape. I extended the waistband so that I could put one in. Unfortunately I cut this out a few weeks before craft camp and forgot I’d done it. Because of this and also being uncertain how the fronts went together, I sort of winged this part and ended up with a messy overlap – on both sides!
I fixed it with some hand sewing but it’s messy on the inside and definitely not my best work. Oh well! It does mean it’s got a hook and eye on one side and a press stud on the other which turns out to be kind of good because it keeps the band sitting straight, which means the front curves don’t pull outwards or sag. I have been contemplating re-doing the waistband because of the poor job I did with the curves and the overlap but so far it’s not quite annoying enough to bother doing that.
I also bought a bulk lot of the hooks and eyes on etsy for less than a pack of 4 at my local stores… except my local stores have stopped carrying the large size altogether. And then they have the nerve to complain that online retailers are taking their profits! I’m TRYING to give you my money! Please stock the things I would like to buy and that are your supposed core business, instead of decorative glass bouys and hen’s night novelties!
Anyway. The bulk lot is good because I inevitably end up losing the bars and only end up with hooks and at least my odds of retaining some are better with more of them.
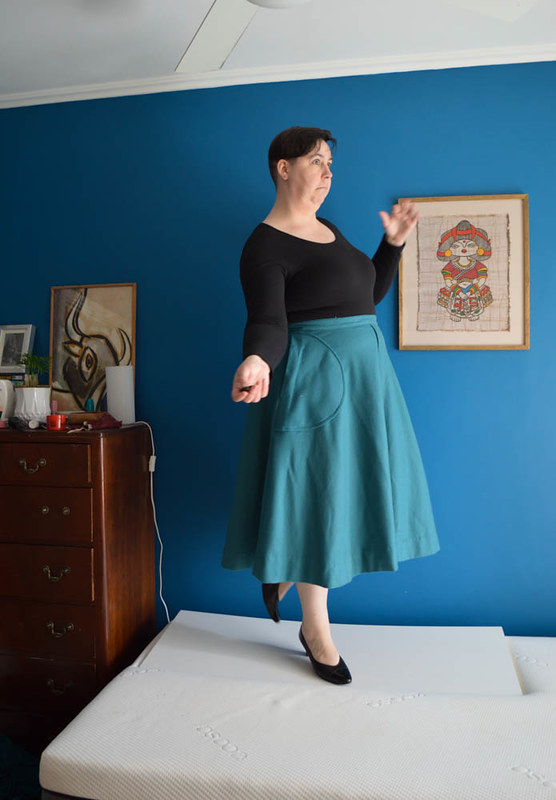
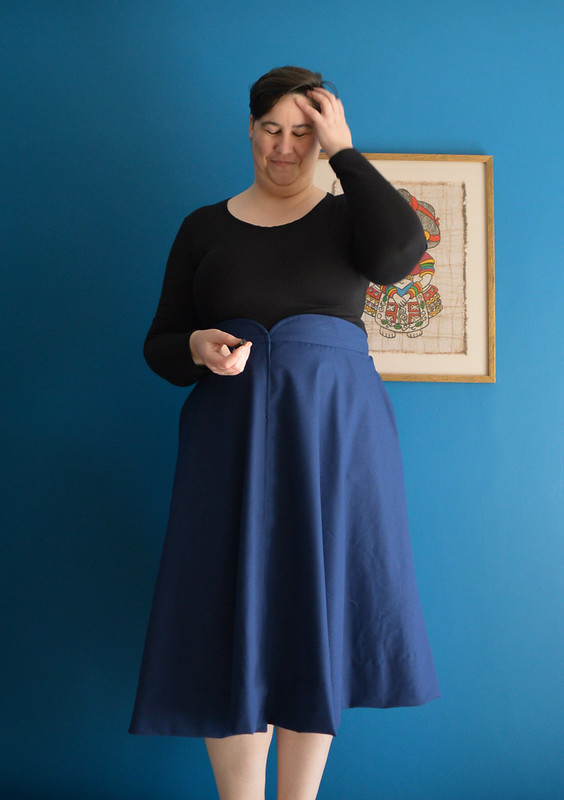
I should also mention I’m still trying to work out how to reclaim my blue wall for photos – the waist on this skirt looks EXTRA high but that’s because I haven’t quite worked out the height the camera needs to be at to get good shots while balancing on my bed, so it’s too low and has the effect of shortening my waist. I mean this is a high waisted pattern but it’s not right up under my boobs like it looks here. You get the idea, anyway.
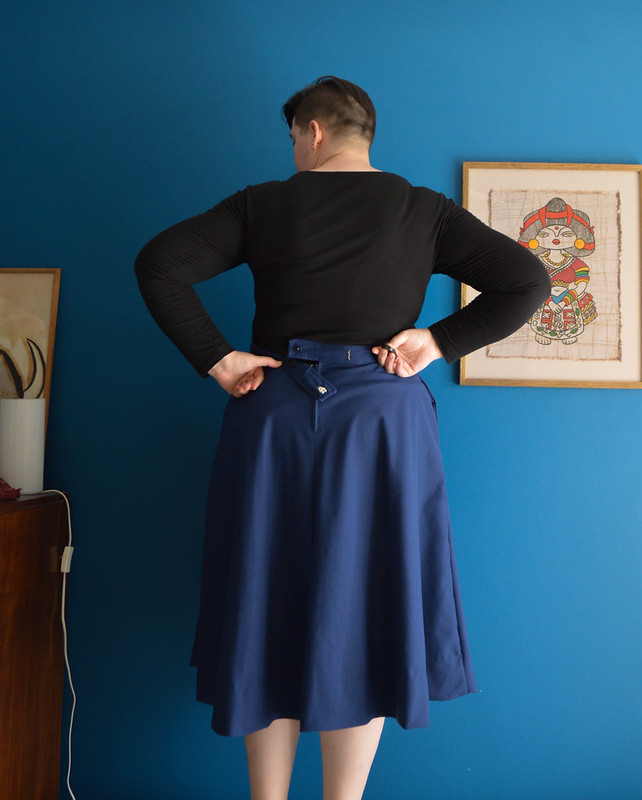
Balancing on the bed is worth it but it did get a bit precarious…
I hand picked the zipper on the principle that it would actually be quicker than trying to do it by machine and having to unpick and redo it five times. It’s not totally neat but I am getting better at this process, and I actually really enjoy it. I made it centred rather than lapped because I found that easier to work out how to do and I’m still new at hand picking so I wanted to keep it simple for my brain. I also hand sewed the waistband facing down, and hand sewed the hem after letting it hang for a week – it did sag quite a bit on the bias.
This skirt is quite long, so after trying it on I decided on a three inch hem. I didn’t do the gorgeous patch pockets because I felt it might be too much with the curved band, so I added inseam pockets.
I was going to add a lining as well, but because I cut it out beforehand I accidentally cut a lining with a side opening. I didn’t have enough fabric on me to cut one that would open at the back, so I just went without. This means I can’t really wear it now, as it’s too cold, but it will be perfect for spring and even cooler summer days. It’s surprising how much warmth even a thin lining can add!
TL;DR
Sewed a size 24
Added in seam pockets
Hand sewed zippers and hems
Added a hook and bar to both zips
Basted the front overlaps together first, did the rest of the constructing and then top stitched
Continued the top stitching up and around the waistband (top stitched the underlying half of the band first)
Next time I would take more time with sewing the curves of the waistband, and mark the seam lines to make sure I got the curve exactly right.
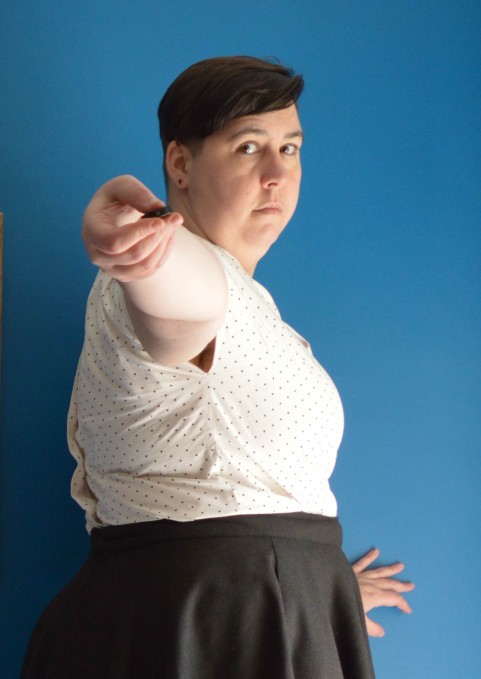
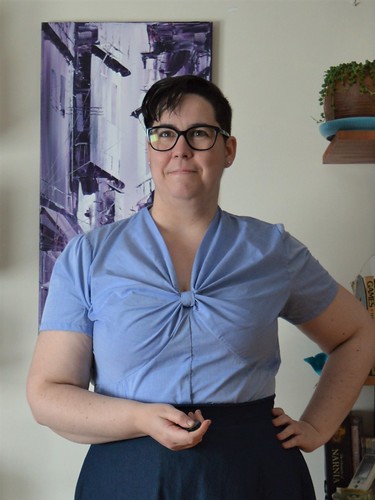
A couple of months ago I was asked if I would like to sew something for the Sewcialists re-launch, with the theme of ‘tribute month’. I’m a bit wary of sewing on a deadline because it often leads to me rushing something and being disappointed in myself, but the timelines were generous and most of my makes are already directly inspired by other sewists’ makes so it fit in with how I sew already. After thinking about it for about two seconds I realised I was already planning to make a top directly inspired by Heather B!
When I first saw her bee blouse, I actually gasped out loud. I WANTED one, but I figured it was probably an original vintage pattern that I wouldn’t have access to. But no! It was a Mae blouse from Blue Ginger Doll. Not only a modern pattern, but one that I already owned!
I immediately thought of this cotton poplin that I have had in my stash for a long time now. It’s from the Spotlight spots and stripes range, and I bought it because it’s clearly in a different base than the rest of the line and it’s really lovely. But I hadn’t used it because I couldn’t figure out what to make that wasn’t too twee but also worked with the fabric. I knew this would be the perfect match! Especially after I dug a little deeper and saw that Heather had in fact made a version with small spots, as well.
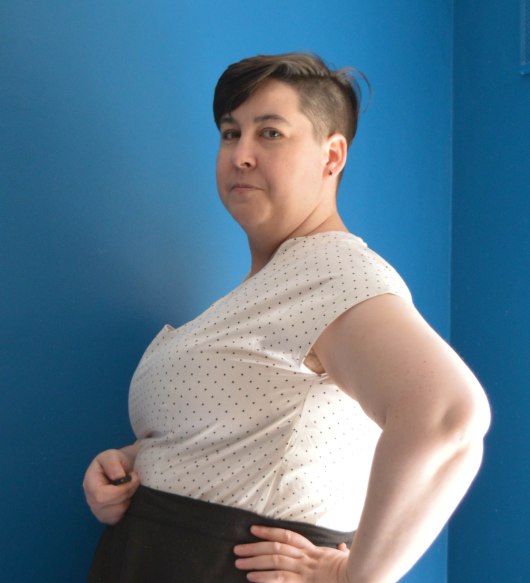
I read Heather’s post for her original Mae for fitting tips. I was initially going to try to do an FBA but I couldn’t work out how to manage it without a dart, which I didn’t want to add in. BGD are already drafted for a D cup, but the the largest size (18) lists the finished full bust measurement as being 1″ too small for me. I decided to muslin it up as a straight size 18 though, given Heather’s experience with it. It was too small through the torso but everything seemed to be in approximately the right place – the bust fit quite nicely although the dart was too far out. I decided I’d copy Heather directly and just add 3/8″ to the side seams below the sleeve portion.
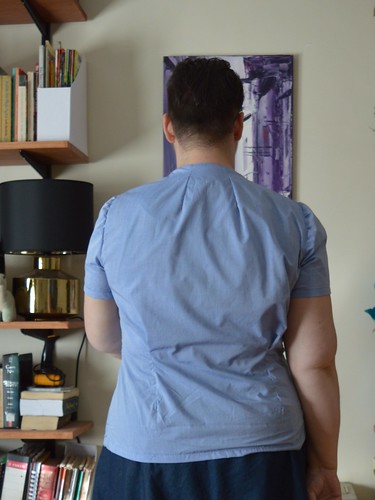
So this version is a size 18 with a size 10 bust dart (the darts are all the same size, just placed differently). I probably should have gone with the size 14 dart as it’s a bit too far in, but not too bad. However, as you can see I do have a fair bit of pulling at the bust. This is exacerbated by the fact that I sewed the armholes up about 1.5″ higher. Initially it fit really well but then when I put it on to take photos you could clearly see my bra. I’m not sure how I thought it was ok in the muslin!
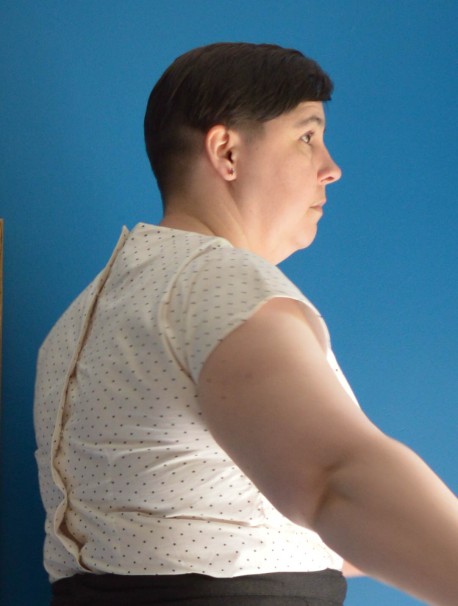
As a consequence of sewing the armholes up higher, the back got tighter. I had to unpick the sideseams and sew them as narrow as I could – I’d already trimmed and understitched so there wasn’t much wriggle room.
I’d say in the end there’s about a 1/2″ total added to the sides, and I could use another 1/4″ at the widest part of my torso. Next time I would do that FBA, even if it did add a dart, and do a small full back adjustment for across my shoulder blades. This is my largest part both front and back, because I hunch so I really always need extra room there.
I would also like to take a wedge out of the centre because my hollow upper chest/low bust/lack of an FBA means it’s collapsing above my bust which throws the whole neckline out and it irritates the heck out of me. I feel like that + the tightness across the bust makes my whole bust look droopy, which is not ideal. If I pinch a 1/4″ out it all fits beautifully, and the whole neckline sits a lot better. Of course, if I’d gone down a size and done a proper FBA, that would also have solved this issue. Oh and while I’m listing things off, I’d also bring that back neckline up, which I did mean to do but forgot. It’s not too bad but it does make the shirt pull forward which adds to the general ill fittingness.
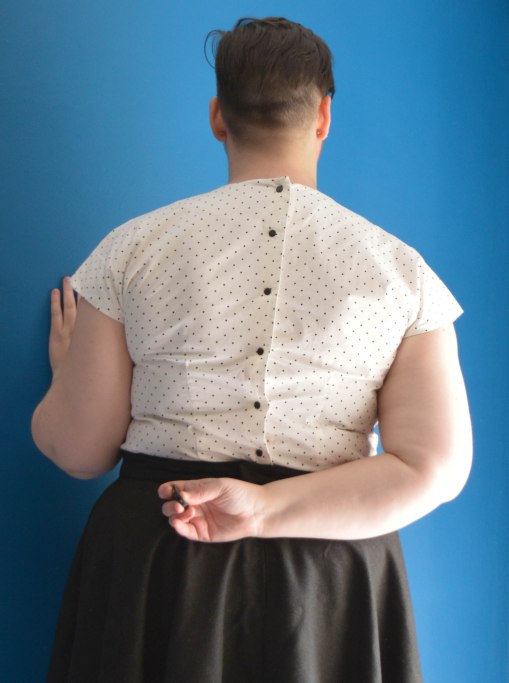
I really took my time sewing those scallops. They are not perfect and one side (the first side I sewed) sits a bit wonky but I am still really pleased with them. The BGD blog had what I’m told was a great tutorial on sewing the scallops, but since the business appears to be pretty defunct the pictures are gone so I gleaned what I could from it, and from Heather’s photos. I enjoyed the process and feel like I learnt a lot by doing it, which I always like.
I did find the instructions a bit baffling and not particularly well written. I seem to have had this complaint with my last few makes – perhaps it’s me? But the things I’m sewing at the moment are fine. Anyhow, I worked it out. I did add interfacing to the back to give that fold some weight, and I’m very glad I did. I find it a bit odd that it doesn’t tell you to do that? I did have to trim the interfaced parts off at the top where there were four layers. I also did the facings in white lawn to avoid the spots showing through.
I thought about just sewing the back up and sewing buttons on through it, since I can pull it over my head without needing an opening. But then I remembered I have a bunch of snaps in my stash and they would be perfect! I really like how they look although they do gape because of the fit issues. Plus it’s always fun to hammer in snaps!
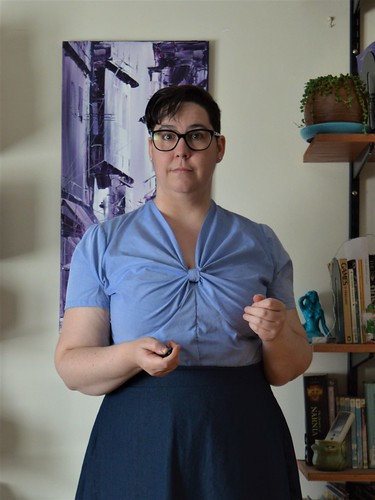
All of the above mentioned flaws are really irritating me now – especially since I had to have three goes at photographing this due to poor weather and also, to be honest, being a bit out of practice! I hope you will forgive the slightly dodgy photos and my tired face. I’m trying to reclaim my beautiful blue wall but it involves balancing on my bed and propping the camera up on a wardrobe shelf and I haven’t quite perfected my technique yet!
Anyway all I can see when I look at these photos are the flaws, and I feel kind of embarrased about them especially because I wanted this to be so perfect as a tribute to Heather – I really took my time and finished everything nicely and then ended up ripping half of it out! But in real life, when I look in the mirror, the flaws are not so obvious and although I can see it pulls across the bust it doesn’t feel restrictive.
I’m anticipating getting a bunch of wear out of this blouse if it ever gets warm again. (It feels impossible right now but I know it will be spring before I know it). I also think that with those few relatively minor tweaks this could be an excellent TNT and a good base for drafting and hacking from. The main part of the blouse goes together so quickly and neatly, and it would be pretty easy to draw in a new neckline or add a skirt, etc. While I feel like there are a lot of flaws looking at these photos, and having listed them off like this, each one just needs a very small tweak to be neutralised, so it shouldn’t be too much work (famous last words?).
TL;DR
Pattern: Mae blouse by Blue Ginger Doll
Fabric: from the ‘Spots and Stripes’ line at Spotlight
Size sewn: size 18 (the largest)
Adjustments made: added 1/2″ to the sides below the armhole. Sewed the armhole up an extra 1/5″ to avoid flashing bra. Added snaps instead of buttons. Cut facings from plain white lawn. interfaced the back fold over placket.
Next time I would: do an FBA, do a broad back adjustment, take a 1/4″ wedge out of the front neck, bring the back neck up about 1/2″
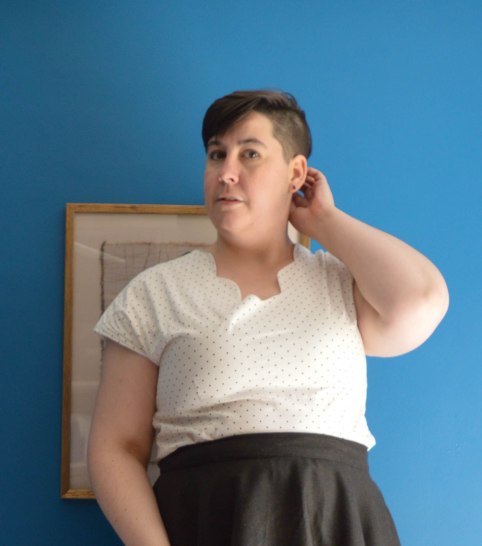
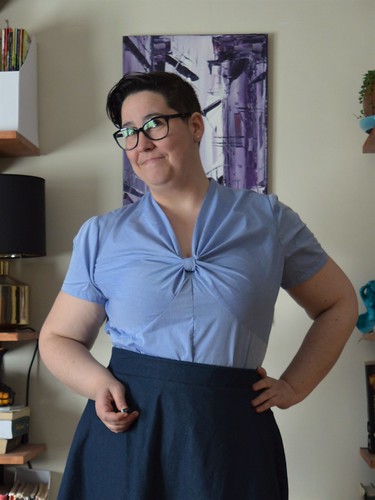
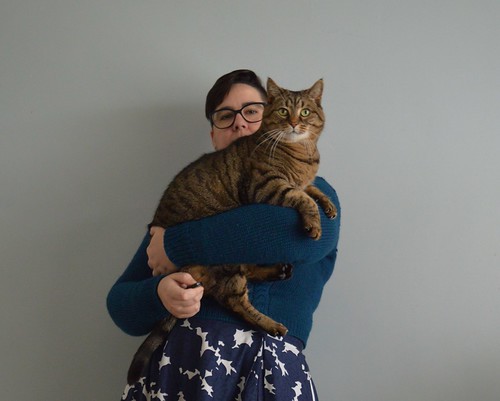
Hello my lovelies! I really need to come up with some better ways to start posts. Oh well, maybe this can be my signature thing or whatever. Here is my Ngaio blouse!
I really liked this when I saw it on Leimomi’s blog – both back in the day when she made it for herself and then again when she released it as a pattern. I loved that it had bust cup sizes. I don’t care for the way the yellow top looks on the model – I mean, I think it looks fine but it’s not a look I want for myself. But the other one with a larger cup size is my JAM. I think for me I want the seamline to sit under my bust, when it’s on top of my bust I feel flattened and a strange shape. Once again, it’s a shape I think looks good on others but I find it disorienting on myself. Body image is a strange thing.
The readme for the PDF gives really clear instructions about which sections to print for which size, which I always appreciate. I printed everything off though because I wasn’t sure what cup size I’d end up using. The PDF went together really well, I love the way Leimomi organises and marks matching on her PDF patterns. I also REALLY love that her sizes are actual measurement sizes – if you’ve got a 46″ bust you’ll sew the size 46.
My measurements are High bust 42″, Full bust 46″, Waist 41″ and Hips 46″ – ish. These measurements all fluctuate by an inch or so but they are fairly accurate. I wear a 36DDD/E bra. Going by the detailed measurement guides this put me in a size 44 with the largest bust cup. I wasn’t too sure about this and I did up a muslin. It… sort of fit. Here are some photos of me where I look like death, wearing the muslin for you. I hope you appreciate it.
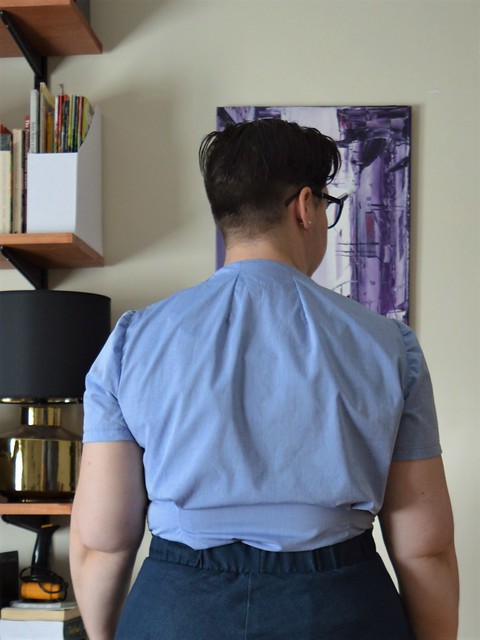
It was too tight though. I let out the side seams and it fit me better (this is what you see above) but still tight, I didn’t love where the bust seam was hitting me, Obviously this is accentuated by the two-tone fabric choices! But it made me look squished and boxy. And the upper back was WAY tight. So I went up a size and kept the same bust size . The final size that I sewed was a 46 with the largest cup size E/F.
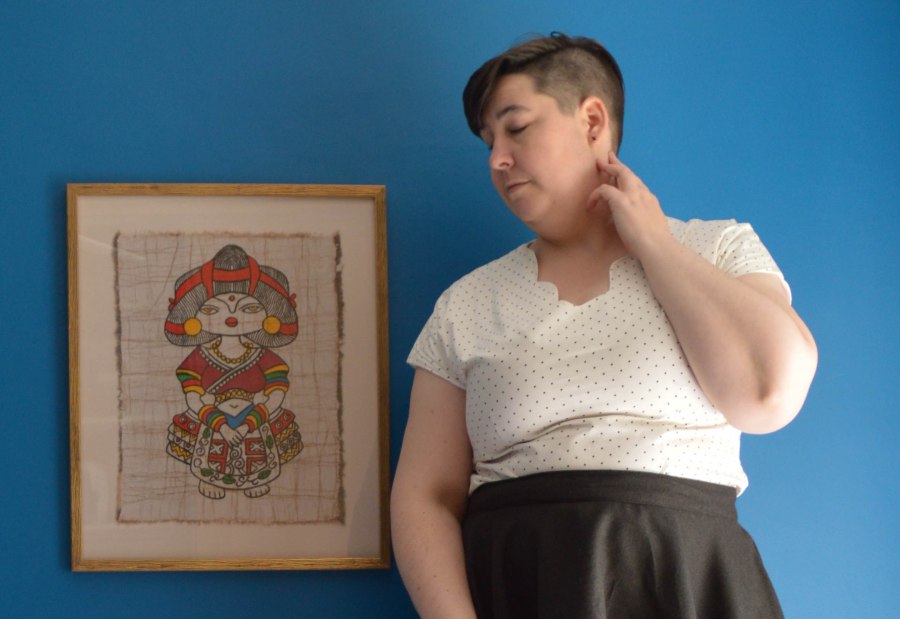
The muslin of this size was still tight across my upper back so I did a upper back adjustment but I don’t think I did a great job. I haven’t quite worked out the best way to do this adjustment for myself. I really need the room across my shoulder blades but not at my upper back/shoulders. This combined with the style lines of the blouse results in some puffiness that I don’t super love – but I need that room for movement!
Perhaps I should just have added on to the sides of the back piece? As it is it’s much better than it was – I can sit comfortably at a desk and reach forward, for example – but still a teeny bit tight.
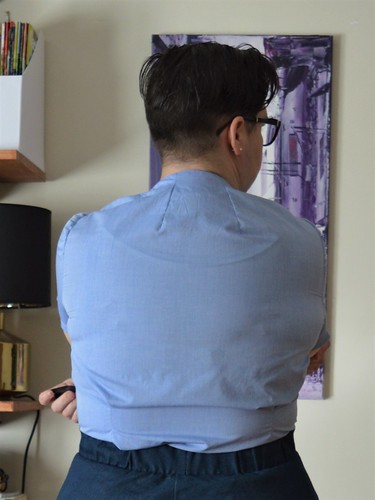
You can see the pull lines at the armscye. The sleeve is also pulling back towards my underarm in a way I’m not quite sure how to diagnose – any thoughts?
Anyway I think this back fit the best I’m going to get without adding in centre back/princess seams. I’m toying with mashing it up with the Springfield princess line back which fit me so spot on. I like the style lines as they are and I’m loathe to muck with them but when I see that back on me I’m not enthralled.
I did sew the back dart a teeny bit deeper, otherwise fabric pooled horizontally but now of course it makes the pouchiness more extreme. Swings and roudabouts!
I also moved the back bottom darts up and shortened them incrementally with each muslin. They’ve ended up with the bottom of the dart being 4″ higher than drafted and the top 2″ higher. As drafted the sat right over the fullest part of my butt. I have a long torso but not THAT long! This was an easy change to make, however. I do love how high up the back neck comes.
I used the full instructions for this because I found the process a bit confusing at first. I do love that Leimomi supplies a short and a long set of instructions but I think in future I will still use the long instructions for this, and just look at the pictures, since the steps are specific enough to this blouse to need the help (i.e. it’s not just ‘sew back to front at shoulders and sides’).
I loved that the instructions told you which direction to sew your seams in – it really makes a difference in a make like this where there’s a lot going on and the way the top sits and fits depends on the way it drapes. A really excellent touch that Jessica also pointed out.
This was an incredibly fast and satisfying sew. You can really tell the drafting and testing work that has gone into this pattern. Leimomi uses it to teach classes and you can really tell that all the rough edges have been smoothed off and only the necessary bits are in the instructions.
Untucked
I do wish the sizes went up a bit larger. In my opinion this runs small, which puts me in the third-to-top size. That’s still more generous than a lot of big 4 sizes where I am often the very top size, or other indies where I can only squeeze into their patterns by doing an FBA and some cheater grading. I do greatly appreciate the broader size range and the fact that it is actually appropriately shaped but there’s still a way to go. I know that both running a small business and drafting for a large size range is very challenging, I’d like to hope that if Scroop patterns gets bigger Leimomi might be able to revisit her patterns and go even higher. I would like my larger compatriots to be able to sew this pattern, too, without needing to grade.
Anyway. The fabric is some shirting that I THINK I got at rathdowne remnants? It’s a wee bit poly feeling. I sewed this up at craft camp and I finished the seams with whatever thread was in someone else’s overlocker at the time so the insides aren’t super pretty! But that’s fine by me.
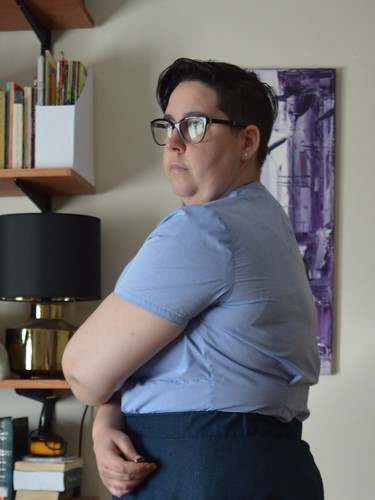
Not as pouchy when untucked. Perhaps it’s too tight at the hips?
I would definitely like to sew this up again. The shirt is distinctive but I think it’s also simple and elegant enough to get away with having a few of these in rotation. I prefer sleeves but I can definitely see a sleeveless version in my future for summer, because the front makes it less basic and negates my main issue with sleeveless which is that I always feel underdressed. Yet another irrational preference that I know isn’t objective but I’ve learnt my own foibles!
TL;DR:
Sewed a size 46 with an E/F cup
Did a broad upper back adjustment of about 1″ I think
Moved the bottom back darts up 4″, shortened by 2″, widened very slightly at the top
Fabric is a plain shirting from Rathdowne Remnants (I think?)
Seams were sewn on the sewing machine and then finished with overlocking
The hem is dodgy as usual. I might redo it or I might just always wear it tucked in.
Next time I would:
Consider subbing in a princess seam back
There’s still some weirdness with the armscye and sleeve – it fits ok (a small miracle in itself!) but there are pull lines it would be nice to figure out what that’s about
I think I might need to do a sloped shoulder adjustment, that would help the pooling at my shoulder and might also help with the sleeve issue?
I will definitely be sewing this again though! Very pleased with this make.
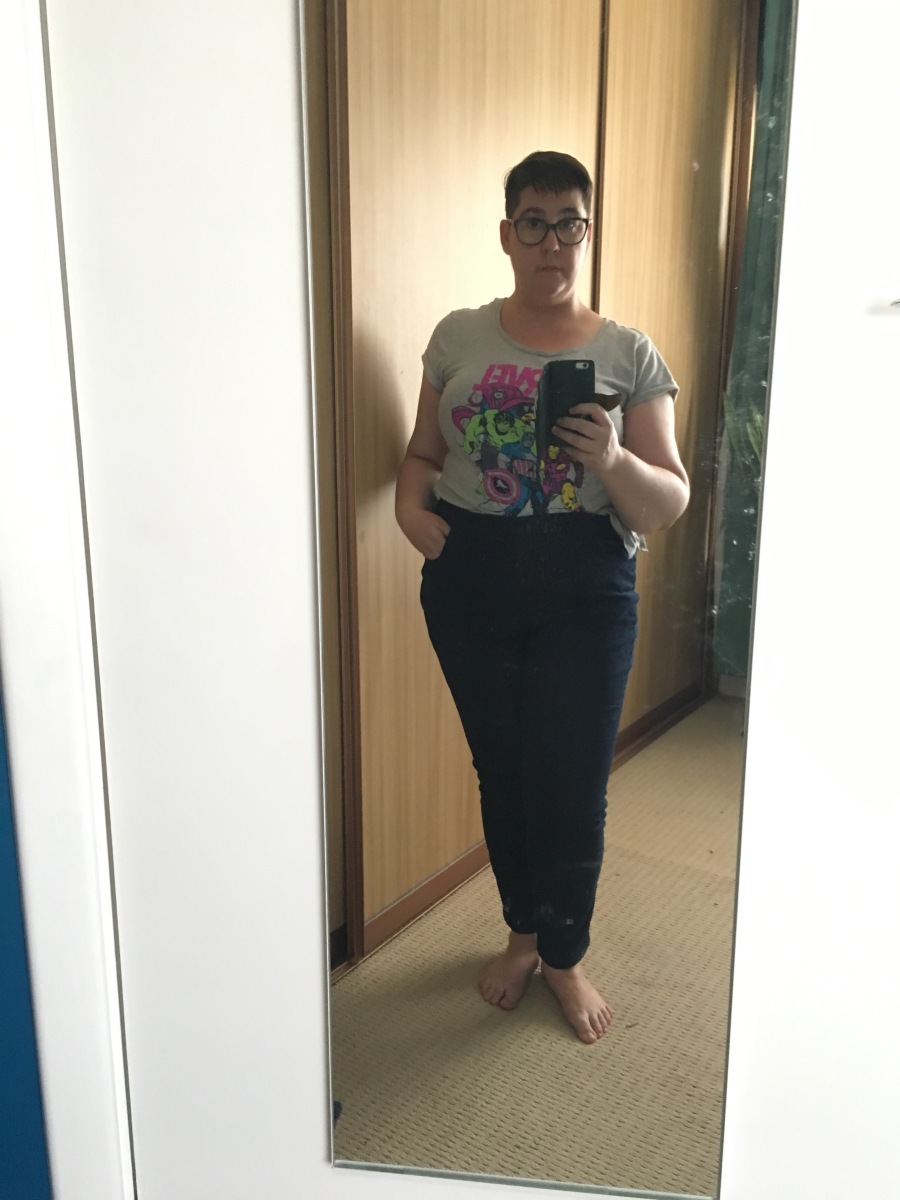
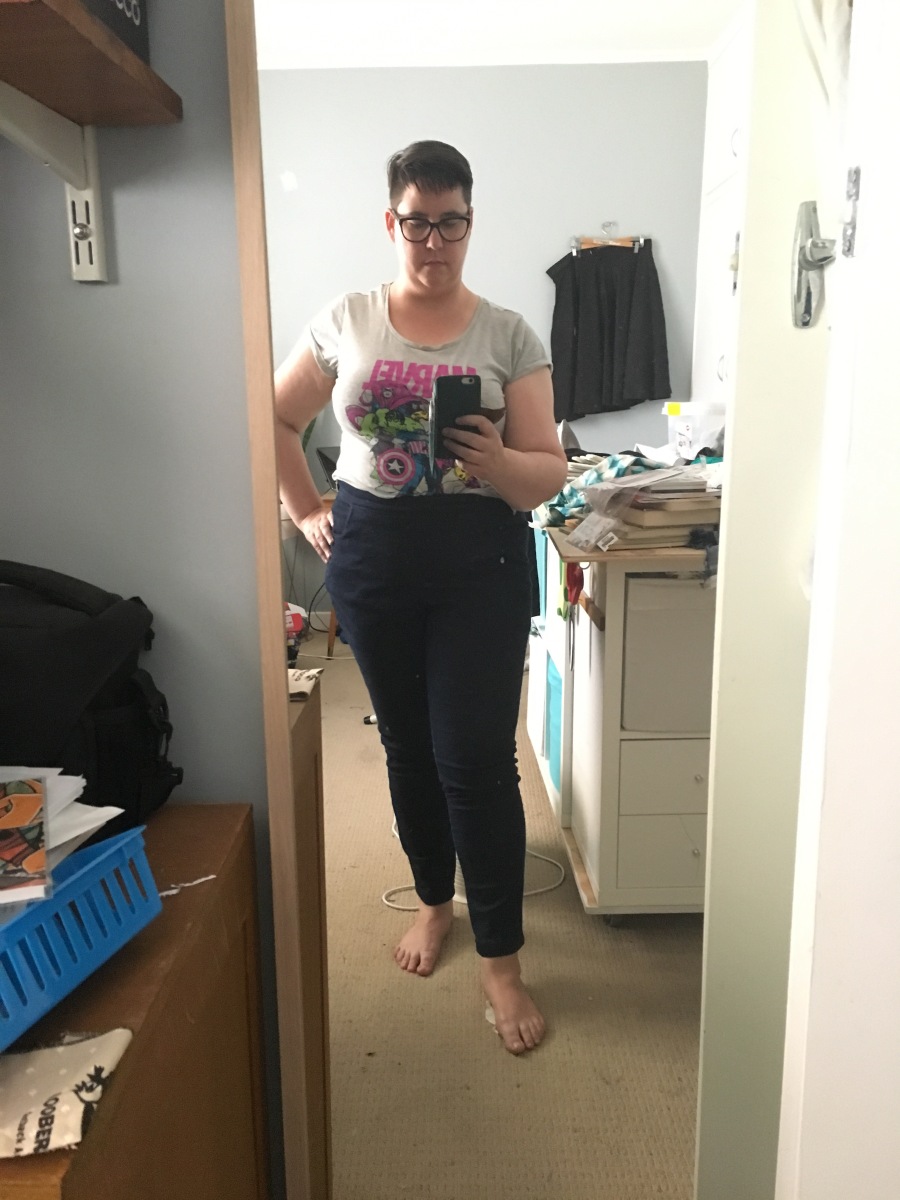
As you might have noticed I’ve been in a bit of a sewing drought. There aren’t too many things I need in my wardrobe right now and for some reason the things I do need aren’t really getting me excited to sew them. Upside is the finished knitted items. Downside is no sewing output (I don’t need many things but the things I do need I really need!) and also feeling a bit weird and twitchy because if I don’t make something regularly I go a bit strange. Er. Stranger. Strangerer. See??
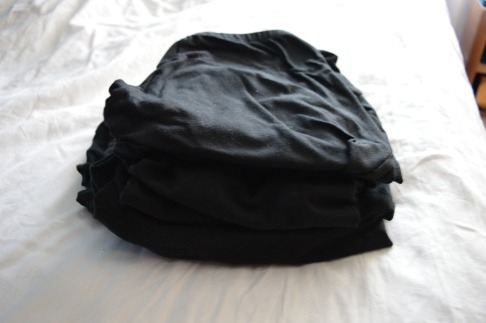
I broke my drought with some knits. First up was a pile of new Steeplechase bikeshorts. I wear a pair at least every work day – my original batch are long gone and the most recent batch was nearing a year old. They are still ok but as they age they lose recovery and the hems start to chafe a little. They are still wearable but not ideal if I’m doing a lot of walking in them, which I do in a normal work day, to and from the train and then usually some walking at lunch when I can manage it. So some of them will be retired into sleepshorts and some will be weekend wear for the occasions when I wear skirts on the weekend instead of yogapants. I now have another week’s worth of new shorts. It feels oddly luxurious to have that pile sitting in my drawer, nice and new and fully functional (although I did make the elastic the teeniest bit tight, so it will take a while for them to wear in. Better too tight than too loose at least). Like treating myself! In the most boring way possible!
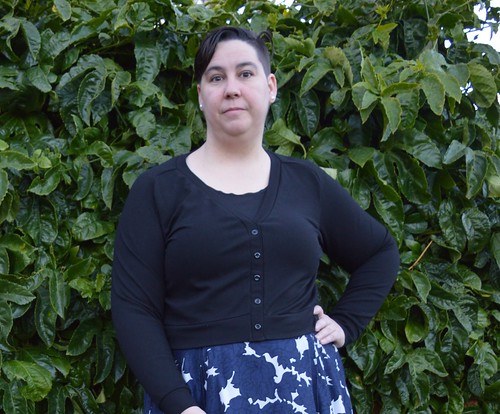
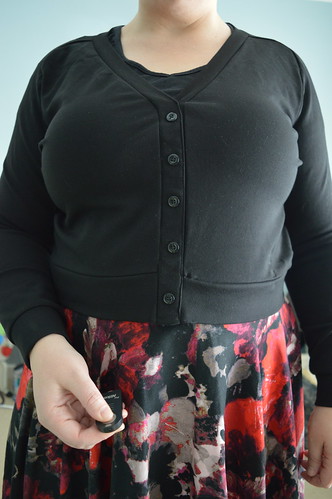
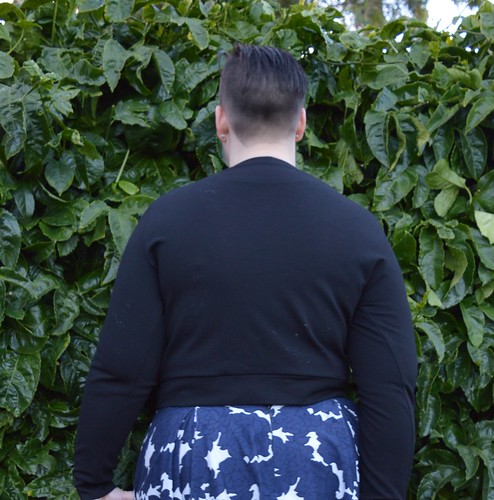
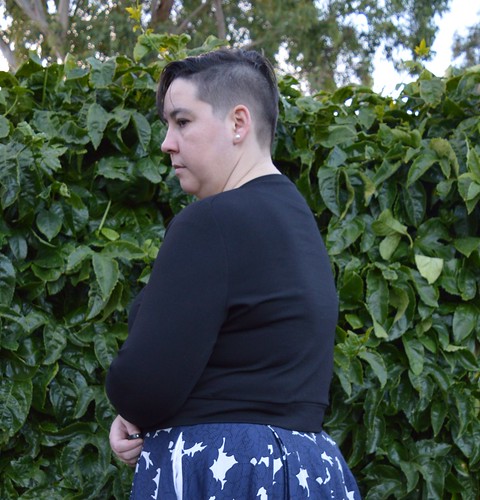
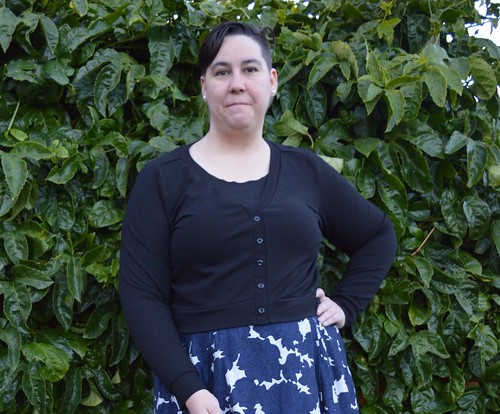
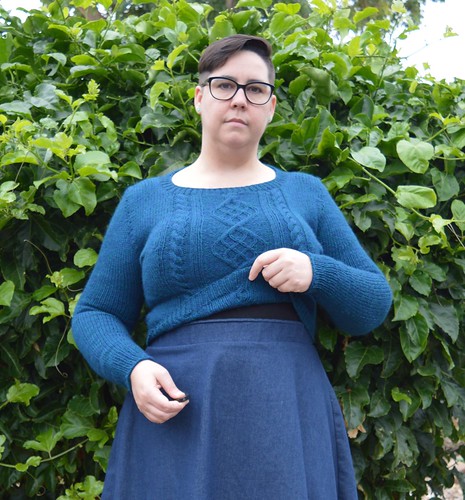
While I was on the black knits train I cut out a Juniper cardigan from Jennifer Lauren Vintage. By the way I hope you’ll excuse the terrible photos. There’s so little daylight these days I’m struggling for photo time. I did a shoot on the weekend where the top was way overexposed and looked super saggy and wrinkly – it is a little wrinkly but it looked like a disaster which it doesn’t in real life! So I did a replacement shoot quickly this morning and I look like a half-asleep ghost (which is about how I feel lately! I do not like winter…) but I’m just not going to have time to photograph it again so you gets what you gets. Weird facial expressions and all…
Still looking more wrinkly than it does irl, but it’s an improvement. Trust me.
I saw this on the CSC pattern roundup for April. I’d put myself on an informal pattern buying hiatus after finding a big stack of printed but not taped up patterns! I was intending not to buy any more patterns until I’ve used some of the dang ones I’ve got, but I liked this so much that I bought it immediately.* It is exactly the kind of silhouette I want for my jumpers, hits at the right place, and the sleeves are a bit interesting. Plus, it’s finished with bands which means no dodgy hems. I have a couple of sewn jumpers that I don’t wear much because the sleeve hems make it look very homemade to me. Obviously I could draft hem bands myself if I wanted! But it’s always nice not to have to.
*As I was finishing this post up I checked my email and saw the Laneway dress and I was so high on the success of my cardi that I bought it. NO RAGRATS! But I might have to put myself on a firm pattern buying restriction because this is getting a bit out of hand….
Is this smizing? We’ll never know
I taped this up and traced off my size during my sewing drought – along with several of those stashed patterns! I’m slowly working through my pdf patterns and getting them neat and organised and labelled, and taping them up ready to go. It feels really good to be organised! And it meant when I felt like sewing again I was ready to go without too much mucking around.
The fabric is ponti from DK fabrics. I thought I’d taken a photo of the tag for fibre content but nope. I think it’s poly/rayon/spandex in some kind of proportion, and it’s really lovely. My intention was to make this as a muslin before using more expensive merino knits because I didn’t think it would be very warm but actually I think it will be a great transitional jumper. If it wears well I’ll be back for more of this fabric – it’s very wide so I have almost-but-not-quite enough to make a pair of gingers, which I think would be great in this. It has quite good 4 directional stretch, too.
Juniper is the first Jennifer Lauren Vintage pattern I’ve bought. I really liked the PDF – there are a lot of pages but everything is sectioned off so you can just print and stick the version you want – long length with long sleeves or short length with 3/4 sleeves etc. I printed everything because I’m a completist 😛 but having it segmented made the taping process feel quick because it wasn’t a big endless swathe. Much easier to do, too, when you can cut as you go and not have a massive sheet of taped together paper taking up space. The matching notches were well designed – I tape up a LOT of PDF patterns so it’s the kind of thing I take note of. This was one of the more painless PDFs I’ve ever used.
The instructions are really comprehensive as well. They would be great for a beginner I think. Often I skim straight through and just look at the pictures but I actually read them all because of the different shoulders, and also because its’ been a while since I sewed and like Anna I tend to have a lot of stumbles when picking up sewing after a break. I haven’t forgotten how to do things exactly but it all feels a bit foreign. The good part of this is it makes me realise how many skills I actually have! I just don’t notice them because I am used to them.
Anyway the instructions are great and very clear and helpful, and I appreciated the extended pattern measurements and discussion of choosing sizes, which helped me feel confident when choosing what size to trace off. Plus I appreciated the discussion of the weight of the fabric, which has definitely caught me out before with knits, as well as information about the right notions to use. The only thing missing from the instructions, imo, is a discussion of what stitches to use. It’s not mentioned anywhere at all which was no big deal for me but would be handy for a beginner. (As an aside, the Scroop Patterns Miramar has the best breakdown of what stitches to use with knits I’ve seen. Disclaimer, I did pattern test the Miramar although I have yet to make one because I have yet to find a knit with enough vertical stretch (maybe this ponti is it??). But the instructions on that were bang on.)
Bow before me and my armpit wrinkles
I cut a size 18 sleeve and upper chest, with a size 20 bust and a size 22 waist, based on the extended measurements and the information about intended ease included in the pattern. This made it a bit tricky trying to remember which size cuff and button band to trace off but not that bad – I just had to think about it a bit! The sleeves were the perfect length when I tried it on without the cuffs, so I just lopped them off to shorten them before I sewed on the cuffs.
As you can see, this fits me ok but not great. I think I need a size larger in the front and maybe a size smaller at back waist – the pouching at the side waist is resolved if I pinch out a good couple inches at the back waist, but then the front is too tight. It’s clearly too tight at the bust – not heaps but enough to wrinkly – and the front pulls up a little. I am trying to decide if I would do an FBA next time (and fold out the dart, or ease it in) or just cut the front a size 22 at the bust and size 24 at the waist, and add 1/2″ length to the centre front. I’ll wear it a few more times before I decide. I’ll also add maybe 1.5cm length to the centre back I think – it technically hits ok but as I move it hikes up and I find myself wanting to tug it down. I think when I make the back tighter it will exacerbate that issue so I’ll add the length to compensate.
The back waistband looks ok but I can feel it gaping
With all those caveats, this still certainly hits my goal of ‘fits better than my RTW version’. My usual outfit every day is some kind of variation on a circle skirt, a long sleeved tshirt or button up shirt and a jumper – usually from woolovers because it’s the only place I can find actual warm wool jumpers (not poly, and not super thin wool like Uniqlo). But they are all very long in the waist and I am always fiddling with where they are sitting, or I have to tuck them in and that has its own issues.
The ponte is warmer than I was anticipating – not as warm as my woolovers ones but significantly warmer than my thin uniqlo one – but there’s enough rayon in it that it’s not weird and sweaty either. And it’s so nice not having to fuss with the waist being too long or the shoulders too wide. ‘Not having to think about it while wearing it’ is super high on my list of desirable aspects for my clothes.
Judging you… or myself maybe? Or perhaps a bird that I saw.
Sewing wise, this top went together so quickly and sweetly! The saddle shoulders have the potential to be tricky but the notches are bang on and the instructions are great so I didn’t have any trouble. The only hiccup was attaching the buttonband. I sewed the bulk of the jumper on my sewing machine with a lightning stitch, and then I used my overlocker for the bands and cuffs because I find they sit neater if overlocked. But I didn’t have any knit interfacing so I used regular, which meant that that section of the button band had no stretch there. Which is fine! Except that it meant that I had no give to ease it in. That plus the bulk not wanting to go under my overlocker meant there’s a little bit of a missmatch at the bottom of the jumper. Not heaps, but enough to make me cross with myself. This would be super easily avoidable if you were sewing on a sewing machine with more control, and next time I will machine baste it before overlocking. Totally user error on my part, a dumb mistake.
The sole survivor of the original photoshoot where you can see the dodginess I created. I promise it’s not half as obvious irl
I also wasn’t really thinking and used white interfacing – which was all I had on hand anyway. It does show through a teeny bit, I think it probably will show with wear. Not a huge deal but a bit annoying, and something to remember next time.
I never wear cardigans open so I decided the sew the buttonband shut. I was also influenced by the sewing error above – this hides it a bit more effectively. I sewed it up a bit too high so it pulls at the top, when I have black thread in my machine next I will unpick that top bit and use my favourite dodgy trick of sewing over the line of stitching for a bit and backtacking to hold it in place. The buttons are just basic ones from my stash, and I sewed them right through both button bands.
I didn’t top stitch because I liked it as is and didn’t want to risk making it wobbly. I stablised the shoulders with some thin twill tape I have from S’s dad – he used to own a deli and stocked basic notions which he took with him when he sold it as the new owners didn’t want them. So I have a nice stash of snaps and twill tape and the like. It felt really good to use some and it was the perfect thing for this. I really don’t like how clear elastic feels so I avoid using it where possible, and I thought on a thick knit like this I could use the extra heft of a woven stabliser. Also I totally forgot to take a photo of that bit and now it’s dark and impossible to photograph black things, so you’ll just have to imagine it.
TL;DR review:
Fabric is a ponti from DK fabrics.
I sewed a size 18 upper chest and sleeves, size 20 bust and size 22 waist.
My measurements are upper bust 41″, full bust 46″, waist 41″, hips 46″
Next time I would size down at the back waist (so, a size 18 upper chest and size 20 down) and either do an FBA or size up on the front from the bust down (size 22 bust size 24 waist).
I shortened the sleeves by 1.5″ ish (the length of the cuff).
I found the pdf really well designed, and the pattern well drafted. Really impressed by this.
I used regular interfacing for the button bands, not knit, and this made it hard to get the bands set in correctly.
This would be easily worked around by basting before sewing or overlocking the bands on.
I sewed the button band shut because I don’t intend on ever opening it.
I used thin twill tape to stablise the shoulder seams.
I really like this pattern and this jumper! My version is not perfect but I like it a lot, and I really enjoyed sewing this well drafted pattern. I would definitely recommend it, and based on the experience I would be keen to try other JLV patterns.
I’m looking forward to sewing it up in some of the merino in my stash – and maybe purchasing some different colours of the fabric store merino – A navy cardi would be very practical, and I think I might need an emerald one, don’t you?
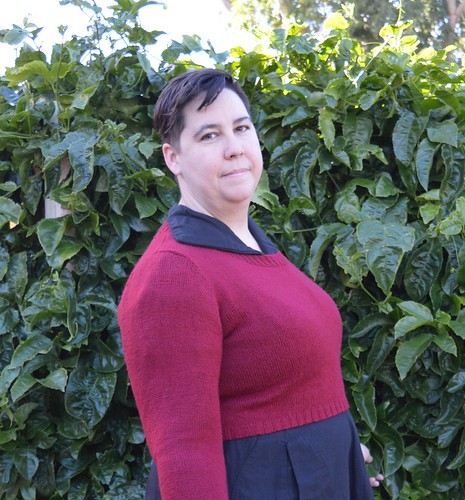
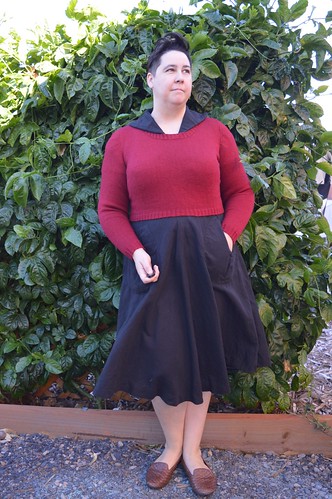
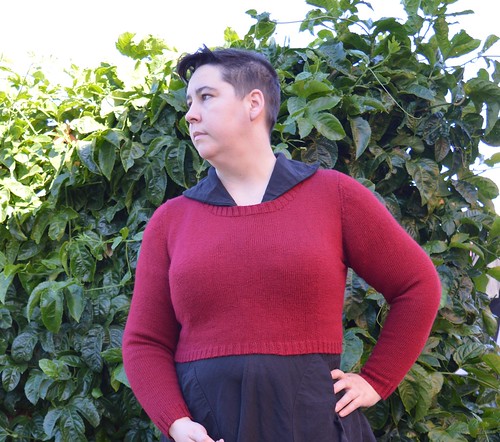
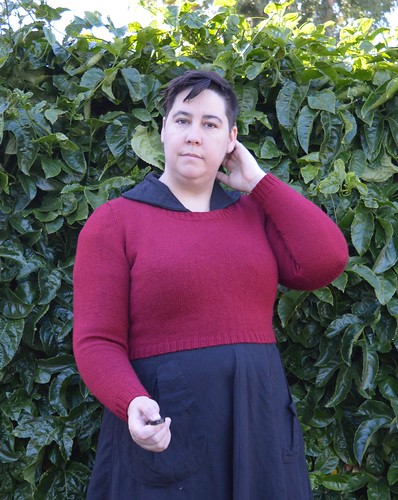
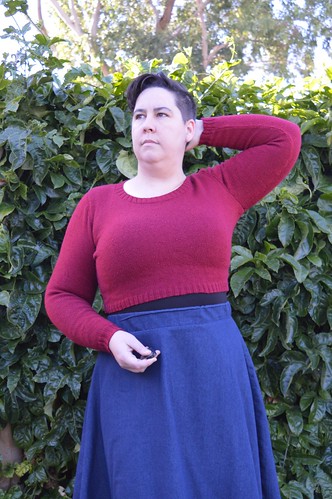
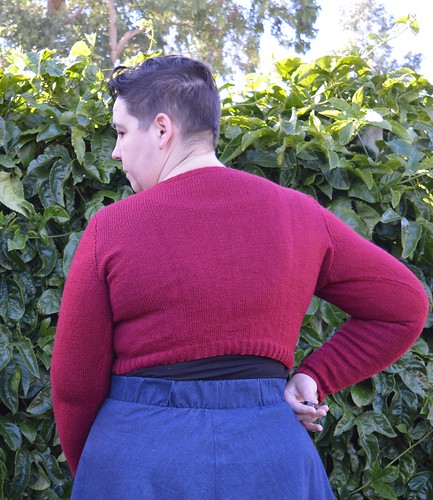
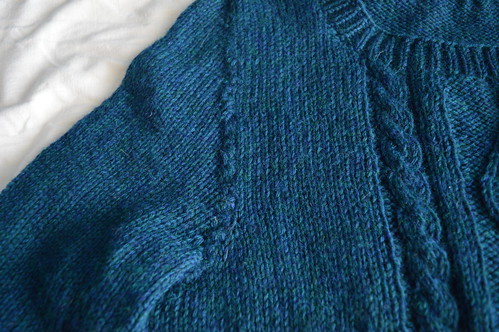
Hoo boy this one is another one that was a long time coming!
This knit started with the yarn. I wanted an affordable, thinner than 8 ply yarn, in nice colours. I can’t tell you much more about what started me wanting that because I bought this yarn almost three years ago! It’s Charlemont from valley yarns. I bought two hanks of Burgundy and three of Evergreen. The yarn is merino/silk/poly. The silk gives it a luscious sheen, and the colour is totally gorgeous (very hard to get an accurate photo of though it’s much less orange than it looks in these photos). But there’s enough poly in it to make it feel a bit odd to knit with, which definitely contributed to how long this knit took me. It’s also very fine – I mean OBVIOUSLY, it’s a fingering weight/4ply. The site calls it sock/fingering weight but it’s definitely fingering.
Because it was so fine I couldn’t get gauge for any of the patterns I liked. And anyway, I wanted something very plain and simple – they aren’t very exciting to knit but they’re the kind of garment I reach for over and over, and miss when I don’t have them in my wardrobe. I think I was swatching at craft camp and someone (Suse maybe?) suggested I try CustomFit. So I did! There wasn’t a design that was exactly what I wanted but the design it yourself bit was so easy. The design notes on this one are:
Hourglass close fit
Hourglass silhouette
Style: pullover
Length: High-hip length [which I then cropped]
Sleeves: Full-length sleeve
Neck style: Crew neck
The pattern called for 1×1 ribbing but I made it 2×2 because that retains its shape better
There’s no option for a cropped jumper, which I knew I wanted, so I just found where the waist would be and knit from there up. Essentially I took 4″ off the length. Details are on my ravelry page.
I really loved using Custom Fit! I always have to add in bust darts and sometimes back shaping – generally I use the method in the Knit to Flatter book (by Amy Herzog who also runs Custom Fit). But honestly it was real nice to not have to do the maths myself. I am perfectly capable of designing this jumper my own self, but really it was worth $10 or so to not have to. Absolutely worth it.
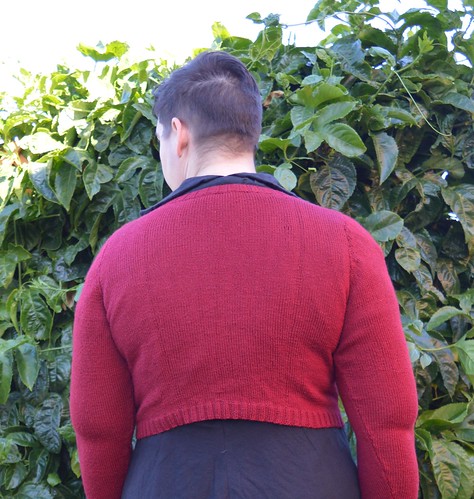
I think I might need to start adding shaping for my upper back though
I did hit a major snag when I finished it and basted it all together. The sleeve caps were just laughably too short. Just not even close. I emailed the Custom Fit support and Amy was incredibly helpful. The measurements I’d put in were outside of what the algorithm could cope with, so she recalculated the sleeve caps for me! This involved some very nifty shaping and I am very impressed, both with her understanding of knit shapes, and the customer service. To be frank, I was a very irritating customer – I wrote long waffly emails, and then took months to reply back with crucial details like measurements. Amy was just wonderful throughout the whole process. I would recommend the Custom Fit service on this alone, PLUS the shaping in the jumper is exactly perfect.
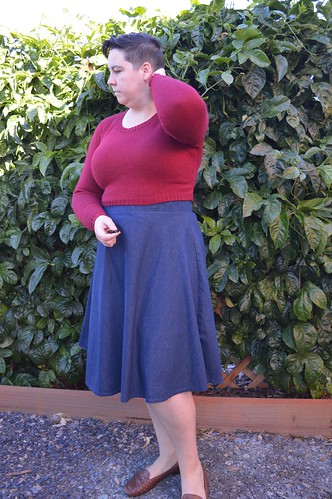
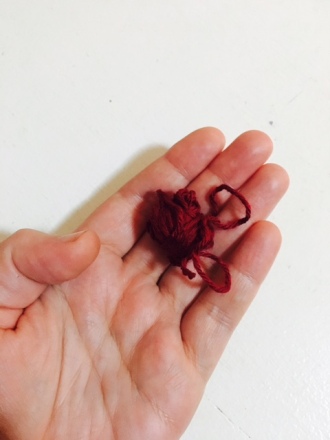
The remaining major flaw is my own fault. As I said, I cropped this jumper, because I wanted it to wear over dresses. However, it’s… short. I think really I should have another inch on it, although it does sit nicely over dresses – which was the intention. So I guess it’s a win – except that I don’t really have any dresses at the moment that this would sit nicely over! The ones I had in mind when I designed it have been retired due to wear or poor fit. Plus I really should have designed it with a Vneck to be useful over shirtdresses. I considered ripping back and redoing the neck – it’s not a hard adjustment to make – but this is the total amount of yarn I have left:
So yeah, I’m not risking it! This is the result of some serious yarn chicken on the sleeves. I initially measured them too short because I measured a bought jumper where the sleeves were exactly 2″ too long, but I neglected to notice that the shoulder of said jumper hung off my shoulder by 2″! And so I had to knit them another 2″ longer than the pattern called for – which turned out to be a good thing because I knit the sleeves at a particularly stressful time and my gauge was noticeably tighter, and the sleeves were too narrow! So with all of that, I’ve knit those dang sleeve caps maybe five times? I had to rip back and weight each sleeve and work out how much yarn each row took in order to get sleeves that matched and were long enough. Yeesh! I did a lot of that on our recent trip to Broken Hill, while listening to the latest arc of The Adventure Zone (it’s the BEST you guys), so now every time I look at this jumper I think of those things, which is really nice.
So as you can see, the jumper isn’t quite right for any of my dresses, and it’s also not right for skirts! The pattern as written/generated, an extra 4″ longer, would probably be perfect.
Nope!
So I have enough of the green yarn to knit the pattern in its original form, and the colour would be more versatile in my wardrobe than this one. But honestly I’m not sure if I’m up for it! This has been on the needles for almost two whole years – mostly sitting idle but even when it was actively being knit on it took forever. That said… I really really like it. The shape is exactly what I had in mind. User error aside, I’m so incredibly impressed by how this turned out. I would 100% recommend the Custom Fit platform and I’ll definitely be using it again. And maybe I’ll even be knitting this pattern again… once I’ve had some time to get over the dramas!
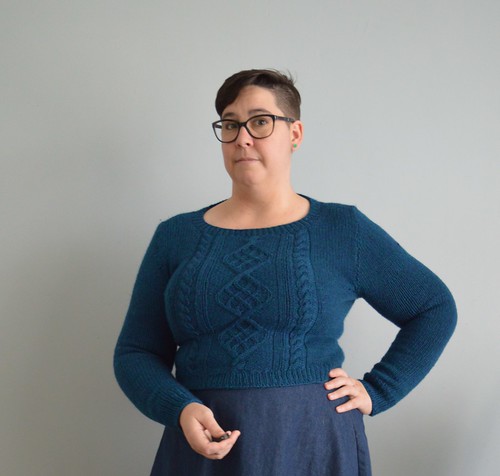
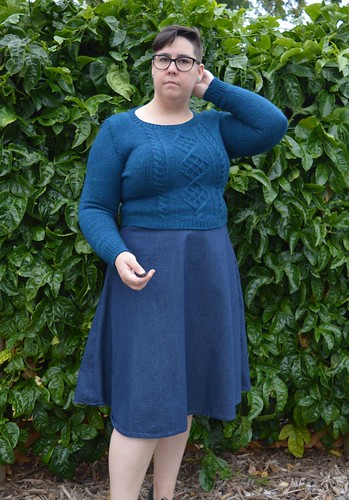
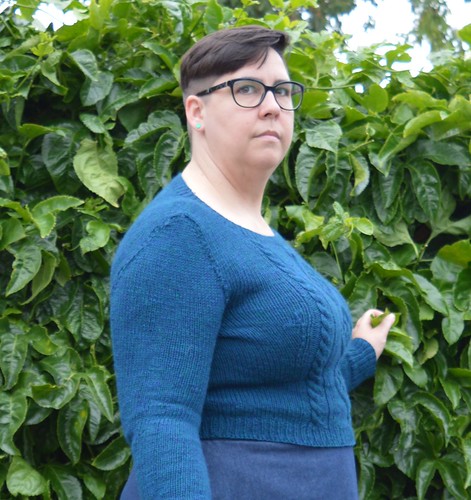
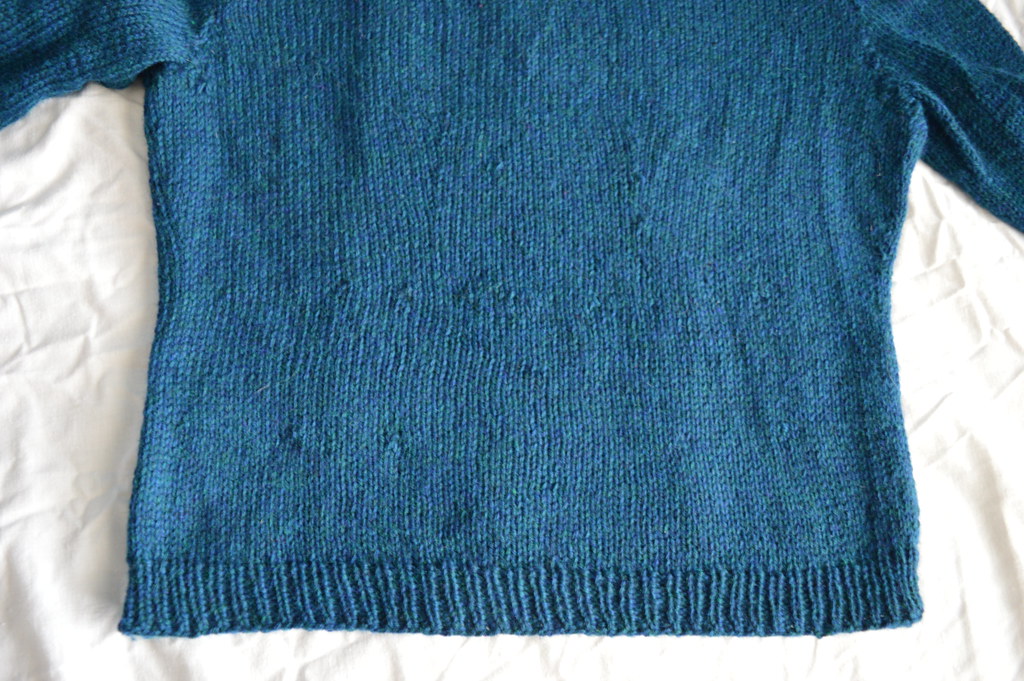
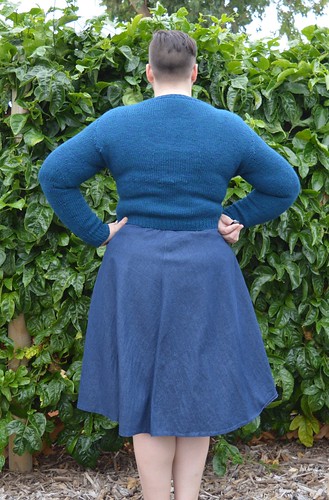
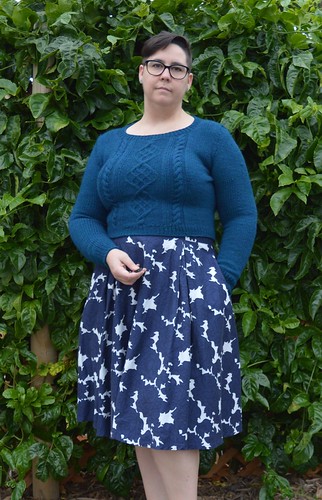
This is Chuck by Andi Satterlund. I’ve seen Andi’s knits a lot on the blogosphere, and admired them, but I’d never bit the bullet on starting one because they are mostly in 10ply which is kind of hard to get here in Aus and also, I don’t honestly have that much call for 10ply jumpers. Until recently, that is! When we moved offices and the new office is basically refridgerated year round. In winter I end up wearing my outdoors jacket to sit at my desk sometimes, so I figured a 10ply jumper might be useful after all.
The yarn is from my stash. I had some leftover Cascade 220 from knitting a Rogue hoodie many years ago. I don’t actually have a single proper picture of that jumper because I never really wore it. The sleeves were about an inch too short, as was the body. It looked ok-ish but I never felt comfortable in it. In December 2014 I pulled it out to see if I could re-knit the sleeves, to find it had been moth eaten in some… significant spots. Nipple holes aren’t really the kind of thing I look for in a jumper, ya know? So I frogged the whole dang thing, planning to reknit it from scratch. A few months of slow progress in, however, I realised I just wasn’t that keen on it any more. I liked the idea of it but a knit hoodie doesn’t really fit in my life or wardrobe anymore. So I frogged it and skeined the yarn up and put it all back in the stash.
Obligatory cat pic
Then in winter last year I got the itch to knit again, and I was cross with the other thing I was knitting, which is quite fine yarn. I remembered Roisin’s version(s) and decided I’d give it a go! The yarn was sitting unused and unloved already, so if I didn’t love it I hadn’t lost much, and I was dying for the feel of chunky, wooly yarn in my hands.
Me, explaining it’s many hours yet until dinner time
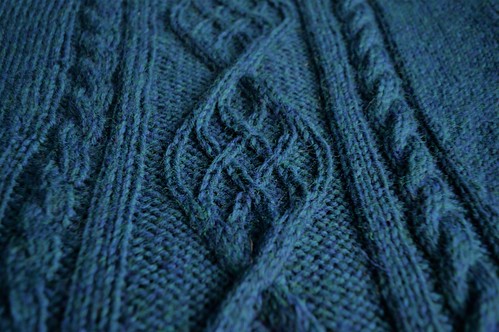
Friends, I HATED knitting this sweater. I found the pattern really hard to navigate – I don’t know what it is but just something about how it was laid out made it hard for me to see what was happening as I read it. I had thought maybe I was exaggerating this in my head but as I was re-reading it to check my ravelry notes were up to date I got so frustrated trying to work out what the heck was going on that I accidentally tore a page in half as I was flipping it back and forth. Oops.
I made a bunch of adjustments. The details are on my ravelry page but the broad overview is:
Went down a needle size for the ribbing
Knit size L for shoulders and increased to the 1X size at the bust.
Added bust dart increases
Moved the side decreases to the back, which is where I need the shaping
Chucked in a couple of short row sections at the back to make up for my swayback
Knit an extra repeat
Knit the sleeves before I finished knitting the body because I was pretty sure they’d change how it fit (they did)
Picked up the number of stitches for the L sleeves and then didn’t decrease at the end of the armhole, leaving me with enough stitches for the 1X sleeve
Made the sleeves full length (see rav notes for how)
Bust increases
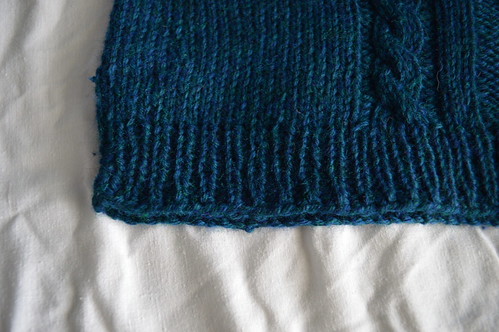
I initially knit the two repeats in the pattern and was going to just knit the ribbing long but the cables hit in an odd place and made me look really foreshortened. I check the hive mind via instagram and everyone agreed that it looked no good. So I ripped the ribbing back and did another repeat. I was concerned this would leave me with either a too-long jumper, or not enough ribbing. In the end it worked out ok. I wish the ribbing were 1/2″ longer, for proportion, but it sits neatly on my waistband at this length so I’m happy with it.
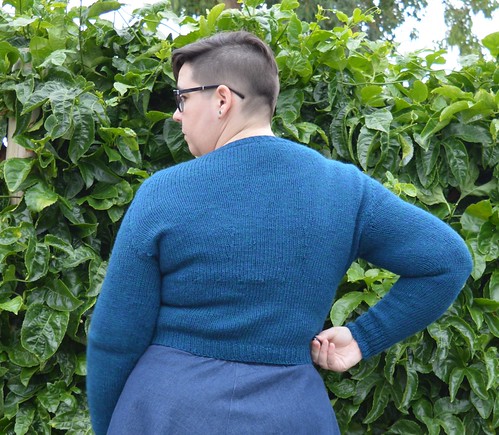
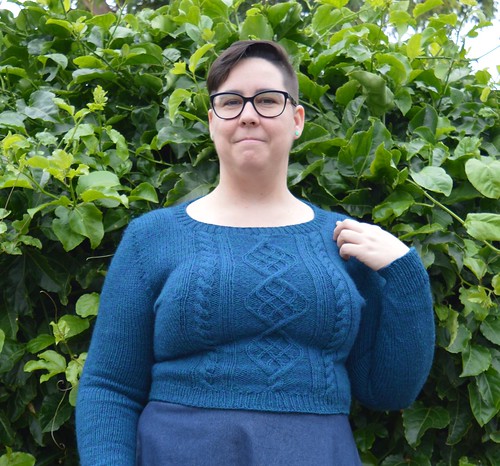
To be honest with you, I would not recommend this pattern to anyone above the size M, or with boobs bigger than say a C cup. I knew going in that it was a risk, making a chunky knit in negative ease, because I just don’t think that knits like that play well with larger figures. I think the risk paid off but I wouldn’t knit this again. And also the bust darts were VERY necessary, even though from the armpit down I knit the size that should fit my bust. Even with the darts you can see it folding and pulling at the side of my bust and I suspect it will wear badly in that area. I also think the cable and the negative ease makes my bust look droopy and frumpy. Not enough to not wear it, but it’s not really ideal.
Also look at the weird shape of that sleevecap! It’s a nice round shape when flat so idk what pulling is making it do that. I think I should have knit a size 1X sleeve but there honestly wasn’t that much difference in terms of stitch count.
Yup that pulling is definitely coming from the sleeve. Ugh.
I also really REALLY hated the way the sleeves were done. You pick up stitches around the armhole and knit it down, using shortrows to shape the cap. You are instructed to pick up less than half of the stitches that would fill out the armhole, and that + short rows immediately after pickup meant that row was really loose for me. I did a better job with the second armhole but even so I had to go back and stitch it closed so it wasn’t all gapey and weird.
ugly join on the first sleeveSecond sleeve is better
I also couldn’t find a way to make the short rows work without showing the wrap. I tried several techniques and all of them worked for me in thinner yarn but in this bulk, with negative ease? Nope. You can really see it in the back short rows I did.
The back shortrows do make it bubble a bit if I stand a certain way, but they also mean it doesn’t pull up at the back waistband. I’m very pleased with how that worked out.
I used this technique for the bindoff, and I’m really happy with it. I think this will be my regular bindoff now.
I did like the way the top down construction helped me try it on and add adjustments on the fly. And I do like the finished product – more than I thought I would when I first finished it! But boy. It was rough going.
I actually knit it with my Malmaison skirt in mind but I’m not sure I love them together. The Cascade is ‘Aporto’ and it’s a dark blue with flecks of green in it. It reads as almost navy but next to a true navy is much more petrol-coloured. And I love to match… I’ll probably wear them together, but I like it more with the demin skirt.
So there we have it! A very ambivalent FO. But however mixed my feelings are towards the pattern itself, I am THRILLED to have finished a knit. I haven’t knit very much the last few years, due to wrist issues and also really struggling with mental health in winter, which is when I knit most, and not wanting to do anything at all. It feels so good to be back to knitting – it’s my very first craft, and what made me start this blog, through which I have met so many of you wonderful people. I hope the bug sticks!